Tuesday, October 30, 2012

Crock Pot Spiced Apple Cider

Crock pot Spiced Apple Cider with Whipped Cream

The first time this was made, I forgot about it. It took me about two minutes to dump all the ingredients into my crock pot, hit start, tuck it back into my pantry and leave for the day. I set the timer so it would be done after my kids naps and we could have in a little late afternoon treat. Except then, I forgot about it. We came home, remarked how it smelled like Christmas in the house and was puzzled as to why. A few hours went by when I walked by the pantry and got a strong whiff. I stopped, squinted my eyes and sniffed the air, trying to follow the scent like a dog. I still didn't remember until I sniffed into the pantry door. And this is why I think dementia might be in my future - or present-. I unplugged the slow cooker and since we were headed out the door to dinner and it was too late to partake of our treat that day, I'd leave it to cool on the counter for a few minutes before sticking it in the fridge for reheating the next day. Except, I forgot it was left on the counter until I came down the stairs the next morning, and since it had oranges in it as well as spice, I knew I had to throw it all away. A few of you might be wondering about my decision, but when you grow up in a family who is very conscious of bacteria growth and cooked fruits and vegetables, and salmonella and all that jazz, you tend to error on the side of throwing things away.

Crock pot Spiced Apple Cider with Whipped Cream

So, I tried it again, and my patience was rewarded by a big steamy cup, complete with softly whipped cream and a dash of cinnamon on top. If you don't put whipped cream on top of your apple cider you are missing out big time. It's a little like caramel apple cider in that it gives a hint of sweet luxuriousness and richness to the cup, but not in the way that it makes it taste like caramel, because were talking about whipped cream here, people. If you want carmel sauce, add that. I don't know why I have to explain this.

Crock pot Spiced Apple Cider with Whipped Cream

May I suggest bringing a cup of this trick or treating? I love walking and watching all the little kids whirl by in their costumes and listening to my kids debate which store hands out the best candy while sipping on something piping hot and festive for the season. Plus, it keeps your hands warm.

You know what I never do? I never add alcohol to the hot drink you see me carrying downtown during the trick-or-treating each year. I don't add peppermint schnapps to my hot chocolate, or fill my coffee mug with mulled wine, and this year I most definitely won't be adding rum to my spiced cider because I'm pretty sure that's wrong to admit when you are watching over little children, even if you do have your husband there with you without a cup of his own doing most of the supervising. No, I'm pretty sure recommending something like that might be illegal, and that's why I'm telling you that I never, never, never, do that. Ever.

Crock pot Spiced Apple Cider with Whipped Cream

Crock Pot Spiced Apple Cider
serves 4-6

2 quarts (64-oz or 8 cups) apple cider
Six 3-inch cinnamon sticks, plus more for serving, if desired
1 medium orange, cut into quarters
1 tablespoon whole cloves
Whipped cream, for serving

Pour apple cider into a crock pot. Add cinnamon sticks, orange quarters, and cloves. Cook on ow for 4 hours. When done, either pass cider through a sieve to strain out solids or ladle straight into mugs, pick out spices or allow them to settle to the bottom of the mug. Top with a dollop of whipped cream and enjoy hot.

This recipe might seem simple, but the flavor is just right.

Thursday, October 25, 2012

Healthier Vegetarian Chili Fries

Healthier Chili Fries

The first major snow of the season is going on right now, chilling our bones and sending mothers to their crock pot's town wide. Except this mother, because this mother is making chili fries for dinner. You may have remembered this post from a long while ago, but I thought I'd bring it back again since I've changed the way it's made a bit, ever tweaking to make it healthier. I still make the same vegetarian chili - that hasn't changed- I love it for fries. It's thick and smokey. But I now serve it on top of roasted sweet potato fries for more beta-carotene, and forgo the cheese. This might make some of you sad. But honestly? It doesn't change any of the appeal for me. The taste is rich and satisfying with the chili boasting notes of beer and coffee, which is heaven with the sweet potatoes.

I said it before and I'll say it again, but what really makes this dinner is the pickled peppers. If you like it spicy, get those, if you like it mild, get the mild or medium banana pepper rings, but whatever you do, get it. The pickled tanginess with the chili fries is perfection. This is one of my families favorite dinners, and I'm betting it will be one of yours too.

Healthier Chili Fries

For the recipe, click here - just remember to skip the cheese and use sweet potatoes instead of white ( I leave the skins on too. Easier and healthier). Cook everything else the same.

Tuesday, October 23, 2012

Roasted Pear Salad with Cranberries, Walnuts and Blue Cheese

Roasted Pear Salad with cranberries and blue cheese

We're Dateline people at our house. There's nothing I like more than curling up on the couch with my ginger lemon tea and watching the mystery of people murdering other people. I only like the murder episodes which is why I'm not exclusive. If 48 Hour Mystery has more intrigue or scandal that night, that's where I'll be. Sure, we spend more time locking our doors and checking the house for killers than most Steamboatians do, but it's worth it. I've come to accept that the suspect is usually always guilty on these shows, just like I've come to accept that most men don't enjoy just a salad for dinner. Huh? It has nothing to do with murder. I know. The Hook bring you back, not the intro, yes? Look, no one even said I was a real writer, okay? You only think it because I write, so therefore I am. And I've said nothing so far, and I can keep it up for as long as it takes. I'm grossly sorry for those of you who don't know The Hook by Blues Traveler and have no idea where this post has gone. Again, I can't stress this enough, but I sincerely apologize.

Roasted Pear Salad with cranberries and blue cheese

Back to salads and murder, but really just salads because I'm willing to bet you didn't visit this blog to read about psychopaths. It's just that I like to write about them from time to time. And, were back to salads for real now. The point I was trying to make with men and salads and dinner in the first paragraph is that I'm well aware that they don't usually all go together. Except in our house. A lone salad is fair game for dinner in these parts, so I made this one with the pears, cranberries, blue cheese and walnuts, and with all the roasting fruit with port and apple cider, my house smelled quite remarkable. I was very excited.  I served the gorgeous salad to oohs and ahh's at the table, and three minutes later when it was wolfed down, my husband looked at me and said "So, what's for dinner?" That, my friends, is what's considered a fail. The point? The salad is indeed fine to look at and lovely to eat, but a hearty dinner it makes not. This is a starter salad meant to be served as the first course. Now, lest you think this didn't occur to me before, I assure you it did, but I trippled the quantity of pears for my husband's salad and called it good. He likes eating light, I told myself. Wrong. Apparently, the addition of a whole pear is not the sort of lusty heartiness a grown man needs to be satisfied at the dinner table. Who knew? Learn from my mistakes, grasshopper. Serve this salad before you serve a maple-dijon pork loin with applesauce and mashed potatoes, or along side a fat roasted chicken, or with a butternut squash soup. Just don't serve it alone.

Roasted Pear Salad with cranberries and blue cheese

As you roast the pears, check to make sure the walnuts don't burn. My oven runs wicked hot and I usually have to put a piece of foil loosely over the top to prevent them from browning too much. It might sound like a pain, but it won't be, you'll smell those nuts roasting a bit too much if they need covering. Please pretend that last sentence wasn't as awkward as it was.

Roasted Pear Salad with cranberries and blue cheese

Roasted Pear Salad with Cranberries, Walnuts, and Blue Cheese
adapted from Barefoot Contessa, Back To Basics

serves 6

3 ripe but firm Anjou pears
Freshly squeezed lemon juice (3 lemons)
3 ounces coarsely crumbled sharp blue cheese such as Stilton
1/4 cup dried cranberries
1/4 cup walnut halves, chopped
1/2 cup apple cider
3 tablespoons port
1/3 cup light brown sugar
1/4 cup good olive oil
6 ounces baby arugula
Kosher salt
Black pepper

Preheat the oven to 375 degrees

Peel the pears and slice them lengthwise into halves. With a small sharp paring knife and a mellon baller, remove the core and seeds from each pear, leaving a round well for the filling. Trim a small slice away from the rounded sides of each pear half so that they will sit in the baking dish without wobbling. Toss pears with the lemon juice to prevent them from turning brown (save remaining lemon juice). Arrange them, core side up, in a baking dish large enough to hold pears snugly.

Gently toss the crumbled blue cheese, dried cranberries, and walnuts together in a small bowl. Divide the mixture among the pears, mounding in on top of the indentation.

In the same small bowl, combine the apple cider, port, and brown sugar, stirring to dissolve the sugar. pour the mixture over and around the pears. Bake pears for 30 minutes, or until tender, checking every now and then to make sure the walnuts don't get too brown (if so, cover the dish loosely with aluminum foil). Set aside until warm or room temperature.

Just before serving, whisk together the olive oil, 1/4 cup of the leftover lemon juice, and 1/4 cup of the basting liquid from the pears in a large bowl. Add the arugula and toss well. Divide the arugula among 6 plates and top each with a pear half. Drizzle each pear with some of the basting liquid, sprinkle with salt and pepper, and serve.

Thursday, October 18, 2012

Scoop Ahead Ice Cream

Scoop Ahead Ice Cream

You know what I hate? When people use initials instead of just typing out the word. Like when my Mother and Father-in-law are suddenly MIL and FIL and I am the DIL. That's not an attractive name for anyone. Also when people refer to me as "K" instead of Krysta. Is it really that hard to type out my name?  Kel will read this (if she even reads this blog anymore- this will be the true test to our friendship) and think it's hilarious and only refer to me as "K" from here on out just to irritate me because thats what she does and has done every time I complain about this. And, you know what? It's not funny Kel. Not funny AT ALL. I'm about to flip a shiz-nit over this. I also hate when people say they're going to do something and don't do it. Or, when people take to Facebook and ask for medical advice after they have admitted they pretty much can't breathe and have been coughing severely for four weeks, and everyone urges them to go to the ER, but they don't even take anyone's advice because they don't really believe they are in that big of trouble, but then later find out they have actually cracked a rib. Yeah, Kel. I'm not talking about you AT ALL. You have permission to call me "K" for two weeks now. But after that I'm cutting it off, you hear me?

Scoop Ahead Ice Cream

Turns out I hate a lot of things. Including scooping ice cream. That was a natural segway, right? I didn't even plan that, it's just the truth. Scooping ice cream is like being asked to cut the cake at a party. People freeze up and get all weird about it. Listen, I understand. It's intimidating stuff. Tell me this whole idea of scooping the ice cream ahead of time isn't ingenious? I saw it on Pinterest. Then, I tried it when I had to serve ice cream sundaes to 13 people; because scooping it out of the carton in front of that many people? No one wants that job. Then I  saw it done a week later at Danielle's house for Annabelle's birthday party. Danielle showed off her tray to me and was all proud and asked me Isn't it the smartest idea ever? And of course it was, but I didn't have the heart to tell her been there, done that because that would be rude. Until now. The truth comes out on the blog.

It really is brilliant.

Scoop Ahead Ice Cream

ice cream
ice cream scoop
muffin tin
cupcake liners

Line a muffin tin with cupcake liners. Scoop ice cream into muffin tins and freeze until firm, about 3-4 hours. 

You all? If you're new, and you don't ever know who the heck Kel, or Danielle or Melissa is, check out my "friends and family page". And you really should know them, because I think they're kind of awesome.

Monday, October 15, 2012

Coconut Breakfast Pudding with Sauteed Maple Nectarines

Coconut Breakfast Pudding with Sauteed Maple Nectarines

Winter and Fall call for hot breakfast and one can only eat so many bowls of steel cut oatmeal. Unless it's my husband because that creature of habit could eat it everyday for years, until he got completely sick of it, which would happen one random day, and never eat it again. I like to change things up and eat foods over a lifetime.

Breakfast is my least favorite meal of the day if I'm being honest. I'm never really hungry until ten (but I force myself to eat before then), I can't eat anything too sweet or drink more than a cup of coffee or I feel jittery. If I eat something heavy, I feel tired. I have to eat something healthy or I feel off and cloudy. Breakfast is high maintenance. So, when I see an interesting and healthy breakfast option, I jump at the chance to make it. Coconut breakfast pudding was in my Whole Living magazine a few months ago and given that it had words like maple and coconut in the title I knew I'd be making it.

Coconut Breakfast Pudding with Sauteed Maple Nectarines

Coconut Breakfast Pudding with Sauteed Maple Nectarines
adapted from Whole Living Magazine, July/August 2012
serves 2

1/3 cup old-fashioned oats (not instant)
1/3 cup shredded coconut (sweetened or unsweetened)
1 cup unsweetened vanilla almond milk or coconut milk
1/8 teaspoon ground cinnamon
Pinch of sea salt
2 teaspoons coconut oil
2 Nectarines, sliced
1 tablespoon maple syrup, plus more for drizzling
1/4 cup shredded coconut flakes, toasted

In a bowl, combine oats and shredded coconut with 1 1/2 cups water and refrigerate overnight. Transfer mixture to a saucepan and add milk, cinnamon, and salt. Bring to a boil, then reduce heat and simmer, covered, until creamy, about 12 minutes. Remove from heat, stir and cover.

Heat oil in a medium skillet over medium-high heat and saute nectarines until golden, 1 to 2 minutes, before stirring in the syrup. Divide oats between two bowls and top with nectarines and toasted coconut flakes. Drizzle with additional syrup, if desired.

Wednesday, October 10, 2012

Pumpkin Pie Smoothie-Cocktail

Pumpkin Pie Smoothie Cocktail

I came across a recipe for a pumpkin pie smoothie on Pinterest. Then I saw another. And another. And I was like, alright already, so I made it. And you all, I was a bit disappointed...so I fed it to my kids. Then, I decided to look up a few of these different recipes and found they were all similar but different. And none of them sounded like they'd be any better than the one I had made in the first place. So, I tweaked and added and came up with this. I wanted a low-sugar smoothie since people usually drink those in the morning, but alas, pumpkin tastes better with sweetness, so if this is a dessert I recommend adding in a bit of maple syrup and if you have sweetened almond or coconut milk in the house, this recipe is probably more suited to that. I don't so I used unsweetened almond milk, which was fine but if I'd had the other I would have used it. 


So what else did I change? Basic quantities mostly, and I added coconut butter for some healthy fat and cakiness. I upped the amount of spice, but it could even stand for a little more. If you like spice, add some more in. I added less yogurt and more banana for additional natural sweetness. 

Can I be honest though? What I really want to do is add some bourbon, and slap some whipped cream on top and call it a cocktail.

Pumpkin Pie Smoothie Cocktail

Um, okay, time out. I just did add some bourbon to my leftover smoothie and a splash of heavy cream (because I was too lazy to whip it) and dang, this was meant to be a cocktail! And I'm not even a sweet cocktail kinda girl, but this is nice. Its mildly sweet with good for me ingredients mixed with not good for me ingredients, and it's so wrong and yet oh so right. The bourbon lends a cozy, warm richness and the cream just adds to that. It's like the most wonderful accident in the world. A little freshly grated ginger in this would be awesome too, but then, I guess it wouldn't be a pumpkin pie cocktail as much as a Fall cocktail.

Pumpkin Pie Smoothie Cocktail

Get excited.

Pumpkin Pie Smoothie  Cocktail
serves 1

1 ripe, brown banana

1/3 cup pumpkin puree
1/4 cup plain Greek yogurt or vanilla yogurt
3/4 cup vanilla almond milk or coconut milk
5 shakes pumpkin pie spice
2 shakes cinnamon
1 teaspoon vanilla extract
1 tablespoon coconut butter
4-5 ice cubes
1 shot good bourbon (or 1 1/2, whatever)
1 teaspoon maple syrup (optional)
lightly sweetened whipped cream or coconut whipped cream for serving (or a nice splash of heavy cream added directly into the drink, or both)

Blend Banana, pumpkin, Greek yogurt, vanilla almond milk, pumpkin pie spice, cinnamon, vanilla, coconut butter, ice cubes, and maple syrup if using and puree until smooth. Turn blender off. Add bourbon and cream (if not using whipped) and blend on low for just a few seconds. Pour into glasses and top with whipped cream and sprinkle with cinnamon. 

Monday, October 8, 2012

The Perfect Fall Picnic - Chicken Cutlet Sandwich with Pesto and Red Peppers

Chicken cutlet Sandwich with red peppers and arugula

Fall is the most gorgeous time for a picnic, especially in the mountains. The leaves are changing colors painting a landscape of gold, red and orange. The air is perfect and cool enough to accommodate the bike ride or hike you took to get to the picnic spot, while the sun is still warm. Fall in Steamboat is nothing short of spectacular, but we're currently experiencing a cold front and with it brings a season ending freeze. Bummer. It's 36 degrees out right now! At least it's still bright and sunny...

Chicken cutlet Sandwich with red peppers and arugula

Just because we might have to stop picnic season short doesn't mean you have to. You probably still have another month or two of my favorite weather to picnic in while we make snow.

breading the chicken
Chicken cutlet Sandwich with red peppers and arugula

pan frying the chicken
Chicken cutlet Sandwich with red peppers and arugula

I like to bring traditional food to a picnic, nothing crazy, because picnics are simple, so the food should be too. My Grandma Grillo used to tell me that when her aunts packed a picnic in the 40's, it would be cold fried chicken and potato salad. That sounds fun, doesn't it? This chicken sandwich reminds me of that memory because it's fried chicken, but between bread. Pesto and red peppers punch up the flavor and fresh lemony arugula rounds everything out. You'll notice, there is no dairy or cheese on this sandwich and that's on purpose. When picnicking, try to avoid things that spoil easily. That's pretty much rule numero uno.

Start by picking a nice crusty baguette and spreading pesto along the bottom. Then, lay the fried chicken cutlets on top in a single layer cutting pieces to fit.

Chicken cutlet Sandwich with red peppers and arugula

Roasted red peppers on top of that

Chicken cutlet Sandwich with red peppers and arugula

Arugula lightly tossed in a little lemon, oilve oil, salt and pepper on top.

Chicken cutlet Sandwich with red peppers and arugula

Wrap sandwich in parchment or wax paper instead of ziplock bags. It's prettier. Just place the sandwich on the middle of a long sheet.

Chicken cutlet Sandwich with red peppers and arugula

Pick up the long sides and fold them together two to three times until it is tight around the sandwich.

Chicken cutlet Sandwich with red peppers and arugula

Chicken cutlet Sandwich with red peppers and arugula

Chicken cutlet Sandwich with red peppers and arugula

Then just tuck the other sides under and tape if needed.

Chicken cutlet Sandwich with red peppers and arugula

Chicken cutlet Sandwich with red peppers and arugula

So, now that you have yourself one gorgeous sandwich, what else should you pack?

Fruit- something seasonal like a honeycrisp apple or crunchy green grapes
Chips- we like kettle cooked for extra crunch
Drink- iced tea in mason jars or bottled water
Desert: a freshly baked cookie wrapped in saran wrap

This is the sack lunch I dropped off to the awesome people I catered for last week. I hope they liked it.

Are you a vegetarian like me most of the time? No problem, just replace the chicken with some grilled eggplant.

Chicken Cutlet Sandwich with Pesto and Roasted Red Peppers 
serves 3

For the sandwich:
1 french baguette, split lengthwise
Roasted red peppers, fresh or from a jar
3-4 cups lightly packed arugula
2 chicken cutlets, recipe below
Basil pesto, homemade or store bought
1/8 cup freshly squeezed lemon juice
1/4 cup olive oil
1/4 teaspoon Kosher salt, plus more for sprinkling
1/8 teaspoon black pepper

Whisk the lemon juice, olive oil, salt and pepper together in a small bowl. Spread pesto generously on the bottom of the baguette. Lay the friend chicken cutlet pieces down, cutting to fit if needed. Spread a layer of roasted red pepper on top of the chicken. Toss the arugula in a bowl with just enough dressing to coat the leaves. Top the sandwich with arugula and sprinkle the whole sandwich with Kosher salt. Close sandwich and cut into three equal portions.

Parmesan Chicken Cutlets
adapted from Barefoot Contessa, Family Style, by Ina Garten
makes 2 chicken breasts, enough for three sandwiches

2 boneless, skinless chicken breasts
1/2 cup all-purpose flour
1/2 teaspoon Kosher salt
1/4 teaspoon black ground pepper
2 large eggs
3/4 cup Italian style bread crumbs
1/4 cup grated Parmesan cheese
Olive oil

Pound the chicken breasts until they are 1/4 inch thick. You can use either a meat mallet or a rolling pin.

Combine the flour, salt, and pepper on a dinner plate. On a second plate, beat the eggs with 1 tablespoon of water and a pinch of salt. On a third plate, combine the bread crumbs and 1/4 cup grated parmesan cheese. Coat the chicken breasts on both sides with the flour mixture, then dip both sides into the egg mixture and dredge both sides in the bread-crumb mixture, pressing lightly.

Heat 2-3 tablespoons of olive oil (enough to lightly coat the bottom) in a large saute pan and cook both chicken breasts on medium-low heat for 2-3 minutes on each side, until cooked through. When done, set cutlets on a plate and sprinkle with Kosher salt. Allow the breasts to cool enough so you can handle them before using.

Wednesday, October 3, 2012

Braised Swordfish with Chorizo and Clams


  • Braised Swordfish with Chorizo and Clams

  • Hark! If you don't like swordfish, this becomes an excellent way to serve clams in delicious broth for dinner with bread, and who wouldn't think that is fun? You can then pretend you are in the Mediterranean dining alfresco because they always serve clams in some sexy broth on the Mediterranean, don't they? I wouldn't know. I've never been, which is why I'm so good at pretending and I don't mind telling you it's one of the greatest tragedies of my entire life. 

  • Dear Jeremy, 
  • Are you aware that never visiting the Mediterranean is, in fact, the worst tragedy of my life? To make matters worse, I have had some seriously messed up crap happen to me, so this is saying A LOT. We travel to Leadville for your bike races. We traveled to Grand Junction for a race. We travel to Crested Butte for your races too. All those times we could have been in the south of France! But, no, because your races are "closer to home" and "less expensive" we just stay in our state and you can still race and ride your bike and be happy. Me? I'll die an unfulfilled woman whos eyes have never seen the glorious riches found a bowl of clams, broth and bread (except for when I make it at home but you and I both know that absolutely does not count). Is that what you want, Jeremy?  Gosh, you can be so selfish.
Obviously, I am kidding. I don't know why I wrote that. 

Dear Jeremy,
I am sorry. I am listening to Mumford & Sons and I think I got all amped up. 

Braised Swordfish with Chorizo and Clams

  • I honestly don't love swordfish, but I still included it since this was the recipe that earned Michael Symon his Iron Chef status and I kind of wanted to follow the directions in their entirety. This is really good but it's more than that. This is the kind of meal that makes you want to linger at the table a little longer, pour yourself another glass of Rioja, and just sit and take in the moment. It breeds thankfulness, friendship, love, and somewhere between dunking your tenth piece of bread into the smokey rich broth and going home, you'll pause, look around and realize the fullness around you. Food has the power to do that, and my friends, this one does. Make sure you enjoy it with people you love.
Braised Swordfish with Chorizo and Clams

If you decide to leave the swordfish out, you'll need to buy more clams.

Braised Swordfish with Chorizo and Clams
adapted from Michael Symon
serves 4-6

  • 2 tablespoons extra virgin olive oil
  • 6 6-ounce pieces swordfish collar (or substitute loin)
  • Kosher salt
  • 1 yellow onion, minced
  • 2 cloves garlic, minced
  • 1 bulb fennel, diced
  • 1 serrano chile pepper, minced
  • 1 carrot, diced
  • 1/2 pound smoked chorizo, thinly sliced
  • 1/2 cup dry sherry
  • 1 12-ounce can whole peeled tomatoes
  • 1 small pinch saffron
  • 1 1/2 cups chicken stock ( I used 2 cups for more broth)
  • 1 1/2 pounds littleneck (about 24), scrubbed
  • 2 tablespoons chopped pitted kalamata olives
  • 3 tablespoons chopped fresh parsley
  • 3 tablespoons sliced fresh basil
  • Grilled bread, for serving
Place clams in a big bowl full of cool water and 2 tablespoons flour. Let them sit in the refrigerator for 30 minutes before using. This will help the clams absorb the clean water and spit out any sand they may have.

Heat the olive oil in a 7-to-8-quart enameled cast-iron Dutch oven over medium-high heat. Season the fish with salt, then cook until browned, about 2 minutes per side. Transfer to a plate. Add the onion, garlic, fennel, chile pepper and carrot to the pot; reduce the heat to medium and sweat the vegetables, about 2 minutes, sprinkle with a good pinch of salt. Add the chorizo and cook until browned, about 2 more minutes. Add the sherry and bring to a simmer, scraping up any browned bits from the bottom of the pot with a wooden spoon.
Crush the tomatoes with your hands and add to the pot with their juices. Add the saffron, chicken stock and clams and bring to a simmer. Cover and cook until the clams just begin to open, about 3 minutes. Add the swordfish to the pot and simmer, covered, until the swordfish is cooked through and the clams open, about 7 more minutes. (Discard any clams that do not open.) Stir in the olives, parsley and basil. Check for seasonings and sprinkle with more salt if needed. Serve with grilled bread.

Monday, October 1, 2012

Cinnamon Sugar Pull-Apart Bread

Cinnamon Sugar Pull-Apart Bread

Hi all.

Phew

Did I just have a week! I had the opportunity to cater for a group of 13 people, every day for five days. I did one meal a day, but let me tell you, that means you work all day for that one meal if it's a dinner, or all day the day before if it's a breakfast. I took a leap of faith in saying yes, and I'm glad I did because I learned that I can, in fact, do something like this. Don't get me wrong, I don't want to jump on the crazy train and do it all again next week or anything (I might go so insane with cooking schedules, special dietary needs, grocery list making, grocery shopping, meal planning, prep, figuring out how to keep food warm/cold, planning what I can make in advance and what needs to be made on site, deciding which dishes to display food on and packing them up to take, packing knives, cutting boards, skillets, coffee makers, mason jars full of ingredients, sauces, herbs, garnishes, lemons, salt and pepper, platters, menus, remembering to print off and pack recipes for cooking time references, making sure things don't burn, making sure I don't undercook things, keeping cooked spinach green -uh, harder than it sounds- scheduling what time I need to leave my house to get everything ready on time, making food time lines, setting tables, clearing plates away, doing dishes, putting dishes away, wiping counters, washing my hands, fighting anxiety related to overcooking salmon and forgetting bread, and being on time with everything for every meal...so insane, I tell you, that I might rip out all of my hair and dance naked in the streets shouting "que cera cera!")

And, you all? I had to shower and sleep, too.

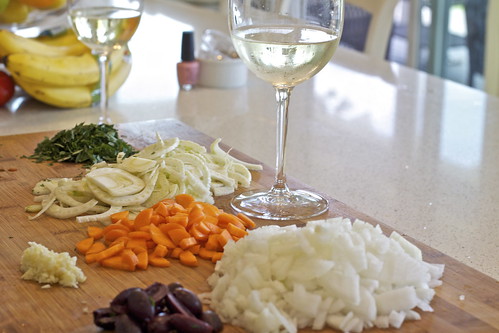
One day, I had to serve breakfast at 8am. EIGHT AM! I'm not complaining, I'm really not. It's just that I had to be up at 5:30am to pull it off. Even then, I was 7 minutes late and needed a two-hour nap. A nap mostly because I was up past 11:30pm prepping that breakfast since there was no other time to do it other than after I got done with a sit down dinner that happened the night before.

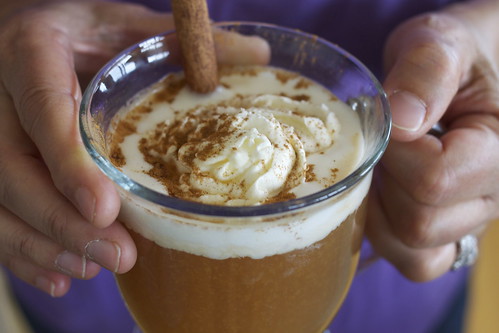
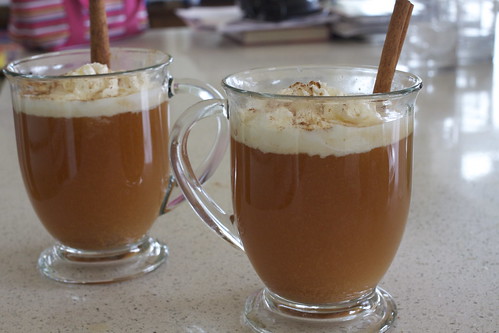
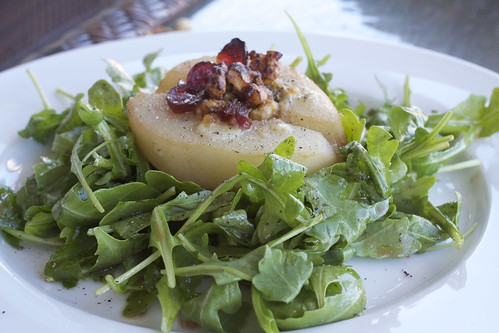
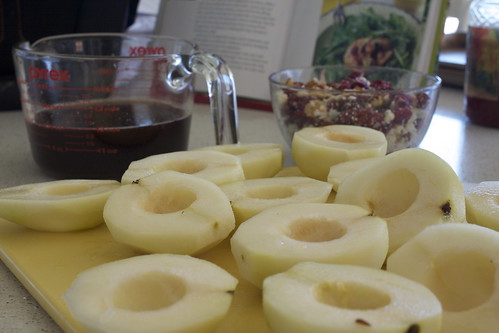
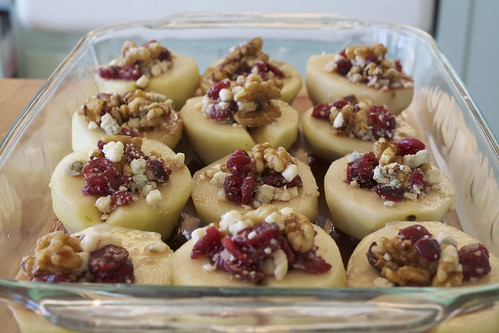
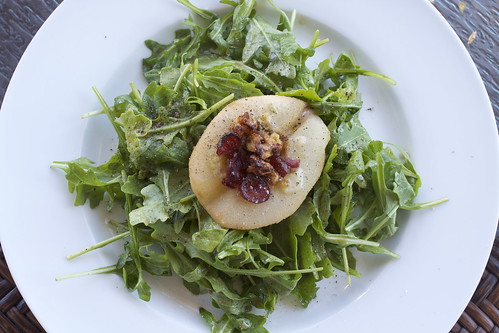
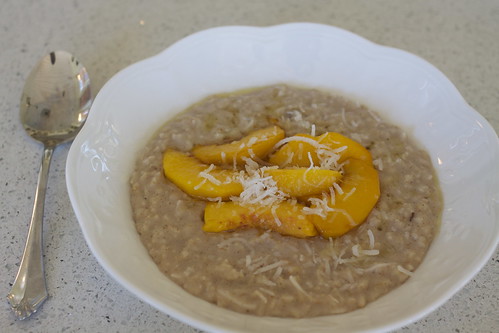
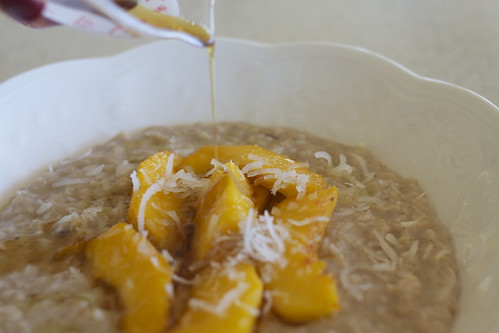
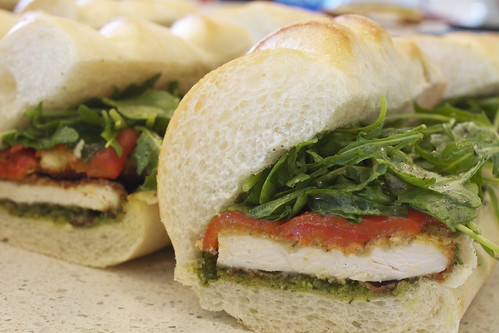
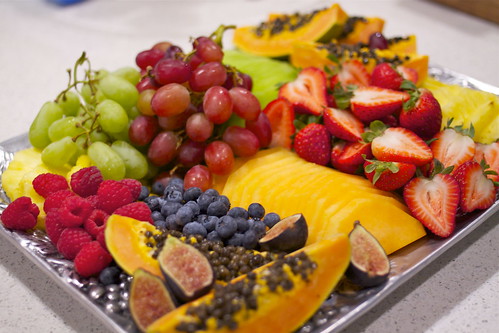
8am Breakfast Fruit Platter
Breakfast Fruit Platter

In all seriousness, I was serving the most gracious of people and it was a pleasure being a part of their event. I'll probably wait a long while before doing anything like it again, though. I prefer actually looking at my kids rather than dough in the morning.

Cinnamon Sugar Pull-Apart Bread

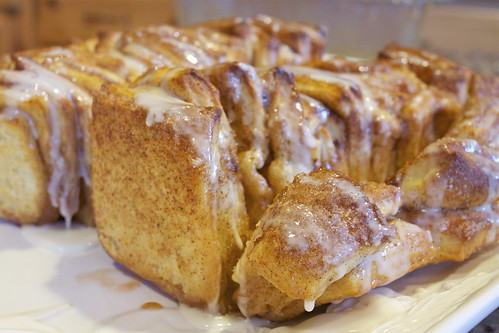
Oh! But this dough? It's the stuff exceptions are made out of. But, I'm confident I don't have to tell you that. The pictures are all you need. Okay, I'll elaborate. It's soft, pillowy sheets of warm dough (think the insides of a cinnamon roll) swaddled in cinnamon, sugar, butter, baked, pull-apart, glaze, dripping, love, unicorns, rainbows, puppies.

I'm sorry to do this to you because this recipe really is spectacular, and I know you really, really want to make it. I don't blame you. Heck, I can't stop making it. But, I also know you're freaked out about yeast and dough, and it's okay...we're going to get through this together.

Making cinnamon sugar pull-apart bread is simple, really (please resist the urge to slap me for saying that). A four step process, none of it complicated, just takes some time. But hard? Not at all. First, mix some flour, sugar, yeast and salt together and set aside. Next, heat some milk and butter together and add some vanilla extract for good measure. Then, there's nothing left but to combine the two.

Cinnamon Sugar Pull-Apart Bread

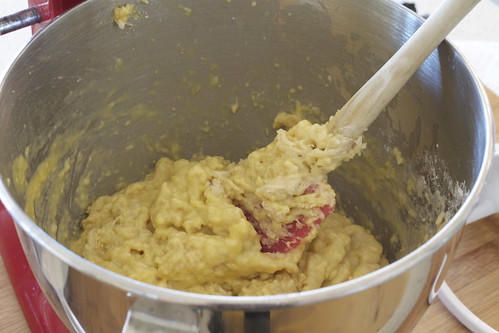
You with me? Add some eggs and more flour to the dough and mix

Cinnamon Sugar Pull-Apart Bread

Place dough in an oiled bowl in a warm, NOT HOT oven and walk away. I usually preheat my oven to 350 for 1-2 minutes, then turn it off to warm it. That part is important because the little bit of heat helps to activate the yeast in the dough. After an hour, the dough will have doubled in size and look like this.

Cinnamon Sugar Pull-Apart Bread

Next, you'll dump it out on a floured counter and knead a bit more flour into the dough so it doesn't stick to your hands. Don't freak at the mention of "kneading." Takes two seconds. The let your dough rest on the floured counter for five minutes while you get your filling ingredients ready (butter, and cinnamon sugar)

Roll out your dough into a large rectangle and brush with butter

Cinnamon Sugar Pull-Apart Bread

Cover the surface with the cinnamon sugar

Cinnamon Sugar Pull-Apart Bread

Cut into six strips. Don't let water drip on your dough like I did.

Cinnamon Sugar Pull-Apart Bread

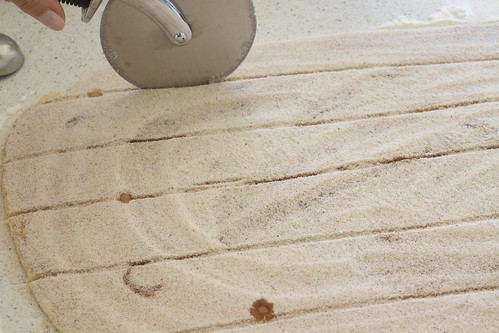
Next, you'll stack the strips and cut squares. that's what makes this "pull-apart bread".

Cinnamon Sugar Pull-Apart Bread

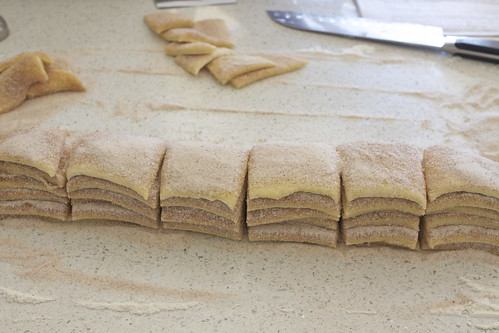
Line the strips up in a loaf pan, cramming rogue squares in pieces to fit

Cinnamon Sugar Pull-Apart Bread

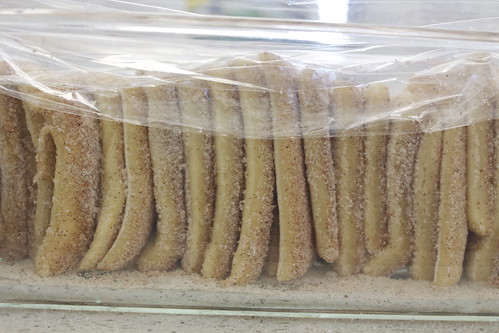
Let that rest in your warm oven, covered with a kitchen towel until doubled in size, about 30-45 minutes.
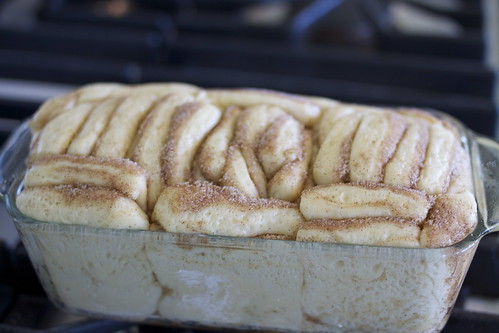
Cinnamon Sugar Pull-Apart Bread

Bake.

Drizzle with glaze. Eat. Groan. Close your eyes.

Cinnamon Sugar Pull-Apart Bread

Ain't no thing but a chicken wing.

So, I might have lied when telling you it was a four step process, but if I told you it was an eight step process, you might have stopped reading and you would have missed out because did you see how easy it was? Sometimes, we need white lies in our life in order to motivate. Don't repeat that.

Try and ignore the super long directions too. Long does not equal hard. I just really walked you through the process.

Cinnamon Sugar Pull-Apart Bread
adapted from Joy The Baker 

makes one 9x5x3-inch loaf

For the dough:
3 cups all-purpose flour
1/4 cup granulated sugar
2 1/4 teaspoons (1 envelope) active dry yeast
1/2 teaspoon salt
2 ounces butter (1/2 a stick)
1/3 cup whole milk
1/4 cup water
2 large eggs, at room temperature (tip- to bring eggs to room temp fast, stick them in a bowl of warm water for a few minutes)
1 teaspoon pure vanilla extract

For the filling:
1 cup granulated sugar
2 teaspoons ground cinnamon
1/2 teaspoon fresh ground nutmeg
2 ounces unsalted butter, melted (1/2 stick)

For the glaze:
1 cup powdered sugar
2-4 tablespoons milk
1/2 teaspoon vanilla extract

In a large mixing bowl whisk together 2 cups of flour, sugar, yeast, and salt. Set aside.

Whisk together eggs and set aside.

In a small saucepan, melt together milk and butter until butter has just melted. Remove from the heat and add water and vanilla extract. Let mixture stand for two minutes, or until the mixture registers 115 to 125 degrees F. Don't freak out! If you don't have a thermometer or don't want to use one, just let it sit for two minutes before adding it to anything. It will be fine.

Pour the milk mixture into the dry ingredients and mix with a rubber spatula. Add the eggs and stir the mixture until the eggs are incorporated into the batter. the eggs will feel soupy and it'll seem like the dough and eggs are never going to come together. Keep stirring. Add the remaining 3/4 cup of flour and stir with the spatula for about 2 minutes. The mixture will be sticky. That's just right.

Preheat your oven to 350 degrees F for 1 minute. Then, turn it off. Now your oven is warm. That's perfect.

Place the dough in a large, greased bowl. Cover with plastic wrap and a clean kitchen towel. Check that your oven is not so hot that it will melt the plastic wrap, you want it pleasantly warm. Place covered dough bowl into your oven and shut the door, or leave it propped open if it's hotter than you think it should be, and allow it to rest until doubled in size, about 1 hour. *The dough can be risen until doubled in size, then refrigerated overnight for use in the morning. If you're using this method, just let the dough rest on the counter for 40 minutes before following the roll-out directions below.

While dough rises, whisk together the sugar, cinnamon and nutmeg for the filling. Set aside. Melt 2 ounce (1/2 stick) of butter. Set aside. Grease and flour a 9x5x3-inch loaf pan (that's an average size loaf pan). Set that aside too. Pat your self on the back. You've almost made it.

Sprinkle a handful of flour on your counter. Deflate the dough by handling it and knead about 2 tablespoons of the flour into the dough, just until you can handle it without it sticking to your fingers. Breathe, it will feel natural to do so. Cover dough with a clean kitchen towel and let it rest on the counter for five minutes. Dough is a lazy SOB and needs it's beauty sleep before it'll work for you. On your now lightly floured counter where the dough is resting, use a rolling pin to roll the dough out into a large rectangle. It should be around 12-inches by 20 inches, but it doesn't have to be exact. If you can't get the dough 20-inches long...that's okay. Just roll it as large as the dough will go, and be patient with it, it'll get longer with each roll. Use a pastry brush to spread melted butter across all of the dough. Sprinkle with all of the sugar and cinnamon mixture. It'll seem like a lot of sugar. Just use it.

Slice the dough vertically (long ways), into six equal-ish strips. Just eyeball it.  Stack the strips on top of one another and slice the stack into six equal-ish slices once again. you should now have square sheets of dough. You might need to trim off a bit at the ends to make nice squares. That's okay, you can stuff those bits into the corners of the pan. Layer the dough squares in the loaf pan like a flip-book, then stuff sheets anywhere you can along the sides to fill that sucker up. It will rise and fill out, so allow a bit of wiggle room for that. Place a kitchen towel over the loaf pan and allow it to rest in your warm oven again for 30-45 minutes or until doubled in size. If you need to re-heat your oven again to get it to warm again, do so.

Take the loaf pan out of the oven, once it's risen and set on the counter. Pre-heat your oven to 350 degrees F. Place loaf in the oven and bake for 30-35 minutes. Check at 20 minutes and cover lightly with a sheet of aluminum foil if it's getting too brown. Bake until the top is a deep golden brown. When the top looks nice and lightly browned, the center may still be raw. A nice, dark, golden brown will ensure that the center is cooked as well.

Remove from the oven and allow to rest for 20 to 30 minutes. Whisk together ingredients for glaze. Run a butter knife around the edges of the pan to loosen the bread and invert onto a clean board. Place a cake stand or plate on top of the upside down loaf, and carefully invert so it's right side up. Drizzle glaze over top. Serve warm with coffee or tea.

I think this bread is best served the day it's made, but it can also be wrapped and kept at room temperature for up to two days.