about cooking
I do not consider myself a writer. I just thought I would take advantage of this time we have together to let you know that. In fact, I don't even really enjoy writing, but I do love cooking and this seems like a good way to document my foodie life. If I were to die my children could look this site up and say, yeah, wow, Mom used to make that for us. I'm not trying to be morbid. I have no plans of dying anytime soon, I'm just saying...that is what I am doing here. Well, that and I have this weird fascination of trying to remember what I made exactly a year ago today or two years ago today and sometimes, I get lucky because I will have written what I was making for dinner on my calendar and it can be forever documented. I know, I'm strange, it's ok. One thing I am sad about is that I am sooooo not computer savvy and so I have not figured out how to get pictures of the food I make onto this blog. It is probably ridiculously simple but still, I have not the foggiest. You eat first with your eyes and lots of times a recipe doesn't appeal to me until I have seen a picture of it. I want so badly to inspire people to cook delicious food but without fabulous pictures and witty writting I feel I am lacking. Maybe my ability to communicate will improve over time and I will figure out how to get pictures up on posts. Really, I want an awesome camera. I occasionally take pictures of my food and I have to tell you they don't always look so good. The type of camera you have makes all the difference. The lighting, the zoom, the softness, the sharpness. I love a good food picture!
These things are on my mind becuase I have been reading the food blog Smittenkitchen.com which I highly recommed, and it is the epitomy of a great food site. Lusty close up pictures of the process, prep and finished product (all taken with the utmost taste and quality) and superb writting skills to boot. It's good ole clean food porn is what it is. That sounds bad. I actually can't believe I said that, but I don't really know what to compare it to. Anyway her site gets about a million views a month. That's alot! How fun that must be! You should check it out. It's written by a woman named Deb and she endears herself to you over time.
Self wallowing aside, I did make a heck of a dinner last night thankyouverymuch! It's baked camembert pasta and it tastes even better than it sounds! You pop the top rind off a round of camembert cheese, leaving a tiny lip around the rim to hold everything in (camembert is reminescent of Brie) and then you top it with fresh rosemary and slices of garlic, a little drizzle of olive oil, salt and pepper and bake it until it is oozy and gooey. Then you spoon this lovely scented cheese over rigatoni pasta tubes that have been tossed with fresh spinach that have wilted from the heat and you are in absolute heaven. Heaven, really.
Baked Camembert Pasta
adapted from Jamie Oliver
1 8-ounce box camembert cheese
2 cloves garlic
1 sprig fresh rosemary
Freshly ground balck pepper
Extra virgin olive oil
4 ounces parmesan cheese
sea salt
1 pound rigatoni pasta (or penne) I used whole wheat
6 cups (about 6 ounces) fresh baby spinach leaves (I use a whole salad carton)
Preheat your oven to 350 degrees
Open the box of cheese (camembert comes in a wooden round box) and unwrap it. Place it back in the wooden container. Score a circle into the top of the skin, or rind, leaving a border , then lift it off and discard. Peel and finely slice the garlic. pick the rosemary leaves off the woody stalk. Lay the garlic slices on top of the cheese, sprinkle with some salt and pepper and drizzle with a little extra virgin olive oil. Scatter the rosemary leaves on top and gently pat with your fingers to coat them in oil. Grate the parmesan.
Place the box of cheese still in the wooden containers base on a cookie sheet and put into the preheated oven for 25-30 minutes, until golden and melted. Meanwhile, bring a large pot of salted water to a boil. When your cheese has about 12 minutes left to cook, add the rigatoni to the pot and cook according to the package instructions. When the pasta is cooked, add the spinach tot he pot (it only need cooking 10 seconds or so) then drain the pasta and spinach in a colander, reserving some of the cooking water. Return pasta and spinach to the pot and let the spinach wilt. Drizzle with a couple of lugs of extra virgin olive oil and add the grated parmesan (or you can just top your individual bowl with parmesan if you dont want to get your pot all cheesey) If the sauce is a little thick for you add a splash of the reserved cooking water to thin it out a bit. Season with salt and pepper and give it a good stir. remove cheese from the oven.
Divide the pasta among your serving bowls. Either drizzle the melted camembert on top or pop the box of cheese on the table and let everyone help themselves to a lovely, gooey spoonful.
My only 2 notes on this is 1) make sure you really do slice your garlic very thin or else they wont cook all the way in the oven and this will lead you to biting into a spicy chunk and having garlic breath all night...not good and 2) this recipe is really long winded for something so simple. Really all you do is prep some chese, bake it and cook some pasta that you have added spinach to. This recipe comes out of Jamie's new cookbook "Jamie's Food Revolution"
So this is not the healthiest recipe, lets face it, but it's ok to have once and a while. Plus if you swap regular pasta for whole wheat, like I did, with the fresh spinach it makes it not such a gulity pleasure. Oh, and what a pleasure it is! Thank you Mr. Oliver, thank you.
Thursday, February 25, 2010

Wednesday, February 24, 2010
Devils Food Cake with Marshmallow Frosting
Well, if you remember a few posts ago I ranted about not having found the perfect chocolate cake. Since then, I have decided that I couldn't go on this way, I have to find it, the recipe is out there! So I have taken on the task of baking a couple cakes in the last couple weeks to try them out (I know it's a hard job...) The recipe that follows down below was a devils food cake that I made that was awesome. It was by far the best devils food I have made, and I have made a couple. My Grandpa has always talked about a devils food cake that his Mother used to make (my Nani) that was so moist and flavorful that all it needed was simple whipped cream to frost it. I dream of this cake even though I have never had it. So when I knew he was going to be coming over last Sunday, I took it upon myself to bake my new recipe for Devils Food so he could taste it. Although, I had no intention of topping it with just whipped cream, even though it would have been delicious, because I had a recipe for seven minute frosting which is basically a homeade marshmallow without the gelatin (YUM!) It just sounded too good to pass up. A grown up ding dong if you will or hostess cupcake. I was more excited for this cake than perhaps any cake I have ever made and I was crossing my fingers that it would be a winner. Guess what? It was...for about 2 hours.
The marshmallow seven minute frosting, when exposed to the air starts to turn into a meringue of sorts and gets tough and hard but up until that happens it is light and fluffy, not too sweet and absolutely delicious. You could make this cake into cupcakes and fill them with this frosting and it would stay soft and probably taste just like a homeade hostess cupcake, especially if you topped it with ganache and piped those little loops on top. Is anyone else drooling? Even Jeremy liked this cake and he is a bit hard to please in the dessert area. My Grandpa said it reminded him of his Mothers and he loved how the frosting complimented the cake in a not too sweet way just like whipped cream would. It was a proud moment for me.
This recipe has coffee in the batter but you won't taste it. Coffee just makes the chocolate sing. If you don't have buttermilk, make you own sour milk by adding a teaspoon of vinegar or lemon juice to regular milk in the same quantity as called for buttermilk. You can do that trick for any recipe that calls for buttermilk.
Devils Food Cake
adapted from The Smitten Kitchen
2 ounces semisweet chocolate
1 cup hot brewed coffee
2 cups sugar
1 2/3 cup flour
1 cup cocoa powder (not Dutch process)
1 1/3 teaspoons baking soda
1/2 teaspoon baking powder
1/2 teaspoon salt
2 eggs
1/2 vegetable oil
1 cup buttermilk, shaken
1/2 teaspoon vanilla extract
Preheat the oven to 300 degrees. Grease pans and line with parchment paper, then grease the parchment paper.
Finely chop the chocolate and in a bowl combine with hot coffee. Let the mixture stand, stirring occasionally, until the chocolate is melted and the mixture is smooth.
Into a large bowl (or if you are like me, over a big piece of foil) sift together sugar, flour, cocoa powder, baking soda, baking powder and salt. In another large bowl with an electric mixer beat eggs until thickened slightly and lemon colored (about 3 minutes witha standing mixer or 5 minutes with a hand-held mixer). Slowly add oil, buttermilk, vanilla, and melted chocolate mixture to eggs, beating until combined well. Add sugar mixture and beat on medium speed until just combined well.
Divide batter between pans and bake in the middle of the oven until a tester inserted in center comes out clean, 50-55 minutes.
Cool layers completely in pans on racks. Run a thin knife around edges of pans and invert layers onto racks. Carefully remove wax paper and cool layers completely. Cake layers may be made one day ahead and kept, wrapped well in plastic wrap, at room temperature.
Marshmallow or Seven Minute Frosting
2 large egg whites
1/2 cup sugar
1/4 cup light corn syrup
2 tablespoons water
1 1/2 teaspoons pure vanilla extract
Combine frosting ingredients with a pinch of salt in a metal bowl set over a saucepan of simmering water (like a makeshift double boiler) and beat with a hand-held mixer at high speed until frosting is thick and fluffy, 6 to 7 minutes, Remove bowl from heat and continue to beat until slightly cooled (1-2 minutes) Use frosting to frost the cake and eat within 2 hours.
If you want to make cupcakes and use ganache here is a recipe
Ganache
1/2 pound fine quality semisweet chocolate
1/2 cup heavy cream
1 Tablespoon sugar
1 Tablespoon light corn syrup
1/4 stick (2 tablespoons) unsalted butter
Finely chop the chocolate. In a 1 1/2 to 2 quart saucepan bring cream, sugar, and corn syrup to a boil over moderately low heat, whisking until sugar is dissolved. Remove pan from heat and add chocolate, whisking until chocolate is melted. Cut butter into pieces and add to frosting, whisking until smooth.
transfer frosting to a bowl and cool, stirring occasionally, until spreadable (depending on the chocolate used, it may be necessary to chill frosting to spreadable consistancy). I found that stirring this over a bowl of ice water did a great job of cooling it off quickly and evenly.
Spread frosting over the top and sides of cake. Chilling the cake will harden the chocolate coating.
Although, this particular set up is not what I was looking for initially, it was a fantastic find. I really would LOVE to find the ultimate chocolate cake, dense and moist with thick chocolate frosting that is not too sweet. This very well might be the cake, but alas, I must still find a frosting to match. This variation with the marshmallow frosting is awesome for when I am feeling nostalgic or when my Grandpa comes over and is a definate crowd pleaser.
Please note that this frosting does not keep well. Make and frost just before dinner and it will stay good long enough for you to enjoy it that night (at least 4 hours or so) then, sadly, it will start to get gummy like a marshmallow and form a crust. But, enjoy it while it lasts!
Sunday, February 21, 2010
Tex Mex Quesadillas and Cucumber Salad

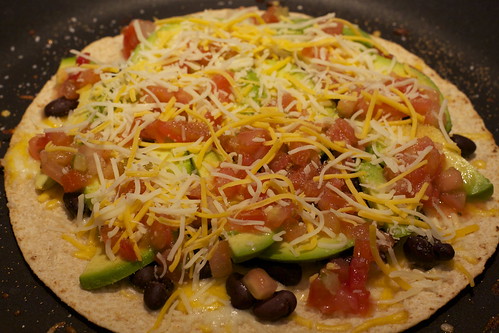
When Jeremy and I were dating, we spent a lot of time at his parents house. We would eat dinner over there a couple nights a week and what I remember is lots and lots of quesadilla's. Before that time quesadilla's, for me anyway, were not considered a dinner. Maybe a lunch and a boring one at that. To me it meant cheese and a tortilla and not much appeal. But when we made them over at his parents house they would pack that tortilla full of any variety of different things and it became more like a sandwich. They were awesome and simple. They basically just threw in whatever they had on hand; cheese, chicken strips, diced onion, chopped tomato or avocado slices and salsa. They were always really, really good.
All that being said, after that chunk of time had passed and Jeremy and I got married and I fell more and more in love with cooking, we kind of left quesadilla's in the dust, until recently. You see, Jeremy started coming home for lunch from work recently and so I needed to have lunch stuff on hand. That sounds simple but I rarely ever have good lunch stuff on hand unless I have prepared for it. Some days I grab something while I'm out. Sometimes I just have a lean cuisine or leftovers or make tuna salad with crackers, you know usual stuff. But since Jeremy has been coming home and bringing his love for fresh and lighter lunch foods with him (think salads...everyday) I have had to get creative. I would love salads for lunch everyday too if I could eat out. For some reason salads at home are so much less satisfying then when you get them out. Anyone? I make a great side salad but they are not something I want to have for a main course, unless it is a taco salad because those are always good from home. When he first started to come home I made things like the taco salad mentioned above, and also a celery root salad with arugula and a half a sandwich. Then there was the eggplant parmigiana that was baked, not fried, with mixed baby greens. Ratatouille another day, and eggplant panini's on wheat pita with cambozola blue cheese and arugula. The problem was, it was getting expensive. I was basically making dinners for lunch, which is kinda how I roll if I'm going to make lunch, but I needed to tone it down a bit. Then I remembered the quesadilla's. My very favorite quesadilla has a lot of black beans, very little cheese, with lots of salsa, avocado, cilantro and a dash of salt and garlic powder or garlic salt if you have it (salt is crucial!) all melted in a crisp whole wheat tortilla. It's so good and satisfying and makes the perfect lunch. Especially if you serve it along side a cucumber salad.
The cucumber salad makes it a good casual dinner option as well. The cucumbers are basically just tossed with lemon or lime juice, salt and chili powder. It is genuine Mexican and we used to get stuff like that at the swap meets in California when I was growing up. Sometimes the cucumbers would be combined with either jicama or mango and served in a white Styrofoam cup. My Mom used to make cucumbers like this except she would cut them up in rounds, spread them out on a plate and we would eat them as a snack.
A note about the quesadilla's- It seems ludicrous to write a recipe for quesadilla's but I think part of the reason why these taste to good is the ratios of ingredients. I put about as many beans to cheese and I use less cheese than usual. I think it tastes better with only enough cheese to hold it together, but you can use as much as you want. The same goes for the rest of the ingredients. You can also sprinkle a little taco seasoning over to spice the quesadilla up if you want.
Tex Mex Quesadilla's
makes 1 quesadilla
serves 1-2
2 whole wheat tortillas
shredded Mexican blend cheese
1/2 cup black beans
3-4 spoonfuls of you favorite salsa
1/2 an avocado, sliced
a handful of cilantro, chopped (optional)
a good pinch of salt or garlic salt
garlic powder
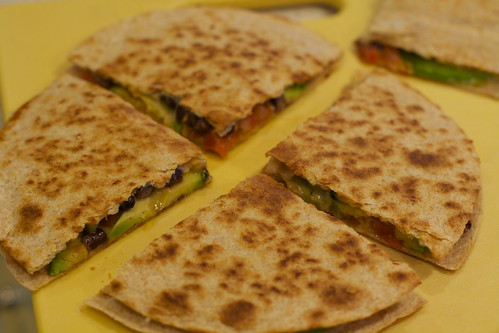
Heat up a medium nonstick skillet over medium heat and put one of the tortillas in it while it heats up. Sprinkle a thin layer of cheese over the surface, then pile the rest of the ingredients on top and sprinkle with salt and garlic powder. Place a second very thin layer of cheese on top so the top tortilla will have something to stick to. Place another tortilla on top of the cheese. Give it a minute or two to heat through and for the bottom tortilla to crisp up, then press the top tortilla down with your hand so it stays together when you flip it. Flip it with a spatula and let it warm through and crisp up on the other side for a minute or two. Remove from the pan and let cool for one minute. Cut into 4 equal wedges
Cucumber Salad
1 hothouse or English cucumber
Tex Mex Quesadilla's
makes 1 quesadilla
serves 1-2
2 whole wheat tortillas
shredded Mexican blend cheese
1/2 cup black beans
3-4 spoonfuls of you favorite salsa
1/2 an avocado, sliced
a handful of cilantro, chopped (optional)
a good pinch of salt or garlic salt
garlic powder
Heat up a medium nonstick skillet over medium heat and put one of the tortillas in it while it heats up. Sprinkle a thin layer of cheese over the surface, then pile the rest of the ingredients on top and sprinkle with salt and garlic powder. Place a second very thin layer of cheese on top so the top tortilla will have something to stick to. Place another tortilla on top of the cheese. Give it a minute or two to heat through and for the bottom tortilla to crisp up, then press the top tortilla down with your hand so it stays together when you flip it. Flip it with a spatula and let it warm through and crisp up on the other side for a minute or two. Remove from the pan and let cool for one minute. Cut into 4 equal wedges
Cucumber Salad
1 hothouse or English cucumber
1/2 lemon
1/4 teaspoon salt
1/2 teaspoon chili powder
I cut my cucumber in half lengthwise then I take a spoon and scrape out all of the seeds. Then I slice the cucumber halves across to make half moon shaped slices. Obviously you can cut them any way you want, this just makes for very pretty presentation. Toss the cucumber pieces with the lime juice, salt and chili powder. Let it sit out at room temperature for 20 minutes before serving. You can peel the cucumber if you wish, but I prefer to leave half of the skin on. I just take a peeler and peel every other half inch or so around.
I don't usually measure the cucumber salad ingredients, so use your own judgement. There needs to be enough salt or else you won't really taste the chili powder. Taste it and decide if you need more. I consider this a nice, well balanced, and flavorful lunch. My husband however doesn't seem to agree. He is in the kitchen right now as I type this, after just having finished his quesadilla, and making an arugula, watermelon and goat cheese salad with salt and a balsamic drizzle (balsamic, upon my urging when I saw he was about to put Italian on it...LOL) No doubt he is eating it for "more health". He is funny like that.
Tuesday, February 16, 2010
Cheating, Easy, White Chicken Chili
So, I made the white chicken chili that I talked about last time and it turned out exactly as I thought it would, good in an okay sort of way. I think this chili is perfect as a weeknight throw together type dinner and that is why I'm choosing to write about it. I realize that not everybody has the time or patience to cook every single night and I also see that in this economy we are all trying to pinch pennies and eat at home as much as possible. This chili is a great solution to both. I made this, oh, I don't know, last Friday? It was a hit with the rest of my family and I admit it was pretty darn good for what it was. Like I mentioned before in my last post, this chili requires no real cooking to be had. The only thing you have to do that is labor intensive is grate some cheese, chop 2 cloves of garlic and that's it! Everything else just gets opened up and dumped into the pot. It's quite remarkable actually. I saw this dinner on an episode of the Rachael Ray show. The episode was about the most requested dishes of the whole year. If you don't know already or are not familiar with the show, Rachael makes food like she does on her other cooking shows on Food Network and calls the segment "what's for dinner tonight?" At the end of last year they took the top 10 most downloaded recipes and highlighted them. One of those recipes was for this white chili, I imagine, for it's simplicity and good combination of ingredients. Rachael didn't make this one up though. It was shown to her by a viewer of the show named Mandy Forester and so, fittingly, this dishes proper name is "Mandy Forester's White Chicken Chili".
It takes maybe 10 minutes to make and another 10-15 minutes to heat through so we are looking at a 30 minute meal. This chili tastes Mexican because it has cumin in it. It's also got a kick. My kids ate it with no problems but they like spicy food. If you have children or sensitive eaters I would recommend using a mild salsa ( I used medium) and use half cheddar cheese and half pepper jack. I do not recommend subing out all of the pepper jack cheese for cheddar because the pepper jack tastes awesome and ties in with all the Mexican flavors so well. Also, I didn't use as much cheese as the recipe calls for. It calls for a whole 8oz block of grated pepper jack cheese. I used about 5oz. I don't think you need much more than that. I also needed about a cup of tortilla chips, crushed, to thicken the soup to my liking instead of the called for 1/2 cup. If you like it thicker, put in more crushed tortilla chips. I should point out that I made this vegetarian. That is, I put in an extra can of beans and didn't buy the rotisserie chicken to shred into it. It was still very good. Chicken would have been better though, I think. I don't know because I usually pick around the chicken in soups so I can't say for sure. Another thing is don't drain the beans. leave them in their juices when you pour them into the pot. It helps thicken the chili and adds extra liquid.
White Chicken Chili
Adapted from The Rachael Ray Show and Mandy Forester
1 32-ounce box chicken stock
3 cans white beans, left un-drained ( I used white kidney and navy beans)
1 chicken, shredded (rotisserie or boiled)
1 16-ounce jar salsa (whatever heat you prefer)
1 8-oz block pepper jack cheese, grated
2 teaspoons ground cumin
2 cloves garlic, chopped
black or white pepper to taste
1/2 to 1 cup finely crushed corn chips
6 servings
Place all ingredients except the corn chips in a crockpot or in a stock pot. If using a crockpot, cook on high until all the cheese is melted and then add in the chips before serving and stir until thickened. If using a stockpot, heat through on the stove top over medium heat until cheese is melted through, then add the corn chips and stir to thicken.
I topped mine with chopped avocado chunks and cilantro. We ate it with chips for dipping too. You could also top it with sour cream. Notice that you put the shredded cheese right in the pot along with all the other ingredients. It's not for putting on top of the chili. That's not common, but it worked and tasted good. I like that there is salsa right in the chili that has all the diced onions right in it so there is no need to chop more yourself. I really like that.
Wednesday, February 10, 2010
White Pizza with Arugula

OK, I have been in a little bit of a food funk. For some reason I am picking meals that have been less than stellar for dinner and I do this knowing full well what the results will be. For example, this week I will make a white chicken chili-without the chicken- to please my nutcase husband, and I know for a fact that it will just be OK. I picked it because it sounded easy. Stupid easy even because really, there is no cooking involved. You just open cans of beans and various other ingredients and dump them in pot and heat it up. I was intrigued because while the recipe will most likely be so-so, it will still be good and I wanted to try it out. I will let you know how that endeavor goes when the time comes. Anyway, to get back to the point it's just been one OK dinner after another. This wouldn't normally be a problem, but I am used to pulling out a restaurant quality meal at least once a week. This is not to say it is fancy. Sometimes it is (I do make an awesome Boeuf Bourguignon and Filet of Beef au Poivre) But most of the time it's just any great food elevated to a level that makes it better than the run of the mill everyday. It's that one ingredient that makes the dish pop, or something so simple, like roasted potatoes, but it has a perfect balance of salt, pepper and fresh rosemary and is cooked to perfection as well, where the outside is crisp and brown but the inside is moist, hot and velvety. I think in essence that is my whole cooking philosophy...that whatever it is I am cooking, I want that particular dish to be the best that it can possibly be. If I am going to make chili, I want it to be what chili is supposed to be- what it is meant to be. Hardy, thick, rich and satisfying. I need it to have fresh ingredients as well as canned and it must be slightly spicy.
Really, to reiterate, what I try to do is take a food like pizza (the recipe below) and try to make my very favorite version of it. I make it over and over again over the course of the year or so until I get it right. That way, I end up at the quintessential version of what I am looking for. The perfect recipe in my mind. I have successfully done this with Beef Stew, Chili, Roast Chicken and a few other things. whenever I make them it is done the same way because there is no need to mess with it, it's my favorite. Although I do make different "versions" of these dishes I usually go back to the original over and over again.
So, I was very glad to have made my favorite pizza for dinner the other night in the midst of my food rut. It was just the thing to remind me that life is too short to eat food that is so-so, especially when you don't have to. Although sometimes you do have to. Some night I am just plain uninspired and tired. Those are the nights you pull out the white chicken chili recipe, without the chicken, that you hardly have to do anything to and it is a good thing.
This pizza I am going to talk about is a white pie and I love it for a couple reasons. The first being that there is no reason to make pizza dough. Just go to your favorite local pizza place and ask them to sell you 2 dough rounds. Most every place will do this. However, if you do get denied for some reason like, the person behind the counter is new and she doesn't know that they sell it that way...that happened to me once, thanks a lot Dominos! Just go to another pizza place and ask again. Another reason is that it takes no time at all to make. Sure you have to make the flavored oil to brush the pizza with, because you really can taste all that garlic, thyme and red pepper flake ever so slightly in the finished product and it's the thing that elevates this dish to make it so great, but the oil literally takes 2 minutes to prepare. Forgive my never ending run on sentences, will you? Oh, and don't even get me started on on the harmony of the three cheeses used on this pizza. Try to use all three if you can. This last time I made it I only used the mozzarella and the goat cheese, leaving the fontina out. I can't say it was a huge disaster because it still was really, really, good but it wasn't as good as it always has been. There is something about that combination of cheeses that makes magic, I tell you. However, I do have a bone to pick with how much cheese is called for in the recipe. Way too much people! I just eyeball how much cheese to put on. I put enough to cover the pizza thinly, not thickly and it is perfect. I don't even know how you could get all the cheese called for on the pizza. If you did, it would be sickening. Also, just consider yourselves warned that when you pull this pizza out of the oven it will be rather greasy. Fear not! Just blot the top off with paper towels to soak up the oil. I think the clincher in making this pizza restaurant quality is the fresh arugula salad that you put on top of it. It's fresh and light to go along with the heavy. It's a little crisp and cool on the hot slice. It's just, perfect really. the arugula wilts ever so slightly from the heat and lends a slight citrus-y bite to the whole thing that works so well with all the other flavors. Really, if you don't put the arugula on top the whole dish is lost. It loses it's appeal in my opinion. So, needless to say don't be afraid to top your pizza with it. Be careful not to over dress the salad though. The arugula should just be coated, not sopping in the vinaigrette. Seriously, this pizza is like the equivalent of Brad Pitt, if you are into that sort of thing, how wrong can you go?
White Pizza with Arugula
adapted from Barefoot Contessa Back to Basics
2 pizza dough rounds
4 garlic cloves, sliced
5 sprigs fresh thyme
1/4 teaspoon crushed red pepper flakes
Freshly ground pepper
3 cups grated Italian fontina cheese (8 ounces) (I would say more like 1 1/2 cups)
1 1/2 cups grated fresh mozzarella (7 ounces)
11 ounces creamy goat cheese, crumbled (I think a small package will do)
FOR THE SALAD
1/2 cup olive oil
1/4 cup freshly squeezed lemon juice
8 ounces baby arugula
Preheat the oven to 500
Make sure your oven is clean since you will be using it at this high temperature.
Get your pizza dough out of the refrigerator and set it on the counter while you make the garlic oil. Place 1/2 cup olive oil, the garlic, thyme, and red pepper flakes in a small saucepan and bring to a simmer over LOW heat. Cook for 10 minutes, making sure the garlic doesn't burn. Set aside.
Stretch or roll the pizza dough out until it is about the size of medium pizzas. Set the pizza dough on sheet pans lined with parchment paper. When the oil is done, brush the pizzas with it and liberally sprinkle salt and pepper over the top. Sprinkle the pizzas evenly with the fontina, mozzarella, and goat cheese. Drizzle each pizza with about a half a tablespoon more of the garlic oil and bake for 10-15 minutes, until the crusts are crisp and the cheeses begin to brown.
Meanwhile for the vinaigrette, whisk together 1/2 cup of the olive oil, the lemon juice, 1 teaspoon of kosher salt, and 1/2 teaspoon of pepper. When the pizzas are done, place the arugula in a large bowl and toss with just enough lemon vinaigrette to moisten. Place a large mound of arugula on each pizza and spread out so it covers the whole surface. Slice and serve immediately.
These 2 pizzas serve 4-5 people. I finish mine with a tiny bit of sea salt before serving. If you are like me and don't bake both pizzas at the same time, because my oven sucks, just bake one, top with the salad and bake the other while you eat the first one. It's the perfect amount of time so when you are ready for the second one, it's ready for you. Disclaimer: This is the original cookbooks picture, not my own, but it looks just like this.
Subscribe to:
Posts (Atom)