Thursday, February 24, 2011

Cocoa Brownies with Browned Butter and Walnuts

IMG_2538

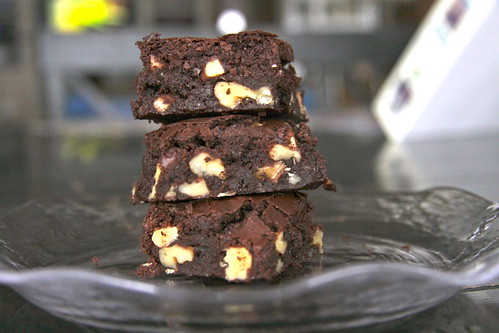
I am still in Arizona soaking up the desert sun. I saw in the extended forecast before I left and saw that it was supposed to rain out there this week. Boo! Let's hope not.

I made these brownies last week on the night I had the girls over to watch "The Bachelor". Upon seeing them, Kel asked if they were the same recipe our friend Caroline had made and posted on facebook a few days earlier. I said that they were and she immediately told me that she had already had these brownies and Caroline had made them for her and her Superbowl party just the night before. Double boo! It didn't stop her from eating them again though.

Caroline is a great baker. It's funny. One day I was over at Kel's when she didn't know me too incredibly well and she mentioned that I should bring some appetizer over to her house for a party she was having. Fair enough. I agreed. Then she added "Caroline will bring the dessert. She always does dessert because she is the best with sweet things." Um....hello? I know Kel was not trying to tell me that because Caroline was good with sweet it must mean that I was not. I was surprised that I had a reaction at all considering I don't have a competitive nature in the slightest. But the fact was that as far as all my friends were concerned, I was the resident baker slash desert person. I have a cake company for goodness sake. I meal plan a dinner party around desert. I found myself remembering a "Desperate Housewife" episode when well known baker Bree Van De Kamp has to shoot down the new neighbor on the block, Catherine when she offers to bring desert to some function they would all be at. Bree lets her know that she always does the desserts and she should just stick to the salad. Catherine defiantly brings desert and war is waged. I always laughed at that episode because I thought it was so arrogant and obnoxious. It is. But all of a sudden I was standing in Kel's kitchen and I was Catherine. Not Bree. And I have always been Bree in the cooking department. It sucks to be Catherine. She's not even on the show anymore...I digress. It's actually great because I love the fact that I have another friend who shares my passion.

Long story short...If both Caroline and I had the good sense to clip this recipe out of Bon Appetit last month and bake it, you should too. :) These brownies are fudgy in the middle and chewy on the outside with a shiny, crackly top. The browned butter adds a rich, nutty flavor.

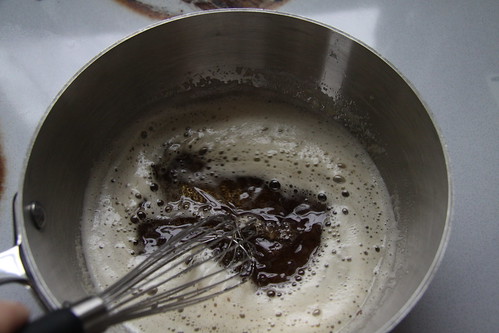
What browned butter looks like:

Browned Butter

Cocoa Brownies with Browned Butter and Walnuts
adapted from Bon Appetit Magazine

makes 9 squares

Nonstick vegetable oil spray
10 tablespoons (1 1/4 sticks) unsalted butter, cut into 1-inch pieces
1 1/4 cups sugar
3/4 cup natural unsweetened cocoa powder (spooned into cup to measure, then leveled)
1 teaspoon vanilla extract
2 large eggs, chilled
1/3 cup plus 1 tablespoon unbleached all purpose flour
1 cup walnut pieces

Position rack in bottom third of oven; preheat to 325 degrees. Line 8x8x2-inch metal baking pan with foil or wax paper, pressing firmly against the pan sides and leaving a 2-inch overhang (This is so you can remove the brownies from the pan after baking to get even slices. If you don't care about that, you can skip this step). Coat foil or pan with nonstick spray. Melt butter in a medium saucepan over medium heat. Continue cooking until butter stops foaming and browned bits form at the bottom of pan, stirring often, about 5 minutes. Remove from heat; immediately add sugar, cocoa, 2 teaspoons water, vanilla, and 1/4 teaspoon (generous) salt. Stir to blend. Let cool 5 minutes (mixture will still be hot). Add eggs to hot mixture 1 at a time, beating vigorously to blend after each addition. When mixture looks thick and shiny, add flour and stir until blended. beat vigorously 60 strokes. Stir in nuts. Transfer batter to prepared pan.

Bake brownies until toothpick inserted into center comes out almost clean (with a few moist crumbs attached), about 25 minutes. I needed to bake mine longer, about 35 minutes. Cool in pan on rack. Using foil or wax paper overhang, lift brownies from pan. Cut into 3 strips.Cut each strip crosswise into 3 brownies.

Can be made 2 days ahead. Store in airtight container at room temperature.


Monday, February 21, 2011

Spaghetti with Swiss Chard, Onions, Kalamata Olives and Pecorino Cheese

Spaghetti with Swiss Chard, Onions, Kalamata Olives, and Pecorino
Spaghetti with Swiss Chard, Onions, Kalamata Olives and Pecorino

I fear I am becoming notorious for the long named recipes.

I am currently in Arizona for a week with the family in the sun. It's blues break around here and my sweet friend Melissa invited us to go with them to her parents second house in Tuscon. They have a pool. I am in heaven.

I am leaving you with this delicious and fresh pasta dish while I am gone. I made it last week for Jeremy's sister and brother in law, Charis and Andrew. Andrew said it tasted like real Italian food and reminded him of what he ate while visiting the country.

This is a mild pasta. It is subtle, allowing all the different flavors of the onions, tomatoes, chard and garlic be unmasked and not weighed down by a heavy sauce. The background flavor comes from the addition of white wine and it compliments the rest of the dish beautifully. Everyones favorite part though, were the toppings of salty olives, toasted pine nuts and a sprinkling of pecorino. It gives the whole thing a ta-da factor.

Spaghetti with Swiss Chard, Onions, Kalamata Olives and Pecorino
adapted from Everyday Italian with Giada De Laurentiis

serves 6

1 tablespoon olive oil
2 onions, thinly sliced
2 bunches Swiss chard, trimmed and chopped (about 10 cups)
6 garlic cloves, minced
2 (14-ounce) cans diced tomatoes with juices
1/2 cup dry white wine
1/2 teaspoon dried crushed red pepper flakes
Salt and pepper
1 lb. whole wheat spaghetti
1/2 cup pitted kalamata olives, coarsely chopped (I used more)
4-5 tablespoons freshly grated Pecorino cheese
1/4 cup toasted pine nuts

Heat the oil in a heavy large frying pan over medium heat. Add the onions and saute until tender, about 8 minutes. Add the chard and saute until it wilts, about 2 minutes. Add the garlic and saute until fragrant, about 1 minute. Season liberally with salt and pepper. Stir in the tomatoes with their juices, wine, and red pepper flakes. Bring to a simmer. Cover and simmer until the tomatoes begin to break down and the chard is very ender, stirring occasionally, about5 minutes. Taste the mixture and season again with salt if needed. Salt will bring out the flavor of everything else.

Meanwhile, bring a large pot of salted water to a boil. Add the spaghetti and cook until tender but still firm to the bite, stirring frequently, about 8 to 10 minutes. Drain the spaghetti. Add the spaghetti to the chard mixture and toss to combine.

Transfer pasta to serving bowls and sprinkle with olives, cheese and toasted pine nuts and serve.

If you are not familiar with swiss chard you can use fresh baby spinach instead. Just buy the biggest container you can find and use that since both chard and spinach wilt down to practically nothing. Feel free to play around with this recipe. Add more wine, more cheese, more red pepper flake. This is just the way I like it but you can adapt it to your taste and make it your own.

Thursday, February 17, 2011

Vanilla Rum Cola and A Girls Trip

Vanilla Rum Cola

This past weekend I partook in a girls trip to Denver. I went with four other ladies. One of whom I know extremely well, one of whom I know pretty well, one of whom I know slightly well and one I didn't really know at all. So it was, Danielle, Kel, Rebecca, me and Caroline set out in a minivan at 7:40 am, bound for great Asian food which would be our first necessary stop in the city. We got to the restaurant around noon. It looked like a straight up run down shanty in a random house on the corner in not such a great neighborhood. First lesson? Don't judge. The inside was quite nice, the food was excellent and our waiter was funny. When Kel indicated she didn't want egg drop or hot and sour soup with her lunch the waiter abruptly yelled "no soup for you!" just like "The Soup Nazi" episode of "Seinfeld." Classic. We were starting out well.

After lunch we set out for some shopping. Danielle needed to go Victorias Secret which was quickly dubbed "Vicky C's". Really, it should have been "Vicky S's" but whatev-. Then it was "Anthro" (Anthropology) Jcrew for me and Rebecca, Gap, Forever 21 for Kel, Orange Julius, Wetzel Pretzel and various other stops in between. By 6pm we were all done and wondering what we should do for dinner. We called-no joke-about twelve restaurants and no one had a reservation available for us until like 9:30pm! I was appalled. I'm an eat dinner at 5:30 sort of girl but It turned out alright because by the time we left we had just enough time to get to our hotel, get ready and get to the restaurant in time. The restaurant was a trendy tapas place called "The 9th Door". It was super cool with fantastic food, loud spanish music, and house made sangria. We might have bought a pitcher of it. It was a lot of fun but towards the end the music got so overwhelmingly loud that we had to yell at one another and read lips to understand what we were saying across the table. But that was no big thing. We got along just fine. You don't need to talk much when you are too busy laughing from the girls demonstrating their husbands lame but very endearing go-to dance moves, all the while hatching a plan on how to go about getting them to do said dance moves in public, so we could all see, and laugh, at them. Brian and Nick beware...We will live to see your bunny hops and booty shakes. I can say that because neither Brian or Nick read my blog. :)

After dinner we went clubbing. Now, this is interesting. Caroline, is the girl I slightly know (from church no less), and she is a very proper, polite, ladylike person. I thought I had a pretty good idea of who she was, from church functions and what not. I was both right and wrong. Caroline is indeed all things mentioned above. I found out on this trip though, that she is also someone who, on occasion, likes to flip that good girl switch and don short pink dresses with tall black boots and dance like a wild woman into the wee hours of the morning. Second lesson? Don't judge. My idea of a great evening out, maybe involves the theatre coupled with a long dinner and wine, then room service and dessert back at the hotel, and bed by 11pm. The very idea of clubbing scares me. I always have this super shady picture in my head of nasty drunk guys obnoxiously hitting on half naked girls wearing way too much make-up and dancing on tables in a crazy crowded, dark, flashing neon-light atmosphere that smells of cigarettes and nasty, salty sweat. Oh wait...that's not just the picture in my head, that IS what its like. The second place we went to was exactly like that. We didn't stay too long. Stay tuned for that. The first place was a mojito bar. We sat in the back with like twelve Asians. Kel loves Asians and Caroline is Asian so I'm sure they felt right at home. It was a bit awkward for me at first because all seventeen of us were sitting there in a semi circle just looking at each other. But the music eventually got the best of everyone and before you know it Kel was up on her feet dancing with more enthusiasm and confidence than I had ever seen anyone dance before. At one point she was on the table dancing with reckless abandon and quickly told to get down by a guard. Tisk-tisk. Ha ha, and she doesn't even drink! Caroline and Rebecca joined the dance train while Danielle and I stayed seated just watching. Then, all the Asians joined, Danielle got up and it was a massive dance party. I stayed behind a bit. I wasn't feeling the music. Finally, "Dynomite" got me on my feet. Not long after, they started playing this weird hybrid techno stuff mixed with what sounded just like the strange flute music the boyfriend in the movie "Serendipity" plays. We all tried to figure out that actors name. It's the same guy from "My Big Fat Greek Wedding". We knew his first name was John, but the last name perplexed me all weekend. It's Corbitt, girls. John Corbitt. As in, Bo Derek's boyfriend. Thanks goodness for Google!

"Clubbing at the Mojito Bar" From left: Danielle, Kel, Rebecca, Me and Caroline
Denver girls trip

We ended up leaving the first place and headed out to find another. We chose the second place based on the recommendation of a random drunk girl on the street who told us we had to check it out because it was, and I quote "real classy like Vegas". Third lesson? Don't judge? We didn't and we went. My above description of what I imagine clubbing to look like defined that place to a tee. Reeeeeeel Klassy! I'm not saying it wasn't fun. On the contrary, it was incredibly scandelous and amusing. When we left, the bouncer sealed the impression of class with his lovely parting wishes to Danielle, who was the last one out, with a (and you have to ready this is a very monotone, tired, unenthusiastic, all in one breath fashion) "goodbye. yourbeautifulhaveagoodnight". Ah, yes, Danielle felt really, super, duper special. :)

Girls weekends are essential. It was great to break routine and get away. Looking back on it, we made some downright funny memories and I am very grateful for the experience. The times you branch out and do things you wouldn't normally do are always the best in retrospect. Things I learned about people this weekend: Don't call Rebecca "Reba". Kel would like to be called either "sweet cheeks" or "sham-sham". Kel does not sleep in or share double beds (nether do I). Caroline has a wild side, but still looks like a lady while displaying it. Rebecca wears purple suede boots and they suit her perfectly. The things people learned about me: I love to handle (er, I might have used the word "fondle") naked whole chickens and more importantly, this mostly vegetarian girl can rally and eat a smashburger with everyone else, if need be. I learned nothing about Danielle as we are besties and I know most everything already. Like, when we went to bed and I made Danielle shut the door that joined our two rooms together, thus segregating she and I in our room and Rebecca, Kel and Caroline in theirs. I knew, as we were drifting off and heard laughing coming from the other room that Danielle lay in her lonely bed wondering and hating that she might be missing out on something. She thanked me though, when morning rolled around and Kel was up, tromping though the other room at the crack of dawn and we were not awoken. Yes, because I know her well enough to know that sleep trumps most everything when it's needed.

Vanilla Rum Cola

This post is done and I haven't even mentioned the vanilla rum colas. Oops. Sometimes I sit down to write and I have no idea what is going to come out. So, you now have a run down of my weekend and a completely random but yummy cocktail recipe. I tore the recipe out for this like two years ago and have been waiting to make it ever since. See, I drink soda hardly ever but I have always liked spiced rum with coke and thought the addition of vanilla and citrus sounded like just the thing to entice me to drink it. However, no one I know drinks rum and coke so it has just been sitting in my recipe file unused. Then, my rum and coke drinking Sister-in-law came into town this week. Eureka! I jumped at the chance to make this. It tasted divine.

Vanilla Rum Colas
adapted from Martha Stewart
serves 6

  • Small ice cubes
  • 3 cups cola
  • 1 cup plus 2 tablespoons dark rum
  • 3/4 teaspoon pure vanilla extract
  • 6 orange wedges or 4 sliced kumquats

Directions

  1. For each drink, fill a glass 3/4 full with ice. Add 1/2 cup cola, 3 tablespoons rum, and 1/8 teaspoon vanilla. Squeeze orange or kumquats into drink, and stir.

Monday, February 14, 2011

Pineapple Upside Down Cake

Pineapple Upside Down Cake

Every baker has those times when you make something simple and yet achieve greatness. Enter this insane, off-the-hook-never-try-another-recipe-again pineapple upside down cake. Yes, it was so perfect that I will toot it's horn like that because it deserves every second of the glory. This cake is downright delicious with all the brown sugar caramel goodness nestled around fresh sweet pineapple pieces atop golden, moist cake. This is it folks. Serve this warm with a scoop of vanilla ice cream and you will be a certified kitchen rock star.

Pineapple Upside Down Cake

Pineapple upside down was not something I grew up eating. Most versions have canned, rubbery pineapple with maraschino cherries dotted all over the top. Sometimes they are dry and don't have much flavor. It reminds me of yellow wall paper, vinyl chairs and jello molds. It kind of freaks me out. I don't know why. This version though, is all class. You use fresh pineapple, first of all, which improves the flavor and texture ten fold. Then you make the caramel sauce, which takes 5 minutes and tastes like heaven. Then the cake you spoon on top of the whole she bang is thick, and flavored with fresh pineapple juice and rum. Once baked, the crumb of this thing is perfect. I might be overusing the word "perfect" but I don't care. This is my new favorite dessert!

I didn't have pineapple juice on hand but I did have a can of crushed pineapple, so I ended up straining the liquid from the can and using that. It worked great. This recipe originally came from Smittenkitchen.com. I love that site.

Pineapple Upside-Down Cake
Adapted from
Gourmet, February 2000

Topping:

1/2 medium pineapple, peeled, quartered lengthwise, and cored
3/4 stick unsalted butter
3/4 cup packed light brown sugar

Batter:
1 1/2 cups all-purpose flour
2 teaspoons baking powder
1/4 teaspoon salt
3/4 stick unsalted butter, softened
1 cup granulated sugar
2 large eggs
1 teaspoon vanilla
1 tablespoon dark rum
1/2 cup unsweetened pineapple juice
2 tablespoons dark rum for sprinkling over cake

Special equipment: A well-seasoned 10-inch cast-iron skillet. If you lack a cast-iron skillet of this size, make the caramel in a small pot and scrape it into the bottom of a similarly-sized cake pan. (I used a 9″ cake pan in the pictures above.)

Preheat oven to 350°F.

Make topping:

Cut pineapple crosswise into 3/8-inch-thick pieces. Melt butter in skillet. Add brown sugar and simmer over moderate heat, stirring, four minutes. Remove from heat. Arrange pineapple on top of sugar mixture in concentric circles, overlapping pieces slightly.

Make batter:

Sift together flour, baking powder, and salt. Beat butter in a large bowl with an electric mixer until light and fluffy, then gradually beat in granulated sugar. Add eggs, one at a time, beating well after each addition. Beat in vanilla and rum. Add half of flour mixture and beat on low speed just until blended. Beat in pineapple juice, then add remaining flour mixture, beating just until blended. (Batter may appear slightly curdled.)

Spoon batter over pineapple topping and spread evenly. Bake cake in middle of oven until golden and a tester comes out clean, about 40-45 minutes. Let cake stand in skillet five minutes. Invert a plate over skillet and invert cake onto plate (keeping plate and skillet firmly pressed together). Replace any pineapple stuck to bottom of skillet. Sprinkle rum over cake and cool on plate on a rack.

Serve cake just warm or at room temperature.

Do ahead: Cake may be made one day ahead and chilled, covered. Bring to room temperature before serving.

I used the rum that is called for in the cake but did not sprinkle the rest over the top since little kids were going to be eating this as well as adults.

Friday, February 11, 2011

Papa al Pomodoro

Papa al Pomodoro

This soup is a regular around here. I saw Rachael Ray make this on one of her 30 minute meals shows and I couldn't stop thinking about it. Largely, because it was really different from what I was used to. See, you put a bunch of cubed bread right into the soup to thicken it up at the end. Bread and soup, hmmm. I don't know how I felt about that at first. What sold me was that it was authentically Italian and a little old man in Italy taught Rachel how to make it. It's a simple, flavorful tomato based soup with a few white beans and onions. You add the bread in at the end and it soaks up all the juices and becomes one with the rest of the concoction. It is a beautiful, filling soup and will most likely become a regular in your house too.

Papa al Pomodoro

The old man from Italy was absolutely insistent on one thing. You have to top this soup with parmesan cheese, fresh basil raw onions, and a drizzle of fruity olive oil or it is not authentic. He made his point alright since Rachael reminds us of this like 40 times during the 30 minute show. It really does make this soup special. The old man says that if you don't have all the correct toppings, don't bother making the soup. I will say, this soup is tasty on it's own but I agree with Italy. Get the toppings right. It does make a huge difference.

Papa al Pomodoro

I am blogging about soup because in Steamboat it is about 10 degrees (-20 the other morning, and -40 last week) and we just got 2 feet of fresh snow. It's chilly. If you live in sunny Florida or California where it's currently 75 degrees and soup isn't really on your radar, I'm sorry I have nothing to offer you. You have the sun. You can grill in your tank tops and flip-flops. Just writing that sentence makes me mad. :) The rest of the country which is snow bound will embrace this recipe with open arms, I'm sure. By the way, I know the weather in California because my Dad, who is a southern Cali resident, called me during the Superbowl to ask me what the weather was like in Steamboat. I said it was freezing and snowing. He was like "Oh, man, I'm sweating like a pig out here, it's 80 degrees in the valley!" Bastard. Then, it dawns on me and I ask "Dad, why are you calling me right now? Aren't you watching the Superbowl?" He replies, very seriously and dismayed, I might add "Krysta! Both teams...BOTH teams don't have cheerleaders! That's why I watch!" Bastard. Ha ha, you would have to know my dad to still love him. He's the kind of guy that can get away with comments like that. On to soup...

Papa al Pomodoro
adapted from Rachael Ray's 30 Minute Meals, Food Network
serves 4

3 tablespoons extra-virgin olive oil, plus some for drizzling
6 cloves garlic, chopped
1 medium to large onion, finely chopped
1 (15-ounce) can diced tomatoes
1 (28-ounce) can crushed tomatoes
salt and pepper
1 quart chicken stock
4 cups, about 1/2 pound, chopped or torn stale bread (mine isn't ever stale, oops)
2 (15-ounce) cans small white beans, such as Goya brand (smaller than cannellini)
1/2 cup grated Parmigiano-Reggiano, to pass at table
10-12 fresh basil leaves, torn

Heat a medium soup pot over medium heat. Add 3 tablespoons extra-virgin olive oil, garlic and 3/4 of the onion. Save the rest of the onion for topping. Cook 7 to 8 minutes, then add tomatoes and crushed tomatoes and season generously with salt and pepper (salt will bring all the flavor out). Add stock and raise heat to make the soup bubble. Reduce heat to simmer and add bread and beans. Stir soup as it simmers until it thickens to a stew-like consistency. Turn off heat, adjust seasonings and ladle into shallow bowls. Top with grated cheese, an additional drizzle of extra-virgin olive oil, basil and a spoonful of the reserved finely chopped onion.

I'd like to take this space to remind you again, a la Italian guy, of the importance of using all the toppings. If you don't have the basil, that's about the only topping you can safely omit unless you are me and love, love, love basil.

Tuesday, February 8, 2011

Spinach Artichoke Dip Throwdown

Spinach Artichoke Dip

My Friend Kel casually mentioned that she makes really great spinach artichoke dip. I sort of snorted and said something like "no, no, no, let me just tell you, I make the BEST spinach artichoke dip around." I guess I'm a pompous bitch sometimes. It didn't seem like it at the time but now that I write it, man, who do I think I am anyway? Anywho, she continued to tell me that hers really was fabulous and that it had lots of stuff going on in it. Mine is pretty basic but has been a family standby for years. I remember my Aunt Kellie making it often for family events to rave reviews. The same recipe is the one I use today except I add spinach (hers was strictly artichoke dip). It's the best I've ever tasted. It's the best anyone I know has ever tasted. A new, local wine bar at the base of the mountain called "The Vintage" is going to feature my recipe for this dip on their menu. Let's just say, I'm confident. I can be graceful and humble another time when somebody claims to make the best such and such (usually, in my experience, when people make that claim, they are right. ) but not this time. Not when spinach artichoke dip is on the line. The thing was...Kel seemed pretty confident too. She named a few ingredients she uses that I don't, so I thought it would be different. I quickly shut her down and told her not to tell me what was in it because I shouldn't know since I was going to challenge her to a throw down. Ha, ha. She was all for it. It would be fun.

Spinach Artichoke Dip

After she accepted, I said "maybe we shouldn't have a throw down because then someone will have to lose and that would be sad." She didn't seem to care. Neither did I. The worst that could happen is her dip would win and I would know a superior way of making it. I'm not really competitive by nature and I can admit defeat. I just talk a big talk.

The contenders:
IMG_2554

The judge, Danielle:
IMG_2556

Tasting:
IMG_2558

This is my recipe:

Baked Spinach Artichoke Dip
serves 8

1 14-ounce can of quartered artichokes (not marinated)
2 cups sour cream
2 cups grated parmesan cheese (the kind in the green cylinder can is OK for this)
4 cloves garlic, minced
fresh squeezed lemon juice (a couple tablespoons)
1 10-ounce package of frozen spinach, defrosted
paprika for sprinkling

Preheat the oven to 325 degrees

Chop the quartered artichoke hearts up a bit more to make smaller pieces. Toss all the ingredients together and thoroughly mix. Spoon dip into a 8x8 inch glass baking dish and smooth the surface. Sprinkle the top with paprika and bake until heated through, about 30 minutes. Serve immediately with fresh bread for dipping.

To make artichoke dip, use two cans of artichoke hearts and omit the spinach altogether.

I am writing this portion of the post after the "big throw down", which was made up of me, Kel and Danielle as we were getting ready to watch The Bachelor. I don't want to hear about this. Yes, I watch The Bachelor. I refused to watch it for years but the first episode caught me off guard and I got sucked in.

Danielle tied her scarf around her head and Kel had her taste one of the dips picked at random, which was mine. Danielle said it was "fluffy". Next she tried Kel's dip. She said it had a stronger spinach flavor. We decided it had to have just been the bite since she had as much spinach in hers as I did.

When we got down to it, we used most of the same ingredients, except she uses mayonnaise and cream cheese for her base and I used sour cream. I was going to post Kel's recipe too but she uses the Kraft recipe subbing garlic powder for real garlic and adding 4 oz cream cheese, so you can easily look it up online. In the end, Danielle declared a tie and we all laughed because the dips tasted almost the same. No wonder we both thought we made the best dip...we do!

Friday, February 4, 2011

The Ultimate Omelette

Photobucket

Yes, it's true. This is, in fact, the ultimate omelette. I have been making this thing for a few years now to rave reviews every time. There are a few secrets to making the perfect omelette. The first secret is using heavy cream. Most people will make an omelette using milk but it just doesn't have the fat to make a proper custard. Real omelette's, like the ones you imagine you'd get in a little French bistro are more custard than they are egg. Don't get me wrong, it won't be like you are eating pastry cream. This is a real omelette but it will be rich, tender and fluffy and a notch up from what us Americans are used to.

Photobucket

The second secret is using clarified butter (this is a process of melting butter and removing the solids. The clear/yellow stuff that is left behind has a higher burn temperature so your omelette will not brown). I have to admit, if I'm just making this for 1 or 2 people I usually skip this step (my eggs have never browned) but I do think it makes a difference for texture. The times I have used clarified butter, my omelette will fold on top of itself without loosing it's shape. The times I have not, it will not fold without breaking (It tastes just as yummy and looks just as pretty open face, like in the picture, so I don't care much). If you are really trying to perfect the art of making a great omelette, clarify your butter. If you are just making it for fun, don't. You won't taste the difference.

Photobucket

The third secret is once you have poured your well-beaten eggs in the pan you must keep them moving. Immediately start to "beat" them with a rubber spatula almost as if you were making scrambled eggs. Try not to let any of the eggs stay at the bottom of the pan for too long. Once the eggs have started to set up, meaning, you can't very well move the eggs around the pan without getting a few bald spots, immediately, settle the remaining unset eggs to make as even a layer as you can get and stick the pan in the oven to finish off. The last secret is to finish the omelette in the oven, but I've already told you that, so....The heat of the oven will be even and your omelette will puff and be beautiful in no time. Don't over cook. That is the only way to mess this perfect creation up.

Photobucket

The recipe originally serves 6 and uses 18 eggs for 3 eggs a person. I cut the recipe in half because 9 eggs sounds a lot less intimidating than 18. This will feed 3 people. The only problem is, I get annoyed that I don't know EXACTLY how many eggs to put in my pan. I have a hard time dividing something into three in my head (since all 9 are scrambled together in one bowl) so sometimes I do the math and scramble 3 eggs at a time, which is one serving, with appropriate measurements of cream. Maybe you are not as anal as I am. You can do whatever you want.

Don't skimp on the butter. Just don't. You need the fat in the pan or it won't turn out right. Also, you do need a small (9-inch) non-stick omelette pan for this in order to make individual omelettes. If all you have is a big non-stick pan, just put all the butter in, along with all the eggs and cook the same way. When it comes time for serving, just cut 3 wedges like a pizza.

The Ultimate Omelette
adapted from Tyler's Ultimate on Food Network

serves 3

3/4 stick butter (6 tablespoons)
9 eggs (3 per person)
1/4 cup heavy cream, plus 2 tablespoons
fresh herbs (chives, parsley, rosemary) in any combination, for topping
sea salt
freshly ground pepper

Special equipment: 1 (9 inch) non-stick pan

Preheat oven to 450 degrees. To clarify butter, put it in a small pot over low heat and slowly bring to a simmer. Cook over low heat until butter separates. when the milk solids fall to the bottom and the golden butter-fat rises to the surface remove from heat. Set aside.

Crack the eggs into a medium mixing bowl and pour in cream. Whisk until well incorporated and foamy. This is a job for a whisk, not a fork.

Preheat the pan over medium heat. When the pan is heated, add 2-3 tablespoons of clarified butter. (yes...2-3) Turn the heat down slightly. Using a ladle, add 1/3 of the eggs to your pan. Eyeball it. Using a rubber spatula, start stirring quickly. This is to heat the eggs through so they set like a custard. Keep swirling them around so the edges aren't in one spot too long.

Once the eggs begin to set, stop stirring. Put the pan in the oven and cook for 1 to 1 1/2 minutes. When you remove the omelette from the oven it should still have a soft custard touch.

Sprinkle with chopped herbs, sea salt and cracked pepper.

If making individual omeletts, use a glove to hold the handle, tip the pan sideways and roll the omelette onto a plate with a spatula. It should fold over onto itself.

Thanks to my friend Kel for taking these pictures of me cooking!

Tuesday, February 1, 2011

Vanilla Bean Cheesecake with Chocolate Ganache

vanilla bean cheesecake with chocolate ganache

I was in a melancholy mood the other day. I didn't feel like doing much of anything because I had been so busy in previous days and I was tired, yet, was committed to making this cheesecake for an event. It had to be done. So, I had two choices. I could either buck up, put my big girl panties on and get it done with a "can do" attitude or I could wallow in self pity. While the first choice would have been taking the high road, I was just too tuckered out for it. I chose to wallow on purpose. I turned my itunes on and downloaded a few dramatically appropriate songs. Then I went about making the cheesecake while blasting some oldies. Namely, "It's my party and I'll cry if I want to", "You don't own me" and finally "Are you lonesome tonight". I was feeling pretty soothed between the music and the heavenly aroma from scraping fresh vanilla beans into the creamy, thick batter. Since Elvis was on, I decided to search for some more of his songs. I guess you could say I was feeling it. "All shook up" started playing and all I could think of was that scene from "Look Who's Talking" where John Travolta is dancing around the baby gym to the song. It made me happy. John Travolta has that effect on me. Especially John from 1991. "Hound dog" started up and they play that song in the dance scene in "Grease", so I had another lovely Travolta moment. Before you know it, the cheesecake was in the oven and I was singing "Viva Las Vegas" at the top of my lungs, alone in my kitchen. It would do you well to knock before entering my house. This is a rather normal scene here, although the songs vary. By the end of it, I had knocked that melancholy mood out on it's butt. Ah, the power of music.

vanilla bean cheesecake

I saw this cheesecake in a special publications magazine a few months back and have wanted to make it ever since. I'm glad I did. It was really good. I'm not a huge cheesecake fan because I find it to be boring most times. There is a lot of bad cheesecake out there. This cheesecake was anything but. It had personality and originality galore. The filling was creamy and slightly tangy and perfumed with all those specks of vanilla bean. It really makes a difference when you use an actual vanilla bean to flavor things as opposed to extract. It's more intoxicating, more delicate yet more pronounced at the same time. I buy mine wholesale and pay way less then you would in the grocery store. You can find them on amazon in packages of about 10-15 beans and they keep forever as long as they are sealed properly.

Vanilla bean cheesecake

The chocolate ganache that goes on top of this is the perfect sweet compliment and balances the flavor of the filling very well. The only thing I would say to be aware of is, make sure you top this cheesecake with the ganache right before serving it. The chocolate sets up right away and if you refrigerate it, it becomes very hard and difficult to cut. The next time I make this I think I'll use a different chocolate ganache recipe. One with a larger ratio of liquid to chocolate so that I can safely refrigerate the whole thing, assembled without the risk of the chocolate setting up hard as a rock. If you make this and try another ganache, let me know what you did. This ganache is a bit out of the ordinary in that it uses chocolate and sweetened condensed milk. Most ganache is chocolate and cream. Either will work. When making this particular ganache, it might be grainy or slightly thick and lumpy when melted together. Just whisk it to smooth it out all the way so it is spreadable. Make sure to start this cheesecake the day before you need it as it will need to sit in the refrigerator overnight (without the ganache).

vanilla bean cheesecake with chocolate ganache

Vanilla Bean Cheesecake with Chocolate Ganache
adapted from Jenn Tidwell from MixingBowl.com, A Better Homes and Gardens Publication

serves 12

2 cups finely crushed chocolate teddy grams (I do this in a food processor)
zest from one orange (optional)
1/2 cup unsalted butter, melted
2 8-ounce packages cream cheese, softened
3 eggs
1 cup sugar
2 cups sour cream
1 vanilla bean, split lengthwise and seeds scraped
1 cup semisweet chocolate chips
1/2 cup sweetened condensed milk

Preheat oven to 325 degrees. For the crust, in a medium bowl, combine crushed teddy grams and orange zest. Stir in melted butter and stir to combine. Press the crumb mixture onto bottom and up sides of the prepared pan. Bake in the oven for 10-12 minutes and set aside to cool.

For the filling, in a large mixing bowl, beat cream cheese with an electric mixer on medium speed until smooth. Add eggs, one at a time, beating until combined after each addition. gradually add sugar, beating until filling is creamy. Beat in sour cream and vanilla bean seeds. Scrape sides of bowl throughout mixing to prevent any lumps, but do not over-beat.

Pour filling into cooled crust; use a spatula to smooth the top. Place in a large roasting pan. Carefully pour enough boiling water into roasting pan to reach one-fourth of the way up the sides of the springform pan. Bake 1 hour. Turn off oven; leave cheesecake in the oven for 1 more hour with the oven door shut or until cheesecake jiggles slightly. Remove cheesecake from the roasting pan to wire rack. Using a small sharp knife, loosen the crust from pan sides. Cool for 1 hour. Chill, loosely covered for at least 5 hours or preferably, overnight.

Prepare ganache up to an hour before serving. In a small saucepan, combine the chocolate chips and sweetened condensed milk. Cook and stir over low heat until smooth. Beat with a whisk if needed. Spread evenly over cheesecake. Let it sit until set, about 5-10 minutes before cutting. Once ganache is put on do not refrigerate the cheesecake again. (You can, but the chocolate will get very hard. If you use another, looser ganache recipe you can refrigerate the cheesecake because it will not harden up as much)

I had parchment paper lining my cheesecake pan because I needed to transport this and didn't want to leave my pan base. If you line your pan you can slide the cake off of the parchment and set the whole thing in a box to take somewhere else and don't have to worry about losing the base. When you go to cut the cheesecake, make one cut and then wipe your knife off with a paper towel. Repeat until the whole cheesecake is cut. This way you will get clean slices.