Monday, October 31, 2011

Muffin Pan Tacos (vegetarian) and A Halloween Sneak Peak

Muffin Pan Tacos

Hey all, I told you I'd try the muffin pan tacos and if they were a success, I'd blog about them. I think you can figure out what happened. I made a few changes from the original recipe. First, I swapped the regular tortillas for Ezekiel ones. Ezekiel tortillas are really, really good if you fry until crisp, or in this case, bake them. In fact, we have several friends who eat them over regular tortillas because they think they taste better. We agree. They can take the place of anything but a soft taco. Truth be told, they are only great when prepared crunchy. They are also way healthier for you because they're made from sprouted grains which means when eaten, the body can assimilate the nutrients easily and the fiber-rich carbohydrates are converted more slowly, which means a lesser spike in blood sugar requiring less insulin to balance and therefore less fat storage of excess sugars. Or in other words, they are better for your waistline. Find them at any health food store or in the freezer section of some grocery stores.

Muffin Pan Tacos
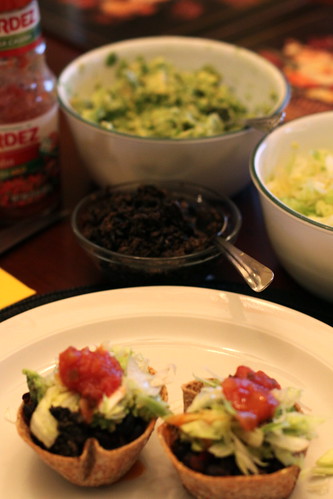
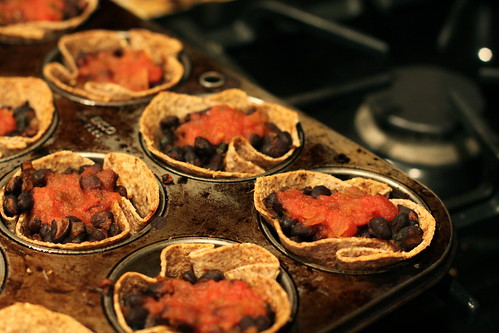
excuse the grease stained muffin pan

The other changes included getting rid of the meat and replacing it with a well seasoned black bean filling (I actually stole the recipe from a black bean taquito) and omitting the cheese. So actually these are vegan. I love cheese as much as the next girl but there is so much flavor going on in this dish you don't really need it and I'd rather save my calories (and...I'm still on my cleanse). However, if you can't imagine a taco without cheese by all means, just top the black bean filling with a pinch or two of cheddar and bake as directed.

Muffin Pan Tacos

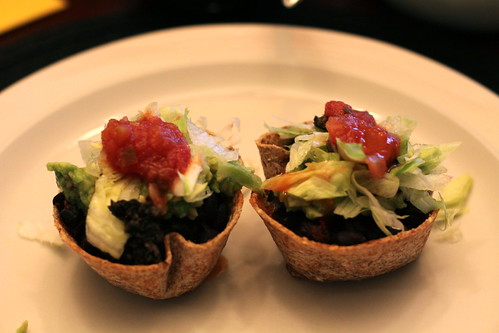
You can pick these up and eat them with your hand, but after I snapped the glamour shot above, I assaulted that taco with an onslaught of shredded lettuce, guacamole, black olives, cilantro, more salsa and hot sauce. I was kind of like a salad, but not really. It was much too delicious to be a salad. More like cheese-less nachos with tons of fresh crisp ingredients on each bite. Yummy, yummy in your tummy.

A mango salsa would be great with these as well. Mangos and black beans are perfect together even with all the other toppings.

Also, here's a sneak peak of Halloween tonight. Our neighborhood had a trick or treat on Saturday and all the kids dressed up and went door to door. This is different for them because our town celebrates Halloween down town. All the businesses hand out candy and that's where everyone gathers. It's really fun and a mad house down there!

IMG_6638
Isabella as Elizabeth Swan from "Pirates Of The Caribbean" and Olivia as a flower fairy

IMG_6637
Jeremiah as a dinosaur and his friend Will as Spider man

We are not dressing up this year :( we didn't have a party to go to or anything so it's all about the kids. But I'll leave you with pic's from two of my favorite Halloweens:
Sept-Oct 2008 199
What's a 7 months pregnant woman supposed to be? Juno!! I loved this.

Halloween 2007 004
This was a huge Halloween party we had at Mambo Italiano after we bought the restaurant. So much fun! I was Sleeping Beauty and Jeremy was the Prince.

Halloween 2007 001

Muffin Pan Tacos
adapted from naturallyella.com and doyouknowthemuffinpan.com
makes 12 muffin cups- serves 3-4

FOR THE MUFFIN PAN TACOS:
1 medium yellow onion, chopped
2 cloves garlic, chopped
1/2 to 1 small jalapeno, seeded and diced (1/2 will not be spicy)
2 tablespoons olive oil
1 teaspoon paprika
1/2 teaspoon cumin
1/4 teaspoon cayenne pepper (optional)
1 teaspoon kosher salt
2 cans black beans, drained
a big handful of chopped cilantro (about 1/4 cup chopped)
12 Ezekiel tortillas or flour tortillas
Herdez mild tomato salsa

FOR ASSEMBLY AND TOPPING:
Shredded Iceburg lettuce, for topping (about 3 cups)
Cholula hot sauce
2 handfuls cilantro, chopped
sour cream (optional: for non-vegan only)
Pam spray, for muffin tins
Guacamole (recipe follows- or store bought)

FOR QUICK GUACAMOLE:
6 ripe avocados
1/2 teaspoon garlic salt
1/2 a lemon

Preheat oven to 350 degrees.

In a pan, heat olive oil over medium heat. Saute onion and jalapeno pepper until onion becomes translucent and starts to brown. Stir in garlic, cumin, paprika, salt, and continue to cook for 1-2 more minutes. Add in black beans and cilantro, cooking until beans are heated through-two to three minutes more. Turn off heat and set aside until ready to use.

Cut 4-inch diameter circles out of the tortillas. The easiest way is to use a standard margarita glass as your guide and cut around with either kitchen shears or a pizza cutter. Save leftovers to make chips some other time. Wrap tortilla circles 3 or 4 at a time in a barely damp paper towel and microwave for 30 seconds to soften. mold the circles into a lightly greased muffin tin. Spoon the black bean mixture evenly between the cups, then top with 1 teaspoon of salsa each. Bake for 20 minutes.

While the bean cups are baking, shred your lettuce, then chop avocados and ix with the lemon and garlic salt to make a quick guacamole. Taste and add more salt or lemon if needed.

When muffin cups are done just pop them out and top with your favorite toppings.

Happy Halloween Everyone!
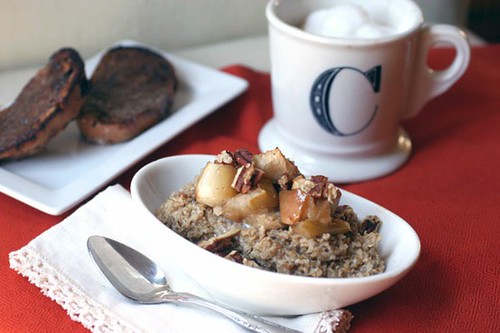
Thursday, October 27, 2011

Calming Fresh Ginger-Mint Tea

Fresh Ginger-Mint Tea

Sometime ago I was watching "The Doctor Oz" show with Jeremy (I had taped it for some reason?) It was all about antioxidants and overall health (oh, that's why we taped it). There was one segment where he was talking about ginger tea being really great for you. Fresh ginger aids nausea, digestive problems, circulation and arthritis. It also has been known to calm an upset stomach as well as stomach cramps. It also supports a healthy cardiovascular system. However, I think Dr. Oz was focused on the antioxidants in ginger. It's a little known fact that spices such as ginger have far greater concentrations of antioxidants that any common fruit or vegetable source. Spices also contain an especially wide variety of antioxidants (did you know some antioxidants help protect the body from things like cancer, while others help more once it's already developed? That why its good to eat a wide variety of foods) making ginger one of the top antioxidants foods around. Sold!

Now, Jeremy and I regularly sit together after the kids are in bed and enjoy this tea. I had never thought about using the actual root to brew tea, but what the hay? I'm glad this is a thing for us now. Sometimes we peel the root and chop it up to add to our water. But most times we slice thin rounds (a serrated knife gets the cleanest and most precise cut) and leave the skin on. Sometimes the ginger sinks to the bottom of the cups and other times it floats. I don't really mind this, but if you do, I recommend the peel and chop method because it seems like peeled, chunkier pieces are more likely to sink. But sliced thinly is prettier so you decide. Sometimes we add mint (like in this recipe) but some of the time we like ours straight up. To make it that way, just omit the mint.

Fresh Ginger-Mint Tea

You only need about an inch of ginger root for each mug. If you know you have big coffee cups, use 1 1/2 to 2 inches. Let it brew in the hot water for a good 5 minutes before tasting. The tea will be light at first, and get stronger as you sip it. You will feel a good and spicy warm burn down your throat as the ginger gets stronger. We love this actually, and it's not uncomfortable at all just so long as you expect it. Ginger root varies in potency so play around with the measurements. If it was too light using 1 inch, add more the second time around, and so on.

If you have a cold, I image a squeeze of lemon and teaspoon of honey would be good editions.

Fresh Ginger-Mint Tea
adapted from The Doctor Oz Show
makes 1

Boiling water
1-inch un-peeled thinly sliced ginger root (serrated knife works best) or peeled and chopped
5 fresh mint leaves

Place the ginger in the bottom of your mug. Add boiling water and mint and let sit for 5 minutes. Sip and enjoy.

Hello, antioxidants!

Tuesday, October 25, 2011

Sky High Classic Banana Cream Pie

Mile High Banana Cream Pie

Some things are better left as classics. I consider Banana Cream Pie one of them. I do have a few requirements though.

1) I like lots of bananas
2) I like a lot of filling. I want it to fill almost the entire pie shell and be creamy but also stiff enough to cut clean slices
3) I like a huge dome of whipped cream on top.

You might say, I like my banana cream pie nice and fittingly, indulgent. The picture below was snapped in haste (because I wanted to eat it) does not do the pie justice. It looks like the whipped cream is overtaking the pie leaving a bit of filling at the bottom. I did whip a lot of cream. This is true. But I whipped it very, very softly so when I went to cut a slice, it weeped down into the side of the filling and covered it up. I will suggest whipping your cream until it can hold soft peaks for yours. I didn't really care what it looked like at that point because as soon as I took a bite and my mouth filled with cold, sweet cream and vanilla, butter crust and pudding, I was done for. This is perfect pie. I'll say it. Perfect classic pie.

The instructions are lengthy but it's because it includes homemade pie crust. . You can always use a store bought crust and skip it. Just make sure to follow the instructions on the package for baking it before filling.

Mile High Banana Cream Pie

Sky High Classic Banana Cream Pie

FOR THE PIE CRUST: makes 2 crusts (you only need one for this recipe)
12 tablespoons (1 1/2 sticks) very cold unsalted butter
3 cups all-purpose flour
1 teaspoon kosher salt
1 tablespoon sugar
1/3 cup very cold vegetable shortening
8-10 tablespoons ice water

FOR THE FILLING:
3 ripe bananas, peeled and sliced 1/4-inch thick
2 1/4 cups whole milk
3/4 cup sugar
6 tablespoons corn starch
3 eggs
1/4 teaspoon salt
4 tablespoons unsalted butter
1 1/2 teaspoons vanilla
2 cups heavy whipping cream, for topping
5-6 tablespoons powdered sugar, for whipped cream

For the pie crust: dice the butter and return it to the refrigerator while you prepare the flour mixture. Place the flour, salt, and sugar in the bowl of a food processor fitted with a steel blade and pulse a few times to mix. Add the butter and shortening. Pulse 8 to 12 times, until the butter is the size of peas. With the machine running, pour the ice water down the feed tube and pulse the machine until the dough begins to form a ball. Dump out on a floured board and roll into a ball. Wrap in plastic wrap and refrigerate for 30 minutes.

Cut the dough in half. Roll each piece on a well-floured board into a circle, rolling from the center to the edge, turning and flouring the dough to make sure it doesn't stick to the board. Fold the dough in half, place in a pie pan, and unfold to fit the pan (this is so you can transfer the dough without ripping it). Wrap the remaining dough in plastic wrap and shape into a disk. Refrigerate or freeze for future use.

Heat the oven to 375 degrees. Crimp the edges of the pie dough to create a nice crust. Line the pie crust with foil and ad pie weights (or dried beans or rice) to weight it down. Bake for 20 minutes. Remove foil and weight and bake an additional 10 minutes, or until crust is golden brown. Cover edge with a pie shield if it starts to brown. Remove pie crust from oven and set aside to cool.

FOR THE FILLING: Layer banana slices evenly in the bottom of the crust. In a medium saucepan, combine the sugar, milk, cornstarch, eggs, and salt. Whisk until smooth. Cook over medium heat, stirring constantly, until it begins to simmer and thicken.

Remove from heat and add the butter and vanilla. Stir until melted. Pour the filling into the baked crust. Place a layer of plastic wrap over the crust, and press down so it touches the surface of the filling. Chill overnight.

Beat the cream on high in an electric mixer fitted with the paddle attachment. After one minute, add the powdered sugar and continue beating until the cream holds soft to medium soft peaks. Taste for sweetness and add more sugar if desired. Top the pie with the cream and refrigerate until ready to eat.

Toasted sliced almonds would be a nice touch on top. Just sayin'.

Thursday, October 20, 2011

Copycat Olive Garden Salad and Bread Sticks

Copycat Olive Garden Salad and Breadsticks

"About 150 million people will sit down for dinner at an Olive Garden this year, and here's guessing that 149.9 million of them will gorge on all-you-can-eat-salad and bread sticks before any of the food they ordered actually shows up. The stuff is addictive."-Food Network Magazine

My friend Melissa absolutely loves The Olivia Garden. I used to make fun of her because she would plan her trips to Denver around the restaurant. Her birthday? She wanted to go to The Olive Garden. Anniversary? Olive Garden. Driving to Arizona? We have to time it so we can have dinner in Grand Junction at The Olive Garden. Not that anything is wrong with this obsession, it's just that for a while I didn't quite understand. It's a chain for crying out loud. I shouldn't be surprised. Her husband's ultimate favorite restaurant? Chili's. Did you know I used to work at a Chili's? "Hello, thank you for calling Chili's, great food to go, this is Krysta how can I help you?" Oh, am I off topic again? That happens to me sometimes. My friends used to yell "Hey, look a chicken!" when I did that. Anyway, I think you can understand. I'm a foodie. I can appreciate a chain, sure, but I'm not scheduling my life around it. Then I went there.

Copycat Olive Garden Salad

It's not like I haven't been to The Olive Garden before. I have, and it was good. But it had been quite a long time. This time, I left with a new perspective of this chain restaurant I had deemed not good enough. That salad and bread sticks were...damn, Gina. They were GOOD. Really, really, good. I now try to hit the Olive Garden up when passing through Grand Junction. I now make copycat recipes in my own kitchen when I can't go to the actual restaurant for the salad and bread sticks. Soft, garlicky, mildly herby, hot from the oven bread sticks which are so easy since they only require one quick rise. Easy enough to make after a days work, as well. And salad that is so crisp and tastes exactly like the real thing. Really, I wouldn't lie to you. The dressing is pretty spot on. Thanks to Food Network magazine for coming up with this winner. The salad isn't the only thing I feel in love with at the OG. I also happen to have a copycat recipe for their delicious minestrone soup as well. Oh, friends. You. Are. Welcome.

Copycat Olive Garden Breadsticks
after the rise, before baking. Sorry about the totally sucky lighting

Fieldings and us
The happy campers who got to partake in the Olive Garden Feast. Father-in-law, Jeremy and me, Shawn and Melissa

If you make this salad for the main course, I suggest you double (or tripple) the recipe so it can be "unlimited" just like Olive Garden.

Olive Garden Salad and Breadsticks
adapted from Food Network Magazine, Copy That! Column

Garden Salad: serves 4

FOR THE DRESSING:
1/4 cup extra-virgin olive oil
2 tablespoons white wine vinegar
3 tablespoons miracle whip
1 tablespoon lemon juice
2 tablespoons grated Parmesan cheese
1/4 teaspoon garlic salt
1/2 teaspoon dried Italian seasoning
1-2 tablespoons water

FOR THE SALAD
1 10-ounce bag American salad blend
1/4 red onion, thinly sliced
4 small pickled peppers, such as pepperoncini
1 small vine-ripened tomato, quartered
2 tablespoons sliced black olives
1/2 cup large croutons
1 tablespoon grated Parmesan cheese

Combine all the dressing ingredients and 1 to 2 tablespoons water in a blender or food processor; puree until smooth. Place the salad blend in a large bowl and top with the remaining salad ingredients. Drizzle with the dressing and toss.


Olive Garden Bread sticks
makes 12-16 bread sticks

FOR THE DOUGH
1 package active dry yeast
4 1/4 cups all-purpose flour, plus more for dusting
2 tablespoons unsalted butter, softened
2 tablespoons sugar
1 tablespoon fine salt

FOR THE TOPPING
3 tablespoons unsalted butter, melted
1/2 teaspoon kosher salt
1/4 teaspoon garlic powder
Pinch of dried oregano

Make the dough: Place 1/4 cup warm water in the bowl of a mixer; sprinkle in the yeast and set aside until foamy, about 5 minutes. Add the flour, butter, sugar, fine salt and 1 1/4 cups plus 2 tablespoons warm water; mix with the paddle attachment until a slightly sticky dough forms, 5 minutes.

Knead the dough by hand on a floured surface until very smooth and soft, 3 minutes. Roll into a 2-foot-long log (measure). Cut into 16, 1 1/2-inch-long pieces. Knead each piece slightly and shape into a 7-inch-long bread stick; arrange 2 inches apart on a parchment-lined baking sheet. Cover with a cloth; let rise in a warm spot until almost doubled, about 45 minutes. I set my oven temperature to 250 degrees and let it warm up for 1-2 minutes before I shut it off so that my bread sticks have a warm place to rise. The warmer the environment (but not hot) the quicker it will rise)

Preheat the oven to 400 degrees and make the topping: Brush the bread sticks with 1 1/2 tablespoons of the butter and sprinkle with 1/4 teaspoon kosher salt. Bake until lightly golden, about 15 minutes. Mine were done after 12 minutes. Check them and make sure they don't brown or turn golden. Meanwhile, combine the remaining 1/4 teaspoon of salt with the garlic powder and oregano. Brush the warm bread sticks with the remaining 1 1/2 tablespoons melted butter and sprinkle with the flavored salt.

Wednesday, October 19, 2011

Oh How Pinteresting- Food Edition

google

Like most of you, I have become completely obsessed with Pinterest. If you don't know what it is you really need to. Pinterest is a visual organized folder. Anytime you see something on the Internet that you want to remember, or print off, or make a mental note about, just pin the picture (it's easy once you sign up) and put it in whatever folder is appropriate.

The food below comes from my Food folder on Pinterest. Follow me if ya want (the button is in the corner). I'm always pinning food things (as well as everything else under the sun) This is what I'm most excited about this week:

Crock Pot Taco Soup- This looks delicious
Crock Pot Taco Soup

Muffin Pan Tacos - I'm going to attempt to do these with Ezekiel tortillas and a black bean filling. If it's a success, I'll be blogging about it!
Muffin Pan Tacos

Baked Lemon Chicken- If I ate chicken this is what I'd be making this week!
Baked Lemon Chicken


Spiced Apple Cider with Rum Whipped Cream

Pumpkin Sherbet- I (heart) this one.
Pumpkin Sherbet

Happy Wednesday everybody!

Monday, October 17, 2011

Roasted Figs and Prosciutto and The Best Sunday

Prosciutto Roasted Figs

The other weekend my husband and I were sitting out on the back deck one afternoon when he asked what I would do that day if I could do anything. I had to think on it. It was a gorgeous fall day. Bright sun, warm, and magazine in hand, I felt relaxed and content to sit, read, watch the kids play and...eat. Hmmm. That was a problem. No grocery shopping had been done and there was slim pickings in the pantry department. I finally answered. "If I could do anything today, I think I would stay right here but I would have a huge platter of assorted cured meats, cheese, hearty warm bread, fruit and red wine to feast on all afternoon long." Done and done.

We headed out to our local meat and seafood house to shop. We picked out a nice spiced salami and prosciutto for the meats. Of course I picked prosciutto - If you don't know already, I am kind of obsessed with it. A nice roasted garlic baguette, Stilton blue cheese and a salty but carmely Piave (my most favorite cheese in the world, followed closely by truffle Pecorino) and we were on our way to my favorite Sunday afternoon in a long time. I already had the most perfect peaches and figs at the house just waiting for a time such as this.

I came home and got to work. I sliced peaches and mounded them high on a plate. I wrapped the baguette in foil and warmed it in the oven. I sliced hard salami, and instinctively wrapped some of the prosciutto around halved figs. In the back of my mind I remembered Ina Garten also my favorite roasting figs just like this. I looked up the instructions. I brushed the wrapped figs in olive oil and roasted them at a high temperature. They came out hot, salty, sweet, crunchy and juicy. They were the perfect figs for my perfect Sunday. Next, the wine was poured, cheese was arranged and we were outside ready to partake. I had made a separate plate for the kids to share so they wouldn't be reaching over the wine glasses to get to ours. Jeremy and I invited his parents to join us and we had the best time just enjoying and talking. Jeremy had also made some roasted cauliflower to go along with everything so we would have a healthy element on the table. Behold...

Prosciutto Roasted Figs and Cheese Plate

Jeremy and his Mom
IMG_6385

The kids with their plate and "wine"
IMG_6384

The Perfect Sunday. Period.

In other news my friend Kel took our pictures this past weekend. This is the sneak peak she sent me.
KEL_6122 copy

I can't wait to see the rest! Stay tuned for that.

Roasted Figs and Prosciutto
adapted from Barefoot Contessa, How Easy Is That?
serves 10

20 large fresh ripe figs
20 thin slices Italian prosciutto (about 8 ounces)
Good olive oil

Preheat the oven to 425 degrees

Snip the hard stems off the figs and cut the figs into half lengthwise through the stem. With a small sharp knife, cut the prosciutto lengthwise into inch-wide strips. Wrap a strip of prosciutto around the center of each fig half, with the ends overlapping. Brush with olive oil and arrange cut side up on a sheet pan.

Roast figs for 10 minutes, until prosciutto is a little crisp and the figs are warmed through. Serve warm.

I feel the need to explain the meat. Not that I need to, but I have told you many times that I don't often eat it. And that's true. But cured meat with wine and cheese is quite possibly the best thing in the world. This is when I choose to cheat. This sort of happiness on a plate is perfection to me. I am a much happier (not to be confused with healthier) person because of it.

Wednesday, October 12, 2011

Skinny Girl Stuffed Peppers

Skinny Girl Stuffed Peppers

I love stuffed peppers but hate all the saturated fat that comes with the traditional ground beef and cheddar cheese version. Not to mention that we don't really eat a whole lot of meat around here. I had to come up with something or else no stuffed peppers at the dinner table for our family. That's a sad realization, especially heading into the winter season.

My mother-in-law, Cindy, had just mentioned last week how much she loves stuffed peppers but couldn't imagine eating them without the ground beef. I told her of this version and she was hopeful but skeptical. She is from Nebraska and is a true mid-westerner at heart, but like us, she tries not to eat meat very often.

I had made these once before and knew how good they were. It was apparent when every morsel was eaten at the table that night and my daughter Isabella, requested that I make the meal for her birthday (which was months away) that it was a winner.

It went over very well with the in-laws too. I make mine with Morning Star Grillers Veggie Crumbles for the "meat", which you can find in the frozen section of the grocery store. But you can also use turkey. The peppers retain just a slight crunch after baking which work really well with the highly seasoned filling. And filling it is! Just what the doctor ordered on a snowy or rainy day when nothing but comfort food will do.

Skinny Girl Stuffed Peppers
adapted from Bethenny Frankel

makes 6-8 peppers

6-8 bell peppers (colors of your choice)
1 pound turkey meat OR 1-12oz pkg. Morning Star Grillers Veggie Crumbles
1 cup quinoa
1/2 large onion
2 tablespoons olive oil
2 to 2 1/2 cups jarred tomato sauce (I use organic)
1 1/2 teaspoons garlic salt
2 1/2 teaspoons worcestershire sauce
1 teaspoon salt
1/2 teaspoon pepper
1 teaspoon chili powder
1/3 cup feta cheese
2 tablespoons toasted pine nuts, for garnish (optional)

Preheat oven to 400 degrees.

Cut the tops off of the bell peppers and remove seeds and core from the inside. Cut the bottom of the pepper flat only if it can't stand level. I usually can skip this step.

Add 1 cup quinoa to 2 cups boiling water in a medium sized saucepan. Bring back up to a boil, then turn the heat down and let simmer with the lid on until the water is absorbed, about 12 minutes. Fluff quinoa with a fork, then re-cover and let stand off the heat for 15 minutes.

Meanwhile, in a large saucepan, saute the onion and turkey over medium heat until turkey is cooked through and onions are translucent. Alternately, if using Morning Star Veggie Crumbles, saute the onion first until translucent, about 7 minutes then add the crumbles straight from the freezer and stir and let cook for about 1 minute before adding other ingredients. Add cooked quinoa (which should be about 4 cups) Add the tomato sauce, Worcestershire, and all the spices. Stir to combine and let everything simmer for 5 minutes.

Fill the peppers with the turkey/quinoa mixture to the top and set in a 9 x 13 casserole dish. Sprinkle the feta cheese evenly over the tops of the peppers and bake for 30 minutes. Take a piece of foil and cover the peppers so the cheese doesn't burn and continue baking for 10-15 more minutes. When peppers are done, sprinkle the tops with toasted pine nuts and serve.

Monday, October 10, 2011

Chocolate Bundt Cake

Chocolate Bundt Cake

Okay friends, so I need to talk with you for a second. I decided that I would participate in a online bake sale for another food blogger over at Foodness Gracious because his daughter Miranda has type 1 diabetes, and they are raising money to walk for a cure. He asked different food bloggers to participate and donate a baked good to sell. He posted pictures of these items on his website and anyone can get on a place a bid for their favorite food item. The food blogger who donates has to bake the item and send it to the highest bidder. I am happy to say I am donating this cake and will be sending it next day, Fed Ex so it cannot go bad. So, I am asking you, my lovely friends, to visit the Foodness Gracious website and if you'd like, bid on one of the baked goods (mine! mine!) ha ha.

I do have a confession though. This isn't the exact cake I will be donating. See, the cake pictured is a really yummy doctored up devils food cake mix. The best recipe I have tried for such a thing, I might add. Sour cream, pudding mix and chocolate chips make the cake really special. But I just couldn't bring myself to have someone bid on a boxed cake mix recipe, even if it is super good. So, I will be making a version of the same cake that will be exactly like it. It's a homemade high quality chocolate loaf cake made from dark Dutch process cocoa with the same chocolate chips mixed in for good measure. It's delicious served with a dollop of whipped cream. I will share that recipe soon, (after I have a picture of it) just in case anyone wants to make that version, that is, if you don't buy it yourself online!

I originally blogged about this cake last year (and forgot) before I wrote this post- So I am attaching what I wrote the last year about this:

"I hadn't planned on blogging about this cake. You see, I made 3 different bundt cakes the other day with intentions on writing about one of them, just not this one. The others I made were from scratch, but this one starts with a...gulp, boxed cake mix. Don't judge! We all need some help once and a while and I am not above taking it. Especially when cooking three cakes in a row. When it came time to taste the cakes I literally could not stop eating this one. I tried really, really hard to love the Caribbean Christmas Ring that I originally wanted to blog about, but, *sigh* it just wasn't all that great. On the contrary, I tried really, really hard not to love this cake because I am sort of a baking snob and this cake is just a doctored up mix. So, with that being said, snob or not, I am also a lover of good food and dude, this is some GOOD food. So, what the hay? I'm blogging about it. This cake does not taste boxed, but it has the desirable texture you want with a boxed mix, only better because it's denser (thankyouverymuch, 4 eggs) and richer (thankyouverymuch chocolate chips) moister (thankyouverymuch sour cream and pudding) and just a touch more sophisticated. A simple dusting of powdered sugar is all it needs. Nothing more, as anything else would be overboard. What are you waiting for? Go make this to take to your next holiday party!"

Chocolate Bundt Cake
adapted from George Morris

4 eggs
1 cup sour cream
1/2 cup water
1/2 cup oil
1 box chocolate cake mix (I like devils food)
1 small box instant chocolate pudding mix
1 cup semisweet chocolate chips
Powdered sugar for garnish

Preheat oven to 350 degrees.

Beat eggs, sour cream, water and oil together in a large bowl until throughly mixed. Add chocolate cake mix and instant chocolate pudding mix. beat until smooth. Stir in semisweet chocolate chips. pour batter into a bundt pan, and bake for one hour. When cool, sift powdered sugar on top.

This recipe actually came from a man who entered it into last year's "Holiday Bake Off" in Steamboat, under the name "death by chocolate". Let's be honest, shall we? This is not a "death by chocolate" cake. It's a good cake, but something called death by chocolate should call for mass amounts of ganache. And devils food cake. And brownie layers. And chocolate mousse. The guy looked like a burned out motorcycle rider though, so I'm wondering what in the world he was doing entering a bake-off in the first place, all the while scrutinizing the name of his dessert. What can I say? It was good. Sixty year old men in leather jackets with long white beards can bake too, I guess.

Friday, October 7, 2011

Roasted Winter Vegetables

Roasted Winter Vegetables

We had out first snow of the season yesterday. More expected today and tomorrow and
before all is said and done, 12-18 inches is predicted. It's okay because the first snow is usually followed by a week or two of sunshine and it all melts away...until Halloween anyway. I welcomed the snow yesterday by sitting on the couch in my red sweatpants, sipping hot tea and fighting off the worst headache in the world! I didn't win. I still have the headache. Ouch.

You needn't feel too badly for me. I am bringing it on myself. I am doing a sugar/candida cleanse and the detox from not eating sugar and bread is seriously nasty! My friend joked that it was like a drug addict, who just needs a little fix to get by. One cup of hot chocolate and my headache would go away-only to delay the withdrawal until the following day. Thinking about my body actually being addicted to sugar like a drug is scary to me. So scary that the headache is worth it. Not really, but I'll just pretend to get through it.

Roasted Winter Vegetables

Something that I am allowed to have on my detox are these roasted winter vegetables. Nothing fancy here. Carrots, parsnips, butternut squash and sweet potatoes tossed in olive oil, salt and pepper and roasted at a high temperature so the veggies caramelize in spots. It's divine and my preferred go-to cold weather side dish to fish, chicken, pork or to toss in you favorite vegetable pot pie filling-whatever your favorite main is. This has been a staple in my house for a few years now and I don't see it changing any time soon. Make it and see why I love it so! Have a happy weekend, all!

Roasted Winter Vegetables
adapted from Barefoot Contessa, Family Style
Serves 6

3 medium sized carrots, peeled
3 medium sized parsnips, peeled
1 large sweet potato, peeled
1 small butternut squash (about 2 lbs), peeled and seeded
3 tablespoon good olive oil
1 1/4 teaspoons kosher salt
1/2 teaspoon freshly ground black pepper
2 tablespoons chopped fresh flat leaf parsley

Preheat the oven to 425 degrees

Cut the carrots, parsnips, sweet potato, and butternut squash in 1-to 1 1/4-inch cubes. All the vegetables will shrink while baking so don't cut them too small.

Place all the cut vegetables in a single layer on a large sheet pan. If vegetables don't fit in a single layer, use two sheet pans. Drizzle them with olive oil, salt, and pepper. Toss well. Bake for 25 to 35 minutes, until all the vegetables are tender, turning once with a metal spatula.

Sprinkle with parsley, season to taste, and serve hot.


Tuesday, October 4, 2011

Pumpkin Roll Cake

Pumpkin Roll Cake

This was my first attempt at a roll cake and I have to say it was much easier than I thought it would be. In fact, the whole thing was surprisingly simple and the cake was delicious. The cake is assembled, wrapped tightly in plastic wrap and chilled in the refrigerator until it is cut in slices at serving time. By then it is firm and compact and cuts cleanly. Swirls of pumpkin and spice and creamy cream cheese? Yes please.

Thanks to Molly from Stiletto's And Diapers for tipping me off to the recipe. Molly is 30-something weeks pregnant with her second child and knows a little something about a good eat when she comes across it. She encourages everyone to go ahead a cut your guests (and yourself) a couple slices because you are definitely going to want it. And how.

Pumpkin Roll Cake

Jelly roll pans vary greatly in size. This recipe will accommodate a 15 x 10.5 or slightly smaller sized pan. If using a large jelly roll pan, double the recipe and watch baking time. You might have to bake a few minutes longer. My cake cracked a tiny bit on the first roll once it was filled. If this happens to you, don't fret. I couldn't tell when I cut slices.

Pumpkin Roll Cake
Serves 6-8

3/4 cups flour
1 cup sugar
1 teaspoon baking soda
2 teaspoons pumpkin pie spice
1 cup pumpkin
3 eggs
1 teaspoon lemon juice

For the filling:
1 8oz package cream cheese
1/2 cup butter, room temperature
1 teaspoon vanilla extract
1 cup powdered sugar

Preheat oven to 375 degrees. Mix all the cake ingredients and pour into a greased jelly roll pan or cookie sheet with sides. Spread the batter into all the corners (it will be thin). Bake for 15 minutes. While baking, get hand towel, piece of linen or other cloth and dampen it, then sprinkle with 2 tablespoons of powdered sugar. When the cake is finished baking, you are going to let it cool a couple minutes, then flip it onto that towel. Roll up the cake and the towel from the short end and allow to cool for 30 minutes. This will help it keep that rolled shape once you fill it).

While its cooling, beat the cream cheese and butter together, then add in vanilla and powdered sugar. Unroll the cake and towel and spread the filling evenly across the cake. Roll back up, this time without the towel and wrap tightly in saran wrap before refrigerating. Serve chilled, cut into 1/4" slices with more powdered sugar sprinkled on top, if desired.

I coated the outside of my cake with powdered sugar because the outside gets rather moist. Don't worry because it all works together in the end.


Monday, October 3, 2011

Homemade Limoncello- DIY Christmas Gift

Homemade <span class=

Happy Monday to you! I was excited to participate in The Saturday Evening Pot's "Countdown To Christmas" this past week. She asked different bloggers to submit homemade gift ideas or holiday recipes for their event, which runs for 100 days before Christmas. Christmas is not necessarily on my radar yet. I'll take Halloween and Thanksgiving first, thank you. But when thinking about what homemade Christmas presents make my favorite gifts, I thought of homemade Limoncello right away. Limoncello is bright and appropriately citrus-y for Christmas time and makes a popular and handsome homemade present for friends, neighbors and family. Limoncello also takes a cool month and a half to make because it needs to sit and develop. So, best to get started now.

Limoncello is a lemon liquor and when you make it from scratch you can control the sweetness. A bottle of this liquid gold will not go bad anytime soon. It can sit in your freezer ready to be sipped from a shot glass or a fancy limoncello glass, like this set that I'm in love with from Napa Style-

<span class=

It's best sipped after dinner or with dessert but also can be drizzled straight from the bottle on sponge cakes or angel food cakes. Add some whipped cream and fresh strawberries and you have dessert.

Consider yourself warned though-If you make this once, you might find yourself needing to make it every year.

Follow the link to Saturday Evening Pot for the recipe and to read my post!