Thursday, June 30, 2011

Blackberry Cobbler

Blackberry Cobbler

I'm feeling particularly spunky tonight. I'm sitting here at my computer wearing a very ornate beaded cream cocktail dress. My daughter asked why I am wearing it, was I going to dinner? Um, considering that I just sat and ate a full meal with you not 20 minutes ago, I'm going to go with "no" on that one. Sorry Isabella. I told you I was feeling spunky. Adding to this is Cee Lo Green's "Forget You" playing in the background. It's amping me up as I feel that lately, it seems to be my anthem. Not the story of the gold digger ex-girlfriend driving around town with a new man. No. Just the "Forget You" part. And the "pain in my chest" part. And the whinny "whhhhhhyyyyyeee?" part. I'm growing, evolving, changing, being stretched and tested, poured out and broken. I welcome it all as it is making me wiser, better and more free. Most days I can be patient with the process, being most thankful for my wonderful family who is in turn being patient with me, but some days...some days, it just feels good to yell "Forget Yoooouuuu!!!!!" Preach it brother Cee Lo!

Blackberry Cobbler

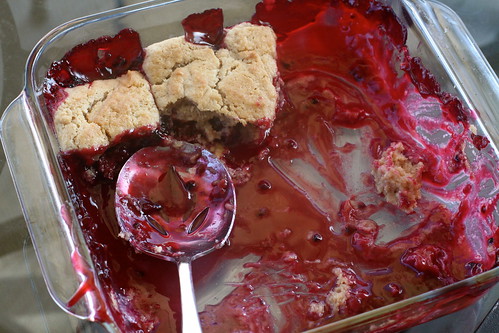
Oh, and I'm wearing the dress because my friend Kel, "the photographer" is coming to take some pictures of me down the street for some contest she's entering. The theme is "whimsical". The dress is whimsical. Nuff said. Just for some background, my day went something like this: I got up feeling tired and wore work out clothes all day. I needed to take a shower (desperately) but didn't because there was Drano working it's magic in the drain this morning and come nap time I had too many things to accomplish to fit it in like I planned. I cried 20 minutes before Kel showed up which made my face puffy. I yelled "Forget You!" to what was making me upset, got sympathy from my husband, re-applied my make-up and headed for the shoot. Kel is amazing because this is what she did with her disheveled, greasy headed, swollen faced, sneezing, itchy throat model:

Krysta in Rita Valentine


You really should hire her. She got game. What these pictures don't tell is that while I was standing there alone and a little awkward, I was thinking "you want me to just, like, look at this wheat or what?" Then when twirling I was totally singing "The hills are alive with the sound of music!" I lost my balance shortly after. I didn't fall though. Gosh, that would have been embarrassing. Actually, whats embarrassing is that I wouldn't have been embarrassed. Moving on...

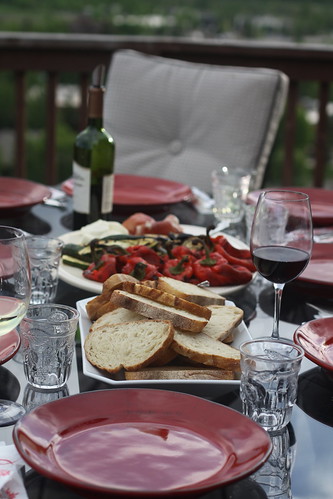
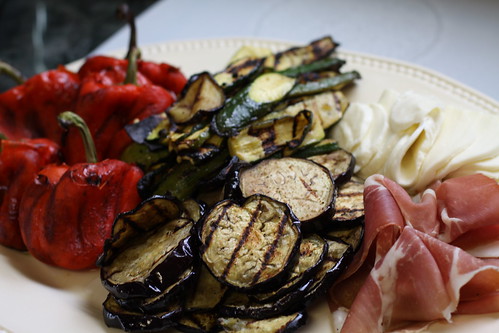
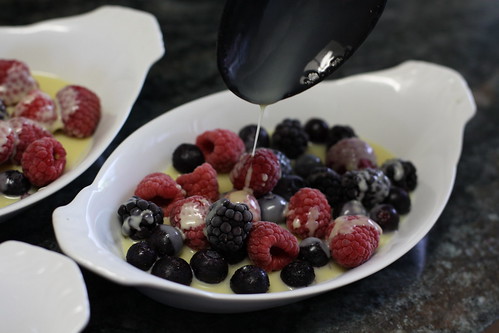
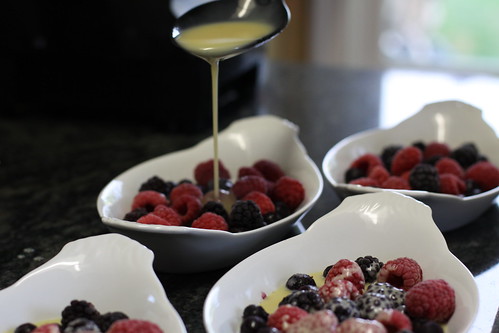
I ate blackberry cobbler right before I did this shoot. My family and I were sitting on the deck and had a beautiful home cooked meal followed by this outstanding dessert. Part of what I love about summer is, with it comes rustic fruit desserts. We polished off a whole pan just the five of us. Poor Kel, there was none left by the time she rolled up.

Blackberry Cobbler

Cobblers are the simplest desserts to make. Just sweeten some fresh fruit up with sugar, then simmer it with a thickener, slap some dough up top and bake. Man, that just sounded really back woods. Sorry. It must be the spunkiness because I'm from Los Angeles. I digress.

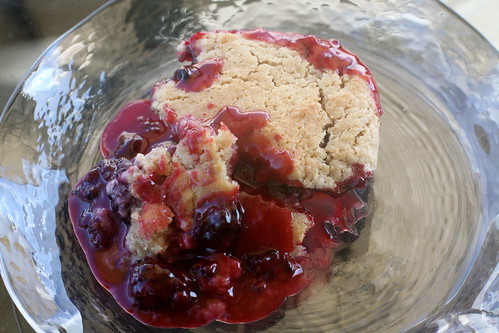
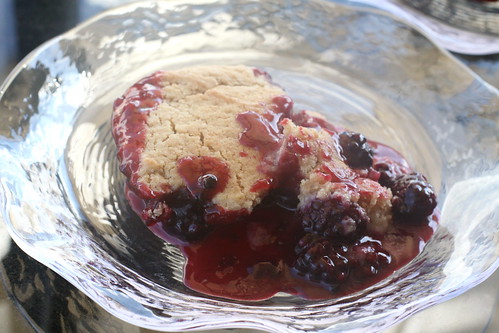
I'm going to make my closing statement with this: Cobbler is about as all American, BBQ worthy, summery dish as you're gonna get. Fourth of July anyone? You can't mess it up either. Fruit didn't thicken? It's still a hot biscuit-y runny, juicy sweet mess. The berries will thicken though...If it doesn't, cook it longer. The biscuits didn't cook and are raw? Who doesn't like sweet dough? This scenario is impossible, of course, because there is dough and there is heat. It will make a biscuit. I reiterate...You CAN'T mess it up. When in doubt, pile some vanilla ice cream on top and call it a day. It'll be great. Cobblers come through like that.

Blackberry Cobbler
adapted from Allrecipes.com, submitted by Amanda Lyneal

Makes one 8x8 inch pan, serves 6

1 cup all purpose flour
1 1/4 cups white sugar, divided
1 teaspoon baking powder
1/2 teaspoon salt
6 tablespoon cold butter, cut into pieces
1/4 cup boiling water
2 tablespoons cornstarch
1/4 cup cold water
1 tablespoon lemon juice
4 cups fresh blackberries, rinsed and drained (about 3 containers)

Preheat over to 400 degrees. Line a baking sheet with aluminum foil. In a food processor, add the flour, 1/2 cup sugar, baking powder, and salt. Pulse a few times to combine. Add the butter and pulse until the mixture resembles coarse crumbs. With the machine running, pour in the 1/4 cup boiling water mix just until mixture is evenly moist.

In a separate bowl, dissolve the cornstarch in cold water. Mix in remaining 3/4 cup sugar, lemon juice, and blackberries. Transfer to a pot, and bring to a boil, stirring frequently. Simmer until mixture has thickened (about 5 minutes) then transfer the berry mixture to an 8x8 Pyrex pan. Immediately place spoonfuls of the biscuit mixture on top and bake in the oven for 20 minutes, or until the dough is golden brown.

Try a blackberry before you make this. If they are on the tart side, consider adding an additional 1/4 cup of sugar to the fruit mixture. My blackberries were pleasantly sweet with a little tart and the filling was mildly sweet with the measurements above. It could handle the extra 1/4 cup sugar if you know you like it that way. Me? I say save the calories for the ice cream to put on top!

Monday, June 27, 2011

Chocolate-Heath Cheesecake in a Jar and The Bachelorette

Chocolate Heath Cheesecake in a Jar

Blogging in the wee small hours of the morning, while the whole wide world is fast asleep...Or if you are me, 7:30 in the morning and since it's summer vacation the kids are still asleep. Except one. There's always that one kid who doesn't sleep in which means you don't sleep in. I'm talking about you, Jeremiah! Usually it's Liv that gives me morning grief, but she is sleeping happily. I guess it's good. As much as I enjoy being lazy in the morning (I swear I get the best sleep from four in the morning until I wake up) I also enjoy getting up early and savoring the quiet. During school days I have to wake up around 6:30am just to get everyone ready on time. That's with my husband helping a lot. If I want time to myself before the mayhem, it would have to be 5:30am. That doesn't happen that much. Okay, at all. However, during summer break the kids will usually sleep until 7:00am, which means I could get up at 6:00am and have a blissful hour all to myself and my husband. I think I shall set the alarm tomorrow and start that. There is something so tranquil about quiet mornings, something so sweet. I think what makes them sweet is the knowledge that at any moment it could get busted up by a precious but busy and loud four year old boy, a cute, feisty and loud 2 year old girl, and about 30 minutes to an hour after that, an energetic and loud nine year old girl. I love my little kidlin's and I want to see them every morning. Just not before I have gotten the chance to wake up myself. Did you get the pattern above? Did you notice I described them all as loud? I can't do loud until I have been up for an hour. Even now as I write this, I am being distracted by an annoying Dora The Explorer toy. It keeps shouting "Press the button! Apresad un boton!" Shut it, Dora. I'm going to set my alarm for tomorrow morning now.

Chocolate Heath Cheesecake in a Jar

Let's talk about more exciting things, shall we? It's Monday which means "The Bachelorette" will be on tonight. Yes, I just said that. I used to watch "The Bachelor" back in it's heyday, but then I felt it got a little trashier and I stopped. My friends would watch and I'd hear little tidbits, but then one day out of nowhere I got totally sucked in again with a vengeance. It was Brad Womack's season (the second one) and I made the mistake of watching the first episode. That was all it took. So now, here I am. I can't believe the power this show has over people. This particular season of Bachelorette has been weird, and I still watch. I don't even really like any of the guys, well, sometimes I do...then I don't, I'm lukewarm to say the least and yet, I still watch. I even will go so far as to say I hate Ashley, the actual bachelorette, and I still watch. It's bizarre. It's like a bad car wreck, you try to look away and you can't because it just keeps drawing you in. That being said, some of my girlfriends and I get together to watch the show sometimes. Dessert is usually involved and it just so happens that my friend brought these chocolate-heath cheesecakes in a jar the last time we were together. I'm not crazy about cheesecake normally so I wasn't thinking much, but the packaging in the jar is just too darn cute to pass up. This was downright delicious. It was a very mild and creamy chocolate flavor with a classic graham cracker crust, bites of heath bar on top and creamy whipped cream to finish it all off. This was made with a graham cracker crust and it was perfect in my opinion, but the maker of this dessert said it could also be made with an Oreo cookie crust for a bumped up chocolate flavor. I want to be clear about one thing. This is a no bake dessert. The crust is just pushed into the bottom and the filling goes right on top and straight into the refrigerator. Simple and good. The filling is creamy not unlike pudding, which I love, love, love. All the different textures (soft buttery crust, cold smooth filling, crunchy butterscotch heath bites and creamy whipped cream) mixed together make for an amazing dessert you won't soon forget. I can't make "The Bachelorette" any better, but I can help with your viewing pleasure if you eat this dessert while tuning in. I recommend you make this dessert tonight since Bentley is coming back and you might need something sweet to counteract all the drama that will surely go on. Unless of course, ABC just teased Bentley's return for tonight's episode again, but won't really show it like they did last week. Either way, you are going to need dessert.

*I apologize to those of you who don't watch the show and don't know what I'm talking about. Stay strong.

Chocolate-Heath Cheesecake in a Jar
adapted from I am Baker (www.iammommy.typepad.com)

makes about 4 cheesecakes in a jar

1 package cream cheese, room temperature
1 can (14.oz) sweetened condensed milk
1/4 cup Hershey's chocolate syrup
juice of 1/4 an orange
12 graham crackers
2 tablespoons sugar
1 cup heavy whipping cream
2 Heath bars, crushed
small, squatty glass jars with lids

For the crust: Crush the graham crackers with the sugar until you have coarse crumbs. Press desired amount of the crumbs into the bottom of the jars. The amount you put in your jars depends on their size. Put in enough to make a slightly generous quarter inch base, and push down and up the sides lightly with your fingers.

In the bowl of an electric mixer, combine the cream cheese, sweetened condensed milk, orange juice and Hershey's syrup. Mix until smooth and divide batter among jars.

Top each cheesecake with Heath bar pieces and pop the lids back on. Refrigerate for 3-4 hours. Just before serving Whip your cream and sweeten it according to your taste with powdered sugar. Top each cheesecake with whipped cream and serve.

Please note I described the crust as "buttery" up above but in all reality the crust has no butter in it! If you added butter to this crust like you would a traditional pie and didn't bake, it would weigh it down and make the bottom wet instead of crackery, which is not what you want for this recipe. I would eat this the day it is made for best results. If they sit for too long the crust might get too mushy, which you may or may not like.

http://www.flickr.com/photos/shanrev/1499732544/


Friday, June 24, 2011

Baked Kale Chips

Kale chip

I have been hearing about kale chips for a while now but I hadn't tried them until a friend of mine, Caroline, brought them to a gathering. Immediately, I knew I had to make them and that I would have to buy two bunches of kale because one would definitely not be enough for my family. I am not kidding when I say these are addicting. I had been assured that they were supposed to be super crunchy, like chips but I didn't fully believe it until I took a bite for myself. They were indeed crunchy, thinner than a chip but delicious and salty and good for you. All wonderful things.

Kale chips
You make kale chips the same way you would roast a vegetable. Coat the leaves in olive oil, season with whatever you like and bake in the oven. That's it. This recipe is basic and only calls for salt but you could get creative and use whatever spices tickle your fancy. I like the idea of using garlic salt, chili powder and a bit of cumin and might try that next time, but my husband insists the plain will stay his favorite. If you try these, let me know what you season them with and how they turned out. Feed these to people who claim they don't like vegetables and see if you can't convert them with this.

Kale chips

Be careful not to over salt the kale before baking. It's easy to do since the leaves shrink in the oven, but the salt content stays the same. A light sprinkling of sea salt will be perfect.

Baked Kale Chips
adapted from smittenkitchen.com

1 bunch kale
1 tablespoon olive oil
Sea salt, to taste

Preheat oven to 300 degrees. Rinse and dry kale, then remove the tough center stems. Cut into chip size pieces, toss with olive oil and sprinkle with salt. Arrange the leaves in a single layer on a large baking sheet. You might need to do this is two batches. Bake for 20 minutes, or until crisp. Cool the chips and eat.


Wednesday, June 22, 2011

Antipasto Platter Dinner (Crostini with Grilled Vegetables, Mozzarella and Prosciutto)

IMG_4508

This is the stuff memories are made of. Warm summer evenings, kidlin's running in the grass, wine, fire pits, good friends and dinner on the deck. On nights like this I prefer simple food that can be served family style. This time I decided to go with a big antipasto platter of sorts. Antipasto is an Italian word that means "before" as in before a meal, like an appetizer. However, the idea for making this into the main meal came the night before I held this party during a casual evening at home. We had gone through our refrigerator and were just cooking up anything we had left over for dinner which turned out to be a bag of red bell peppers, an eggplant, a few zucchini and a half a loaf of crusty bread on the verge of going stale. We grilled the vegetables, and roasted the peppers on the grill. Then just before we sat down Jeremy put the sliced bread over the flames for a few seconds to toast it up. The Michael Chiarello in me instinctively started rubbing a raw garlic clove over the slices, infusing them with flavor. I knew at that point that our dinner was going from "just leftovers" to a really sexy antipasto sandwich. The grilled vegetables were very simply seasoned and their juices dripped into the toasted garlic bread slices, softening them up a bit.

IMG_4506

Then my mind started going. I was really enjoying this last minute rustic Italian dinner and I just had to share. The next day, we invited a handful of friends over and I planned to recreate the grilled vegetable sandwich from the night before, only dressed up for company. I decided to keep the eggplant, zucchini and roasted red peppers the same, but add fresh mozzarella and prosciutto to the mix to satisfy our meat loving friends. Okay, and me. You all know how I swoon for prosciutto. Ha ha, I just looked up the meaning of "swoon" and the definition after "fainting" was "to be overwhelmed by ecstatic joy". I'm still chuckling. I'm going to keep it because it's actually pretty accurate.

IMG_4510

Serving dinner like this is great because it takes the stress out of it. You prep all the veggies before hand and then hand them over to the hubby to grill while you pile the prosciutto and mozzarella on a big platter, mingle with guests and nibble on olives. When the vegetables are done, simply arrange them on your platter while the bread is grilling. Once done, just run your bread with that garlic, and serve. There is no race to the table because warm to room temperature vegetables are actually better than hot for this. I serve the red bell's whole and let my guests take one per person and cut it up themselves. It's prettier and easier that way.

After dinner we went out to the front yard for a fire pit and some play

IMG_4571


There definitely was cuteness and playing...

IMG_4553

IMG_4574

IMG_4530


A rainy sunset

IMG_4577

There was also crying and comforting...

IMG_4556

IMG_4564

And always a little pouting...

IMG_4561


But mostly, food, smiles and fun.


Antipasto Platter Dinner

serves 6

6 red bell peppers
8 small-ish zucchini, cut into long 1/4" thick strips
2 medium eggplant
2 packages of fresh mozzarella, sliced
12 slices good quality prosciutto
2 loaves crusty Italian bread, sliced
4 garlic cloves, peeled
1/3 cup bottled Italian salad dressing
4 tablespoons olive oil, plus more for drizzling at the end
Sea salt and cracked pepper, for garnish and sprinkling

Place the cut zucchini in a large Ziplock bag and add Italian dressing. Let the zucchini marinate in the dressing for at least and hour and up to a day before grilling.

Pre-heat your grill to medium high heat. While you are waiting, place the prosciutto and mozzarella on your serving platter in neat piles.

Make the roasted red peppers first: Place your peppers on the heated grill and close the lid. Let the peppers roast for about 15-20 minutes, or until their skin is blackened all over. Keep an eye on them and turn them occasionally with tongs to ensure uniform cooking. They should be pretty charred on all sides.

While your peppers are roasting, prepare the eggplant. Cut each eggplant into 1/2" thick rounds, skin on. Toss them with the 4 tablespoons olive oil and a few generous pinches of Kosher salt and pepper. The eggplant will soak up the oil rather quickly, but try to get as much of the olive oil evenly distributed. Set aside until red peppers are done.

When the red peppers are done, take them off the grill and place them in a bowl or other container. Cover with plastic wrap and let the peppers steam for approximately 10 minutes. Take the peppers out of the bowl and let them cool. When cool enough to handle, the blackened skin should peel off easily. Set them on your platter while you finish grilling the other vegetables.

Turn the grill up to high heat and cook the eggplant and zucchini slices until lightly blackened (or not if you are not into that sort of thing. I happen to be) or cooked through and tender. Add the grilled vegetables to the platter.

Lastly, place the slices of bread on the grill for 30 seconds or so a side or lightly toasted. Rub immediately with raw garlic cloves and place in a big bowl. Set everything on the table. Serve and make open face sandwiches.

Monday, June 20, 2011

Frozen Berries with Hot White Chocolate Sauce

IMG_4439

I am disgruntled to be sitting at my computer back to wearing sweatshirts. It has been chilly and rainy here lately and being that our snow is still melting, I am sick of it! Alright, I got that off my chest so I think I can move on. Frozen berries with hot white chocolate sauce is the perfect dessert to serve to a crowd. Why you ask? I'll tell you. The instructions are as follows: 1) buy fresh berries (chances are they will be on sale since they are in season) 2) freeze them 3) melt chocolate, cream and vanilla together 4) pour hot sauce over frozen berries 5) serve. Oooooh's and awwww's all around.

IMG_4429

The berries are frozen but when you pour that hot sauce over, it defrosts them just enough. What you are left with is semi-frozen chunks of cold fruit draped in sweet, creamy hot sauce. It's cold, it's hot, you are confused, and enjoying every minute of it. It's funny how many people upon being served this dessert will furrow their brow and say "Wait, the berries are frozen?" Crazy host. Crazy genius, superstar host.

I don't recommend buying frozen berries to begin with. The whole point is to have fresh seasonal berries. Plus, when you buy a carton of berries and freeze them on a sheet pan as per the instructions in this recipe, you don't get berries that have been stuck and frozen together in clumps, like so often happens with the pre-bagged kind. Freezing your own berries makes for much prettier presentation. Don't like white chocolate? Semi-sweet chocolate would work too.

IMG_4432

Frozen Berries with Hot White Chocolate Sauce
adapted from Ina Garten

serves 8-10

  • 1 1/4 pounds good white chocolate coarsely chopped
  • 2 1/2 cups heavy cream
  • 2 tablespoons pure vanilla extract
  • 2 1/4 pounds frozen mixed berries or frozen raspberries

Directions

Combine the chocolate, heavy cream, and the vanilla in a heat-proof bowl and set it over a pan of simmering water until the chocolate melts.

About 5 minutes before serving, remove the berries from the freezer and place them on individual serving plates. Ladle the warm chocolate sauce over the berries and serve.


Note: You can freeze your own berries by placing the berries on a flat tray in a layer. When the berries are fully frozen, keep them a plastic bag in the freezer. Larger berries, such as strawberries, do not freeze well.


This recipe makes a lot of sauce. I didn't halve it because if you really are serving 10 people you will need that much sauce. If you are only serving 4-6 people, you can safely cut the recipe in half.
______________________________________________________________________

*****I originally blogged about this in April 2010. I had no followers or pictures, however, I like what I said about this dessert and I wanted to keep the original post documented. Here it is...*****

This is the dessert I made for my Grandparents when I was out in California. It's one of my very favorites, especially in the Summertime because it's easy, light, but not too light, and satisfying. Basically, you just freeze seasonal berries (I like lots of raspberries mixed with blueberries and blackberries) on a sheet pan so they don't stick together. When they are frozen you just put them down in a pile in a pretty, shallow glass bowl and ladle a scrumptious hot white chocolate sauce over them. The hot-ness from the sauce will defrost your berries halfway making them the perfect texture for eating.

Frozen Berries with Hot White Chocolate Sauce
adapted from Ina Garten

1/2 pound plus 2 tablespoons good white chocolate, coarsely chopped
1 1/4 cups heavy cream
1 tablespoons pure vanilla extract
2 1/4 pounds mixed berries, or raspberries, frozen on a cookie sheet

Combine chocolate, heavy cream, and the vanilla in a heat proof bowl and set it over a pan of simmering water until the chocolate melts (Or just combine it in a saucepan and warm it over low heat until melted, stiring occasionally)

About 5 minutes before serving, remove the berries from the freezer and place them on individual serving plates or bowls. Ladle the warm chocolate sauce over the berries and serve immediatly.

serves 6

I usually, instead of dealing with pounds, figure a carton of berries per person and combine them all. But, you could serve more generous portions if you wish as no one will complain. I also combine the chocolate (sometimes I buy good quality chips and skip the chopping step, but don't do this with less expensive chips becuase they have too many stabilizers and it will not melt well) cream and vanilla in a small saucepan and put it over very low heat just as I am about to sit down to dinner. It is usually almost ready and melted when we are done. Also, if you don't care for white chocolate, use bittersweet instead, it would be delicious. Although, the sauce does not primarily taste of white chocolate.

Friday, June 17, 2011

Classic Egg Salad Sandwiches

Egg salad sandwich

To celebrate my friend Kel's birthday, a few of us girls decided to get together and do a picnic at the park. She is turning thirty-one this year and she'll be the first to tell you that it's all downhill after thirty. She actually loves to tell people that. I think she is kidding, but I can't really tell. You can never really tell with Kel. Upon hearing that I was still twenty-nine and turning thirty this year, she yelled "your just a baby! Just you wait"---like, wait for what? She acts like at the stroke of midnight on the eve of my thirtieth birthday I will suddenly grow arm hair, sharp teeth, and turn into a werewolf. Besides a flare for the dramatic (which she tries to pin on me most of the time) Kel loves egg salad sandwiches, so deciding what we should eat was a no-brainer. Egg salad is a classic picnic food and evokes a familiar feeling of Americana.

Egg salad sandwich

What I'm after in my filling is nice defined chunks of tender egg with perfectly yellow centers (no weird gray stuff) held together by a blanket of mayonnaise with crunchy bits of celery and green onion with a hint of fresh dill and a squeeze of lemon. Yes, that sandwich would go very nicely with a sour pickle and salty, crunchy potato chips along with a refreshing peach iced tea. Well, I guess I have my side dishes. I think it best to not over do something like a picnic. Classic is always best.

Having a gathering like this is fun and at the same time, torturous for someone with my psyche. I can't help but think of other menu's I could possibly serve at a picnic on a future non-existant date. You could go southern style with buckets of cold fried chicken, potato salad and sweet tea. You could go Italian with a bottle of wine, cheeses, baguette and fresh grapes. Swap the wine and grapes for Champagne and strawberries and voila! It's a French picnic. You could go a million different ways and trust me it took restraint from rambling on, but right now I must focus on the two tasks at hand. Making a mean egg salad sandwich and trying not to turn into a werewolf. You are kidding, right Kel?

Classic Egg Salad Sandwiches

makes enough for 6 sandwiches

12 large eggs, hardboiled (method follows) and chopped into smallish bite size chunks
2 ribs of celery, minced
2 scallions, sliced thinly
1/4 cup mayonnaise, plus 1 tablespoon
1 tablespoon Dijon mustard
juice from a quarter of a lemon
1 generous tablespoon chopped fresh dill
1 teaspoon Kosher salt
1/2 teaspoon pepper
6 hoagie rolls
6 leaves of lettuce

Mix first nine ingredients together until throughly combined. To make the sandwich, split the hoagie rolls in half. Place one leaf of lettuce on each sandwich half and top with egg salad.

Perfect Hard Boiled Eggs (no weird grey yolks)

Place eggs in a large pot with plenty of cool water to cover so that the eggs have a good water to egg ratio. Egg should have room to move around so don't try to cram everything into a small pot. Place the pot on the stove over high heat and bring the water to a boil. Let the water boil for 1 minute, then remove the pot from heat and place a tight fitting lid to cover. Let sit for 20 minutes. Discard the cooking water and run cold water over eggs until very cool. Your eggs need to be cold before you attempt to peel them.

Wednesday, June 15, 2011

Grilled Artichoke with Homemade Mayonnaise

artichoke and mayonnaise

Patience. That's what you need to make homemade mayonnaise. Luck. That's what you need to get featured on Bon Appetit's website. I had both this week. Funny thing happened the other day as I checked my stats (something I don't do on a regular basis) I noticed that I had 55 hits on my Peach-Vanilla Cream Pops already for that day. The day had just started. I checked my sources and lo and behold, a link for a page on Bon Appetit's website came up. What the what? I clicked. I found an article on what frozen/icy treats food bloggers were making from their magazine this month. There were about five blogs featured and My Life In Food was the third one down. Cue heavenly music from above. I have no idea how they found me or how I got there. All I know is that this is a very exciting thing for me indeed.

Now that we got the luck part covered, let's talk about patience. It takes about 8-10 minutes to make mayonnaise. Essentially all you do is whisk an egg yolk, some lemon juice, salt and white wine vinegar together until smooth. Like this:

mayonnaise

Then you drip small drops of oil into the mixture, whisking constantly and vigorously for four minutes. You will still have a lot of oil left to incorporate. After the four minutes is up, you can then pour the rest of the oil in the bowl in a very slow stream, again, whisking constantly and vigorously. This is most likely where your patience will be tested. You would be amazed at how long it takes to get all that oil incorporated. You'll be tempted to just dump all of it in, but don't. Homemade mayonnaise is an art and it must be done a certain way. Keep whisking and blending. After you have blended everything together you will be left with a pale, thick and deliciously silky mayo. See?

mayonnaise

mayonnaise

This mayonnaise is heavenly with grilled artichokes. These artichokes are marinated in balsamic, olive oil and garlic and they taste just like the ones you order at fancy restaurants. Plus, they are easy to make and fun to grill. The artichokes will already be cooked when you place them on the grill because you boil them until tender and just grill long enough to get those gorgeous char marks.

IMG_4480

Grilled Artichokes
adapted from Emeril Lagasse
serves 6 appetizer portions

4 large artichokes, rinsed well, top third removed, and leaf tips trimmed
1/4 cup salt
2 lemons, cut in 1/2
1 cup olive oil
1/3 cup balsamic vinegar
1 tablespoon chopped garlic
1/2 teaspoon salt
1/4 teaspoon freshly ground black pepper
homemade mayonnaise for dipping (recipe follows)

Fill a large pot 3/4 full with water. Add 1/4 cup of the salt and bring to a boil.

Rub the cut sides and bottoms of the artichokes with the lemon wedges and carefully add them to the boiling water. Weight the artichokes as necessary with a heavy dish or bowl, and simmer, partially covered, until the bottoms are just tender and can be pierced with a sharp knife and an outer leaf pulls out easily, about 20 minutes. Drain the artichokes upside down in a colander until cool enough to handle.

Cut the artichokes into quarters (or half if they are smaller) and discard the prickly purple leaves and hairy choke.

In a bowl, combine the olive oil, vinegar, garlic, salt, and pepper. Add the artichoke quarters and toss to coat. Let marinate for 2 to 4 hours, turning occasionally.

Preheat grill to medium-high. Remove the artichokes from the marinate and grill, turning, until warmed through and lightly charred around the edges, about 5 minutes. Place on a platter and serve with homemade mayonnaise.

Homemade Mayonnaise
adapted from Molly Wizenberg
makes 3/4 cup

1 large egg yolk
1 1/2 teaspoons fresh lemon juice
1 teaspoon white wine vinegar
1/4 teaspoon Dijon mustard
1/2 teaspoon salt plus more to taste
3/4 cup canola oil, divided

  • Combine egg yolk, lemon juice, vinegar, mustard, and 1/2 teaspoon salt in medium bowl. Whisk until blended and bright yellow, about 30 seconds.


    Using 1/4 teaspoon measure and whisking constantly, add 1/4 cup oil to yolk mixture, a few drops at a time, about 4 minutes. Gradually add remaining 1/2 cup oil in very slow thin stream, whisking constantly, until mayonnaise is thick, about 8 minutes (mayonnaise will be lighter in color). Cover and chill. Can be made up to 2 days ahead. Keep chilled.


Monday, June 13, 2011

Raspberry Lemonade

IMG_4337

IMG_4342

We had our friends, Melissa and Shawn over for dinner last week. Like usual, I pondered the menu and drinks and decided upon serving a simple lemon grilled salmon, with a side of pasta and salad for dinner. Easy. My go to cocktail is usually wine or champagne but I was feeling more festive. Luckily, I had whipped up a batch of raspberry lemonade the day before. I had served it to my girlfriends who were over for lunch that day and it got great reviews. Not too sweet or tart, with a great balance of lemon and fresh raspberry. The fact that it was the most gorgeous shade of pink didn't hurt either. I had just enough left over in the pitcher to serve as the base for our cocktails that night. Perfect! This lemonade was begging for some vodka to be added to it.

IMG_4402

This turned out to be a remarkably refreshing drink. Jeremy, my husband, and Shawn loved it. More importantly, by the end of the glass, I think they forgot that they were drinking a pink, fruity cocktail. As for the girls, by the end of our drink, Melissa and I found ourselves upstairs trying on lip gloss and talking much too loudly. Come to think of it, I don't know why we were upstairs. Were we not supposed to be making dinner? A little vodka sure distracts you from the task at hand, I'll tell you that much. Don't say you weren't warned.

Me and Melissa before the lip gloss
IMG_4405

I love drink concoctions during the summer months whether it be iced tea, lemonade or fruit spritzers of some sort. Doesn't really matter what it is. There is nothing better than sitting under the pergola with ice clinking in your glass, enjoying the sunshine.

This is a very simple drink to make that I have a feeling will be enjoyed at many parties and BBQ's this year. With and without that silly Mr. Grey Goose.

Raspberry Lemonade
adapted from Food network Magazine, June 2010
serves 6

1 cup fresh raspberries
1 cup freshly squeezed lemon juice
3/4 cup sugar
4 1/2 cups water
lemon slices, for garnish

Make a simple syrup: Combine the sugar with 3/4 cup water in a saucepan and bring to a boil, stirring until sugar is dissolved. Let cool.

Muddle the cup of raspberries with the simple syrup in a pitcher, crushing the berries with the back of a wooden spoon. Stir in the lemon juice and water; add ice and lemon slices to each glass and serve.

Taste your drink after you have mixed it up. You might like to add more water. I find this to be a great combination for me since I tend to add a hefty amount of ice to my glass that slowly melts and dilutes everything. This recipe is easy to double for more people. (2 cups raspberries, 2 cups lemon juice, 1 1/2 cups sugar with 1 1/2 cups water for the simple syrup, then add 9 cups of water to the finished product. Serves 12).

Jam Hands

Thursday, June 9, 2011

Fresh Tomato and Basil Pasta

Tomato Basil Pasta

Confession time: I don't like fresh, raw tomatoes. I know, crazy right? I used to love them. I'd eat them like candy as a kid, sliced with a sprinkling of salt. It all changed one day as I was eating lunch in my bathing suit, wrapped in a towel, about 8 years old, in my grandparents back yard. It was hot and I had been swimming. I remember the tomatoes were cold and perfectly ripe, sliced just as I liked but this time with a little garlic salt on top. Later that day I came down with the stomach flu and I suppose you can guess why I don't like them anymore. Every time I try to eat a piece of a raw tomato, I gag a little. It makes me sad. Sometimes, if the tomato is perfectly ripe and sliced thin and not pithy at all, I can eat it on a sandwich. It happens maybe once a year.

Being a foodie and all (I hate the word "foodie"), this creates all sorts of problems for me. Caprese salad anyone? Bruschetta? Bacon, lettuce and tomato sandwich? Gazpacho? Pass. This particular food aversion taunts me because I really want to eat these things. It's not even like they aren't tempting because I don't like tomatoes. They are all too tempting and I hate the fact that tomatoes ruin it for me. It's only raw tomatoes though. If those babies are made into sauce, marinated or sauteed, I love them.

Tomato Basil Pasta

Enter this lovely tomato basil pasta. I longed to make it but that damn tomato annoyance was getting in my way. I wanted a simple pasta, bursting with fresh flavors of garlic, tomato and basil that was delicate in flavor but not bland. I decided to be brave. I chopped three beautiful red tomatoes fully prepared to add them to my hot skillet full of butter, oil, crushed red pepper and garlic. Fail. I had a freak out at the last second. I thought I wasn't going to be able to enjoy the pasta if I went through with it. The smell of the tomato was just a little to robust for me. I opened a can of organic diced tomatoes and used them instead. Listen, I know this pasta would be sensational if made with fresh tomato, but I just wasn't strong enough this time. However, now I can say for certain that if you buy a high quality canned tomato and drain most of the juice, it works just as well. This pasta was awesome, simple and light. It highlighted each of the flavors used perfectly without overpowering any of them. Try it, you'll like it.

Fresh Tomato and Basil Pasta
serves 4-6

2 tablespoons butter
3 tablespoons olive oil
1 pound angel hair pasta
7 fat garlic cloves, minced
20 fresh basil leaves, chopped
1/4 teaspoon crushed red pepper flakes
1/2 teaspoon Kosher salt
2 tablespoons white wine
3 medium to large tomatoes, chopped or 1 14.5 oz can diced tomatoes, juice mostly drained
Parmesan cheese, for garnish

Cook pasta according to package directions. Meanwhile, heat a large skillet over medium heat. Add the olive oil and butter and melt together. Add the garlic and red pepper flakes and saute for about a minute. Add the tomatoes, salt and white wine and continue sautéing for about a minute, then turn the heat down to low and simmer for 4-5 minutes. Add the basil to the tomatoes and when the pasta is done, add it to the sauce in the skillet and toss everything together. Serve with a dusting of Parmesan cheese on top.

To make my cooking time smoother, I mince my garlic and chop my basil before I start cooking the pasta and making my sauce. Always prep before hand. It saves a lot of stress during the actual cooking process.


Monday, June 6, 2011

Peach-Vanilla Cream Pops

Peach-Vanilla Cream Pops

Hello summer! Finally. We totally skipped spring up here in the mountains and are facing a horrible flooding of the rivers, but hooray, there is still reason to celebrate because warm weather is here! Finally. Since I have been home I have already gotten the chance to grill on our deck with friends, get to the park, make a run to Ciao Gelato with the kids, and make these peach popsicles. Sunny weather activities. FINALLY! I have been waiting for warm weather for months and months. There's no holding me back now.

Peach-Vanilla Cream Pops

These pops are in a word, ridiculous. Peaches and cream are a perfect combination already, but add vanilla bean sugar and a slight tang from some yogurt and dang. If you add the optional amaretto, which is not optional in my book (unless kids will be eating them) it creates the perfect deck dessert for a hot summer night. I'll be making these time and time again, that's for sure.

Peach-Vanilla Cream Pops
adapted from Bon Appetit, June 2011

makes 8 pops

1/2 cup plus 2 tbsp. sugar
1 vanilla bean, halved lengthwise
4 cups sliced peeled ripe peaches (about 4-5 medium), or 16 oz. frozen sliced peaches, thawed
1/2 cup chilled heavy whipping cream
1/4 cup Greek-style yogurt
1 to 2 Tbsp. amaretto (optional)

Place sugar and 1/2 cup water in a small saucepan. Scrape in seeds from Vanilla bean; add bean. Bring to a boil over high heat, stirring until sugar dissolves. Transfer syrup to a small bowl; chill. Discard vanilla bean.

Puree syrup and peaches in a food processor or blender until smooth. Set a fine-mesh strainer over a medium pitcher; strain, pressing on solids to extract the puree (If you use a powerful blender such as the Vita-mix, like I did, you can skip this step because everything will be blended thoroughly without lumps). Whisk in remaining ingredients. Divide among molds. Cover; insert ice-pop sticks. Freeze until firm. Dip bottoms of molds into hot water for 20-30 seconds to loosen pops. Remove pops from molds and serve.

*This blog post was featured on Bon Appetites web page.

Summertime and the livin's easy! Okay, so technically I know "summer" doesn't actually begin until June 21st. However, school is out and so is the sun, so it's all the same to me!

Summer of the Popsicle 2

Sunday, June 5, 2011

I'm Back!

I had to leave pretty abruptly last week in order to visit my Grandma Burgos in the hospital. I took off, leaving my kids and husband behind and spent a bit of every day with her. She's doing much better than when I first arrived so that's good. Anyway, I'm back and ready to start blogging. Now I just need to get to the grocery store and buy food!
Krysta