
 about cooking
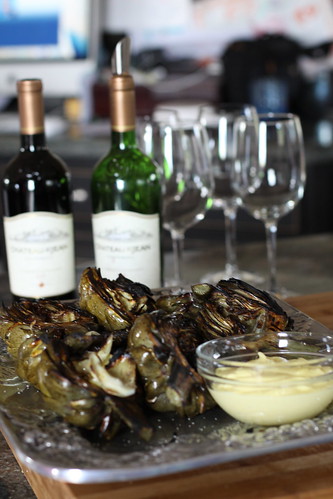
Now that we got the luck part covered, let's talk about patience. It takes about 8-10 minutes to make mayonnaise. Essentially all you do is whisk an egg yolk, some lemon juice, salt and white wine vinegar together until smooth. Like this:
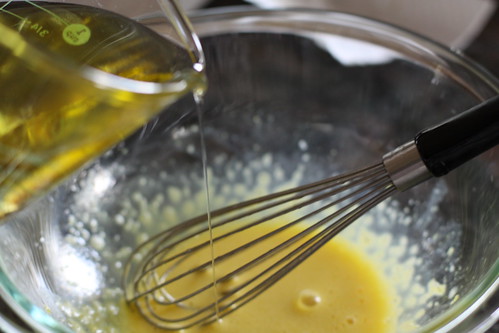
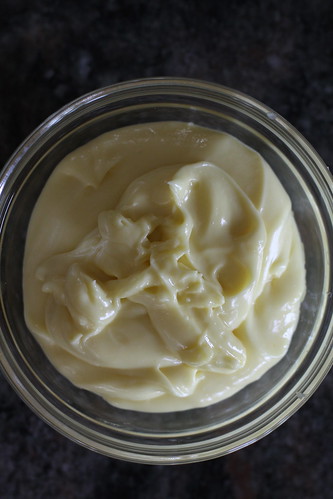
Then you drip small drops of oil into the mixture, whisking constantly and vigorously for four minutes. You will still have a lot of oil left to incorporate. After the four minutes is up, you can then pour the rest of the oil in the bowl in a very slow stream, again, whisking constantly and vigorously. This is most likely where your patience will be tested. You would be amazed at how long it takes to get all that oil incorporated. You'll be tempted to just dump all of it in, but don't. Homemade mayonnaise is an art and it must be done a certain way. Keep whisking and blending. After you have blended everything together you will be left with a pale, thick and deliciously silky mayo. See?

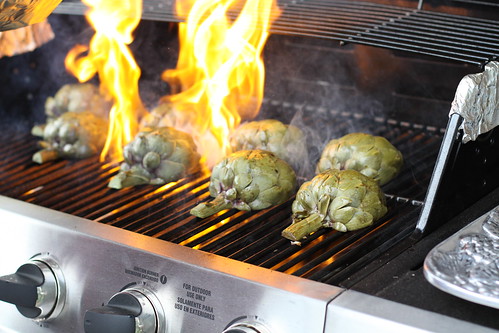
This mayonnaise is heavenly with grilled artichokes. These artichokes are marinated in balsamic, olive oil and garlic and they taste just like the ones you order at fancy restaurants. Plus, they are easy to make and fun to grill. The artichokes will already be cooked when you place them on the grill because you boil them until tender and just grill long enough to get those gorgeous char marks.
Grilled Artichokes
adapted from Emeril Lagasse
serves 6 appetizer portions
4 large artichokes, rinsed well, top third removed, and leaf tips trimmed
1/4 cup salt
2 lemons, cut in 1/2
1 cup olive oil
1/3 cup balsamic vinegar
1 tablespoon chopped garlic
1/2 teaspoon salt
1/4 teaspoon freshly ground black pepper
homemade mayonnaise for dipping (recipe follows)
Fill a large pot 3/4 full with water. Add 1/4 cup of the salt and bring to a boil.
Rub the cut sides and bottoms of the artichokes with the lemon wedges and carefully add them to the boiling water. Weight the artichokes as necessary with a heavy dish or bowl, and simmer, partially covered, until the bottoms are just tender and can be pierced with a sharp knife and an outer leaf pulls out easily, about 20 minutes. Drain the artichokes upside down in a colander until cool enough to handle.
Cut the artichokes into quarters (or half if they are smaller) and discard the prickly purple leaves and hairy choke.
In a bowl, combine the olive oil, vinegar, garlic, salt, and pepper. Add the artichoke quarters and toss to coat. Let marinate for 2 to 4 hours, turning occasionally.
Preheat grill to medium-high. Remove the artichokes from the marinate and grill, turning, until warmed through and lightly charred around the edges, about 5 minutes. Place on a platter and serve with homemade mayonnaise.
Homemade Mayonnaise
adapted from Molly Wizenberg
makes 3/4 cup
1 large egg yolk
1 1/2 teaspoons fresh lemon juice
1 teaspoon white wine vinegar
1/4 teaspoon Dijon mustard
1/2 teaspoon salt plus more to taste
3/4 cup canola oil, divided
Combine egg yolk, lemon juice, vinegar, mustard, and 1/2 teaspoon salt in medium bowl. Whisk until blended and bright yellow, about 30 seconds.
Using 1/4 teaspoon measure and whisking constantly, add 1/4 cup oil to yolk mixture, a few drops at a time, about 4 minutes. Gradually add remaining 1/2 cup oil in very slow thin stream, whisking constantly, until mayonnaise is thick, about 8 minutes (mayonnaise will be lighter in color). Cover and chill. Can be made up to 2 days ahead. Keep chilled.


How exciting! I had someone find my blog too (a local restaurant) and they gave me gift cards for mentioning them!! Congrats!
ReplyDeletewow congrats and well deserved you have a lovely site this mayo looks divine
ReplyDeleteYum, these look SO good!
ReplyDeleteHuge congrats on the feature! That's awesome!
ReplyDeleteVery well deserved, Krysta! Congratulations! Your blog is at the top of my list. Now, about that mayo....had no idea that it was that easy. Thanks!
ReplyDeleteOh this will be perfect for my BBQ tonight!!!!
ReplyDeleteThis looks Delish! I absolutely LOVE grilled artichoke, & paired with homemade Mayonnaise...Mmmm! Thank you so much for the recipe. I gotta an urge to go and buy me some Artichokes now. Too bad it's about 1:00am :(
ReplyDeleteOh & a Huge Congrats on the Bon Appetit's hook up. Very, very cool :>
So, you may already know this, but I wanted to share how easy & quick it is to make homemade Mayo... in a blender, & with far less muscle & patience. I do it all the time myself. The blender is a beautiful thing *insert heavenly music here*. I personally think that homemade tastes much better than the store bought stuff anyway.
You could easily use your own recipe above, Krysta, & you were spot on about beating the egg yolk first for about 30 seconds before adding your acids & then seasonings. That doesn't change just because you’re using a blender instead of a whisk. This brings the yoke to a stickiness that allows it to receive the oil. You stated that making Mayo is an art. So true. It is also just as much a science *sigh*. Admittedly I hated science in my school years, but I do love to cook & bake & there is so much science in this art that it is uncanny to me. Wish I would have realized that way back when.
Here are just a few alterations & notes about using a blender & you will be good-to-go:
1) If using your recipe above, you will likely need to double it. Most blenders will not blend just one egg yolk as there is not enough volume to reach the blades. Two yolks, however, work beautifully.
2) Julia Child's Three Golden Rules to blender Mayo Making:
Use cool oil (not ice cold) - Add oil SLOWLY - Do NOT over blend.
Cooling at least a portion of your oil beforehand will help keep the blender blades cool. Trust me, you may want hot to happen in the bedroom, but not in your Mayo. It isn't pretty.
3) I know I just told you to keep your cool, BUT your egg yolk is the exception. It will emulsify much better when beat at more of a room temp - Not hot, not cold, just sort of "Goldilocks".
4) Use a LOW blender speed. Fast = Friction = Freaking Hot Mess! I promise. It only takes one time where your beautiful, creamy creation is fluffing before your eyes & then *BAM!* a liquefied, slimy pool of Yuck suddenly appears & you will never, ever want it to happen again. It somehow sends your heart into your stomach. BUT... No fear my fellow Foodies! If this happens, you can simply start over with another yolk & just very slowly add back in your "hot mess" (that I would suggest you cool down slightly in the freezer before reintroducing to your blender). It's all good :P
5) No clock watching required - After the initial egg yolk whipping, add a few oil droplets first, let it incorporate & then a slow steady thin stream of oil (about the thickness of a pencil lead). You may find it necessary to add a touch of tepid to cool water for consistency when using your beloved blender, but your own judgment will serve here. And of course, the usual blender protocol of stopping occasionally to scrape the sides will likely be necessary.
*NOTE: As a rule of Julia Child's thumb, the maximum amount of oil any one large egg yolk can absorb is about 3/4 cup. When this is exceeded, the binding properties of the yolk give up & have a break down. So be aware of how much oil you are adding. You don't want to stress out your faithful huevos - Respect the yolk & nobody gets hurt.
I realize this was a lot of info, but once you understand the science, throwing it all together is nothin' big. It's quick & it's delicious. You can add spices for a little change-up, or vary the amount of vinegar or oil to get the flavor you are after too. I personally add a touch more acid than Krysta's tasty recipe above, as well as include about 2 tsp worth of egg white. Just make it yummy for YOUR tummy - Enjoy!
true religion jeans
ReplyDeleteray ban outlet
ray-ban sunglasses
dallas cowboys
rolex watches,rolex watches,swiss watches,watches for men,watches for women,omega watches,replica watches,rolex watches for sale,rolex replica,rolex watch,cartier watches,rolex submariner,fake rolex,rolex replica watches,replica rolex
oakland raiders
cheap soccer jerseys
cheap wedding dresses
karen millen uk
prada sneakers
michael kors factory store
hollister canada
air max 2014
vans shoes
christian louboutin shoes
timberland shoes
north face outlet
chicago bulls
mcm backpack
mlb jerseys
mm1110