Friday, July 30, 2010

Strawberries and Dumplings


I know, that's all I have to say right? I had you at the name. Or, maybe the pictures. Seriously? Strawberries and dumplings...like, together. Why have I not heard of this before? Why is it not some famous dessert like bananas foster or baked Alaska? I'll tell you this much, it deserves to be. Strawberry shortcake probably stole their thunder and shame on it really, because this is no sleeper dessert. It's a star and way better than just biscuit, plain strawberries and a little whipped cream. One bite and you will know what I'm talking about.

The dumplings are perfect by the way. They are hearty little things but break down pillowy and soft when you spoon into them. So, basically you toss some strawberries in sugar (more if they are under ripe and not as sweet) and lemon juice and leave them to macerate like you would for strawberry shortcake, but then you bring it all to a simmer and it does lovely things like get sweeter and bring out more juice in which you poach your dumplings. If that wasn't drool worthy enough, you top it off with a drizzle of heavy cream and BAM! (pardon my Emeril moment) That's what I'm talking about!

This, I feel like I don't even need to say, is (one) of my favorite desserts. It rank's right up there for me, with chocolate cake and bread pudding, man! It's that good. Don't delay. Make this today. That's my only advice. Oh, and make sure you invite friends over to eat with you or else you are in serious danger of eating the entire recipe by yourself. You only think I'm kidding.

Strawberries and Dumplings
adapted wildly from Gourmet via Smitten Kitchen

serves 5

1 quart (about 2 pints or 4 cups) strawberries, trimmed and thickly sliced
1/4 cup sugar (though I might try brown sugar next time, just to up the cozy quotient)
juice of half a lemon
1 cup unbleached all purpose flour
1 1/2 teaspoons baking powder
pinch of salt
1/2 cup whole milk
2 tablespoons unsalted butter
heavy cream, for topping

Stir together strawberries, sugar and lemon in a 4-quart heavy saucepan and let stand stirring occasionally, until juicy, about 15 minutes. Bring to a simmer over medium heat, stirring occasionally.

Stir the four, baking powder, and salt together. Heat the milk and butter together just until the butter melts. Stir this warmed milk mixture into the flour mixture with a wooden spoon until incorporated and smooth. Gather a golf-ball-sized portion of the dumpling batter onto a small spoon, then push the dumpling onto the stew using a second spoon (I used a small cookie scoop) It should make about 10 dumplings. Cover the fruit with the dumplings, leaving about 1/4 inch between each. Tightly cove the saucepan and reduce heat to low. Cook, undisturbed, until dumpling looks dry on top, 18-20 minutes; the dumplings will have doubled in size. Let stand off the heat, uncovered, five minutes, then dish up into plates or shallow ramekins. Drizzle with heavy cream right before serving.

This dish definitely tastes best freshly made, as the dumplings do dry out a bit by the second. But then it starts to taste like a cobbler and really, who is going to complain about that? I served this dessert 2 dumplings per person and it was perfect unless you are feeling greedy, in which all bets are off. My dumplings took a few minutes longer to cook. I just checked one by breaking into it with a spoon and when it's fluffy all the way through it's done.

If you are making this for a dinner party, bring the berries up to a simmer just before you sit to eat. Put the dumpling in to poach right as you are about to sit down to dinner and leave it. 20 minutes later, and probably after you have finished your meal, check them and if they are done, turn the heat off and leave the dish there covered until ready to serve. Just make sure you serve it within a half hour or so for maximum freshness and good color.

Tuesday, July 27, 2010

Frozen Flower Fruit Pops & Adult Fruit Kabobs-Isabellas Summer Snacks


This is not a recipe. More of a process, rather. It was time once again for Isabella's summer snack to take center stage, which she graciously let's her brother partake in, much to his delight, if he happens to not be napping. This time it was so hot out that I couldn't fathom turning our oven on for baked goods or muster up the energy to dirty my kitchen too badly, so instead we made these super cute fruit pops.

Only 3 ingredients are needed which include green apple, watermelon and pineapple, not to mention the wooden skewers used to hold it all together. It's simple really. You just cut and assemble and when they are all said and done you are left with a treat that is fresh, good for you and frozen through, but still soft enough to bite.

You don't need to stick to this flower design either. I used to freeze grapes as a kid and eat them out of a plastic bag. And just recently I read that the Four Seasons somewhere gives out little complimentary mini frozen grape kabobs as a pool snack. They, of course serve it on those sweet little green skewers with a little vloop on top. Way to take it up a notch guys. But what I'm really trying to say is that frozen fruit kabobs of any kind are going to be received with rave reviews throughout the summer. Here's a revolutionary idea; try putting fruit together that actually compliments one another, like you would in a smoothie. Combinations like peach and raspberry kabobs or watermelon and kiwi or pineapple, mango and strawberry. Keep fruit like grapes alone in a solid string. If you are feeling randy, you could take a melon baller to your various melon pieces and soak them in vodka before skewering and freezing. You could also just forget the skewering and add the frozen fruit to the bottom of a glass with crushed ice and mint and muddle together and top with ginger ale or pellegrino or club soda.

Come to think of it, a mini frozen fruit pop would be cute served along side a cheese plate on a hot night. Whatever you do, it's simple and rewarding, so get skewering!

Frozen Flower Fruit Pops
adapted from Family Fun Magazine

For each pop:

1 slice of green apple, core removed
1 ball of watermelon, from a melon baller (or grape)
1- 1/2" thick slice of pineapple, core removed (to create a ring)
1 wooden skewer

Cut notches into the pineapple ring along the sides to create "petals". Pierce the green apple on first, width wise, like in the picture above to look like two leaves on a stem. Slide it down to the middle of the skewer. Then skewer the pineapple ring, length wise, stopping when you get to the middle, briefly to add the watermelon ball into the center and skewer back into the pineapple. Push the fruit down enough so that the sharp top of the skewer comes all the way out of the top of the fruit. Then cut off the top with scissors so the end is flat. Freeze on cookie sheets in the freezer for 2 hours and enjoy!

Sunday, July 25, 2010

Watermelon Salsa


The dog days of Summer are in full swing here in Steamboat. If you were to venture downtown you would see tons of tourists and locals alike biking or tubing down the Yampa wearing nothing but bikinis with beers in hand, smiling and soaking up the hot sun. This, I know is not technically the "dog days" since that usually refers to temperatures so hot that all outdoor activities cease and you lie around like, well, dogs. However, in Steamboat this is about as close as we come. The sun is intense in the mountains so even though it's only 85 degrees out, believe me it's hot. It's wonderful really because you can still enjoy all of what summer has to offer outdoors and not be a sweaty, blistering mess, unless you are mountain biking. Or, if you are not feeling all that sporty, you can just sit out on your pergola with a nice book, kids biking in the long circular drive way snacking away on a refreshing bowl of watermelon salsa. That's what we decided to do on this beautiful Sunday and I just sat there happy, full of the food and the spirit of Summer. Relaxed and refreshed are initially what I think after we have had a day like this. And that watermelon salsa? It does wonders to promote that.

Watermelon salsa might sound odd to you and that's OK. It did to me too until I had some. My friend Danielle whipped up a batch and I sampled it when I went to her house this past week for a play date. I have had her Mom's pineapple salsa before and let me tell you, that's a winner also and if I ever get the recipe I promise to post it as well. I thought the notion of pineapple salsa was sort of strange at first too. I mean, it would be perfectly OK to accent fish or put on top of something as an accompaniment, but to be the star attraction eaten with a tortilla chip was nutty in my opinion. I was wrong. And that's exactly how this watermelon version is eaten too. I think it's best served with a pita chip, although tortilla would work fine. The best way I could describe this would be to say it's "the person who doesn't like raw tomatoes answer to pico de gallo" It's a version of pico although WAY better than the original (this is coming form a person who hates raw tomatoes though). It's slightly sweet from the watermelon but once you get past that it's pretty complex. Faintly garlicky, slightly sour, onion-y goodness in the back ground...ugh, it's just refreshing and light and perfect for your hot summer days.

I like pita chips with this as I said before because they are crunchier than tortilla chips and also compliment the salsa better in my opinion. Especially if you can get the garlic and herb version. I know, now you do think I'm nuts. Trust me though, the garlic and herb pita chip matched with this salsa is perfection.

This salsa will create quite a bit of juice if kept longer than a hour or so but it's fine, actually encouraged as the flavor only improves. If you have extra, keep it in the fridge in Tupperware and it will be good for about a week, ready to go when you are.

Watermelon Salsa
adapted from Kathy Nichols recipe file

1/4 of a seedless watermelon, rinds removed cut into small dice
1/2 a green bell pepper, cut into small dice
3 scallions, diced
1/2 a head of cilantro, minced
2 cloves of garlic, minced
juice from 2 juicy limes
2 1/2 tablespoons diced pickled jalapenos*
a hearty pinch or two of kosher salt

*diced pickled jalapenos can be found in the condiments section of the grocery store

combine everything into a medium sized bowl and stir. Taste. This recipe isn't an exact science so tweak the quantity of ingredients based on your tastes. (I had to add a bit more watermelon as mine was small to begin with) Let sit for at least 10 minutes or up to overnight.

Serves 4 in theory (served 2 1/2 at my house)

This recipe can easily be doubled for a larger crowd. I used these exact measurements in my recipe today except for adding in an extra slice of watermelon to brighten the whole thing up since it was predominately green to start out with. It should be an even mixture of pink to green. Ahh, now to get back to my relaxing afternoon! Happy weekend everyone.

Friday, July 23, 2010

Whole Wheat Pancakes with Coconut Syrup and Fruit

This just might be my favorite breakfast. Although, that might be because I don't eat very interesting breakfasts in the first place. Plain oatmeal, Ezekiel toast, grape nuts with peaches and bananas don't exactly scream excitement. But this, this is something to celebrate!

If you have never had coconut syrup before, I pity and urge you to make it a priority to taste this week. I first had it in Hawaii where it is served commonly like maple syrup is here. My husband and I stayed in Kauai for the "baby moon" of our second child. Lucky us. The sun shone, the clouds rained and since there were no cocktails to be had, the guava juice and coconut syrup flowed. I remember my cousin Harrison had bottles of coconut syrup in his pantry that he would bring home from his trips to Hawaii because you couldn't get it here. Harrison's dad is Hawaiian and had connections. I knew early on that it was a precious and much coveted commodity. I thought you had to order coconut syrup over the Internet to get it here, and I did a couple times, but then I found a recipe online for making it yourself at home and I was intrigued. So I tried it and it's dang close people. Close enough that I probably won't buy it again over the Internet.

I had a very memorable breakfast at my Aunt Jenny's house a couple years ago. Becca and Micah were there. I'll just call them my cousins even though Becca is really my aunts, husbands sister. I grew up around her and even though we are not blood related, anyone married in or remotely related to me in anyway gets chalked up to "cousins" in my mind. Any who, we had this amazing breakfast consisting of these outrageous butter waffles (they are called butter waffles for a reason) covered in various chopped up fruit with coconut syrup and whipped cream. Can anyone say gut-bomb? It was absolutely delicious but I didn't feel very good the rest of the morning. Sugar tends to do that to me. Gut-bomb aside, I certainty couldn't go the rest of my life without having these flavors for breakfast every now and again so I thought about how I could change it to make it both healthier and to cut down the sugar quotient. This recipe is what I came up with and can I tell you, you don't miss a thing! You don't need all the butter in those waffles or the extra sugar in pre-bottled syrup and whipped cream. Because this, my friends, is breakfast nirvana.

Whole Wheat Pancakes with Coconut Syrup and Fruit
adapted from allrecipes.com and various other sources that are just hodge-podged together

for the pancakes:

1 cup whole wheat flour
2/3 cup all-purpose flour
1/3 cup wheat germ or oats
1 1/2 teaspoons baking powder
1/2 teaspoon baking soda
2 tablespoons brown sugar
1 teaspoon salt
5 1/3 tablespoons unsalted butter
2 1/2 cups buttermilk
2 eggs, beaten
3 tablespoons unsalted butter

In a food processor or a large bowl, combine the whole wheat flour, white flour, wheat germ or oats, baking powder, baking soda, brown sugar, and salt.

Cut the butter into small pieces with a knife, and add the butter to the flour mixture. mix until the mixture has a sand like consistency (If using a bowl instead of the food processor, just warm the butter in the microwave for a few seconds so it blends easily).

Make a well in the center of the flour-butter mixture, and add the buttermilk and eggs. Stir until the liquids are fully incorporated.

Heat a frying pan over medium heat and grease the surface with 1 tablespoon of butter or oil. Ladle the batter onto the surface to form 4 inch pancakes. once bubbles form on the top of the pancakes, flip them over, and cook them on the other side for about 1-2 minutes.

serves 4

Coconut Syrup:

1/3 cup water
1/3 cup sugar
1 can of good quality coconut milk*
a pinch of kosher salt
1 teaspoon vanilla

Combine the water and sugar in a saucepan and boil together until it's reduced in volume by roughly half. Strain the can of coconut milk through a fine mesh strainer. Discard the watery stuff that falls out and only use the more solid stuff.* Add the coconut to the syrup mixture and whisk to combine. Let it cook just until it's thickened up a little, about 5 minutes. Add the salt and vanilla and mix well. Serve warm.

* good quality coconut milk should separate a bit to leave some watery stuff floating in the top and bottom the can. That's what I want you to strain out. However, if you open your can and don't see any separation, just pour the whole can in, it'll be OK, just a tad thinner.

Fruit:
dice up any combination of the following and mix together: (we use all)

bananas
strawberries
kiwi
peaches
mango

To assemble- top pancakes with fruit and drizzle with coconut syrup.

The blog I got the coconut syrup recipe from was adamant that the salt and vanilla extract are NOT optional. So please add it in. It gives it depth of flavor. If you have more than 4 very hungry people, I would urge you to double the pancake recipe. Happy weekend everybody!


Sunday, July 18, 2010

Mustard-Herb Glazed Salmon


Someone once used the word "inspired" to describe me. I think it's my favorite word ever. Inspired. It's more flattering than pretty, or fun or brilliant. It means something special. It's something you can't muster up on your own. Something that is a gift, and if it's true, nothing that I have achieved myself. That's why I love it so.

Usually when I invite people over for dinner it is because I have been inspired to make a meal and want to share it with others. I've done it the other way too, where you do the inviting first and then rack your brain trying to figure out what to serve. However, if the meal inspiration doesn't come in time, I'm never happy with the results. That's why I prefer the first method. Every couple has the "we really should have (insert who ever here) over for dinner soon" conversations. Sometimes, there is follow through and other times you have the same conversation over and over for years before you actually do it. I generally strive for follow through, but I wait for inspiration first. If I have no specific vision for the night or what food will be served, the invites do not go out. I willingly wait. I think I owe people that. When I have someone over, my purpose is to honor them. Make them feel taken care of and well fed. I will fail every time if not prepared and that's why I choose to wait.

I love methodically preparing a meal for company, with my kitchen timeline well laid out ahead of time. Lighting candles and putting on good music, like Diana Krall or Michael Buble a little louder than seems right. Getting ready an hour before hand and starting a glass of wine before the guests arrive so that I am absolutely ready when they come. I don't want anyone to ever feel like I am not ready for them when I'm hosting.

Last night we hosted. The inspiration came in the form of mustard-herb glazed salmon because we had wonderful fresh caught wild Alaskan variety. It's sharp and lovely giving the right amount of bite to salmons natural richness. Its basically a thick and concentrated vinaigrette made from a combination of Dijon mustard's, garlic, white wine, olive oil and fresh herbs. It's also a perfect choice for people who don't exactly love salmon as it stands up to any fishy flavor it might have naturally.

We sat out on the cool of our deck, overlooking our town, kids playing all over the yard, wild and proceeded to have a refreshing, wonderful Summer evening over great conversation, salmon, roasted potatoes, asparagus, wine and strawberry shortcake.

Mustard-Herb Glazed Salmon
adapted from Giada De Laurentiis' Everyday Italian

2 garlic cloves
3/4 teaspoon finely chopped fresh rosemary leaves
3/4 teaspoon finely chopped fresh thyme leaves
1 tablespoon dry white wine
1 tablespoon extra virgin olive oil
2 tablespoons Dijon mustard
2 tablespoons whole-grain mustard
nonstick olive oil cooking spray
6 (6-8 ounce) salmon filet's
kosher salt and freshly ground pepper

In a mini food processor, combine garlic, rosemary, thyme, wine, oil, Dijon mustard, and 1 tablespoon f whole grain mustard. Grind the mustard sauce until combined, about 30 seconds. Transfer to a small bowl. Add remaining 1 tablespoon of whole-grain mustard to the sauce and stir to combine. Set aside mustard sauce.

Pre-heat broiler. Line a heavy rimmed baking sheet with foil. Spray the foil with nonstick spray. Arrange the salmon filet's on the baking sheet and sprinkle them with salt and pepper. Broil for 2 minutes. Spoon mustard sauce over filet's and continue broiling until the filet's are just cooked through and golden brown, about 5-7 minutes longer. The fish will be done when it flakes easily when pierced with a fork

Transfer the filet's to plates and serve with lemon wedges.

serves 6

I didn't notice my picture was blurry until I uploaded it on here. Sorry about that. It was beautiful in person, I promise. You can make this without the whole grain mustard, using Dijon for the whole thing but I wouldn't advise it. They both have distinct flavors and work together wonderfully here. One thing though, please use fresh herbs. Someone asked me if they could use dry and I suppose you could, but just don't. Dried and fresh herbs don't even compare. You just can't...well, do what you will but fresh are definitely better. The inspiration just tells me so...And Aunt Jenny, thanks.


Saturday, July 17, 2010

Homemade Oreo Cookies-Isabella's Summer Snacks


As I write this, my hard working husband is huffing and puffing it somewhere along his 110 mile ride for Sunshine Kids in the Tour De Steamboat. I love that I am married to a man who has the stamina and mental discipline to attempt such a thing. If you know Jeremy, you know he's not lolli-gagging along. Rather, he is giving it his all, demanding excellence of himself and pushing a little harder each mile. I am not the only one who greatly admires him for that, although he wouldn't want to know it.

Today the kids and I made homemade Oreo cookies. Isabella has been eagerly awaiting the day we make these and I'm not surprised. Who doesn't love a good Oreo? And, If you're out there, who are you? We decided we would bring a couple to Daddy after he crosses the finish line in a bit to congratulate him on his ride. It's an odd choice, to bring him Oreos since they wouldn't be his first pick (I guess I just answered my last question). But they have sugar and carbs, which will be much needed in his body and the kids are so very excited to give them to him.

Honestly, these are not the easiest snack for kids to make, but I guess that's what I'm there for! They are quick to whip up but you have to bake the cookies in batches and it takes a while. Once they are baked and the filling is made (which is a snap as well) the fun part is filling them, of course. I filled some and the kids filled the others.

Homemade Oreo Cookies
adapted from Retro Desserts

For the cookies:

1 1/4 cup all purpose flour
1/2 cup unsweetened cocoa
1 teaspoon baking soda
1/4 teaspoon baking powder
1/4 teaspoon salt
1 cup sugar
1 1/4 sticks unsalted butter (1 stick plus 2 tablespoons) at room temperature
1 large egg

for the filling:

1/2 stick butter, at room temperature
1/4 cup shortening, at room temperature
2 cups powdered sugar
2 teaspoons vanilla

Preheat the oven to 375 degrees

For the cookies, place the flour, cocoa, baking soda, baking powder, salt and sugar in the bowl of a mixer of food processor and pulse or mix a few times to combine. Add the butter and the egg and mix until the dough comes together. Dump out onto a lightly cocoa dusted counter, or pastry mat and roll out to about 1/8 of an inch thick. Cut out with a round cookie cutter as big as you would like. We used one about the size of a real Oreo but any size will do. If you don't have a cookie cutter, use the rim of a glass. Alternately, you can just drop by the teaspoonfuls onto a sheet pan and lightly press down with damp fingers. Bake cookies in batches for 9 minutes. Let them cool on the pans for 2 minutes, then transfer to a cooling rack and cool completely.

While the cookies bake make the filling. Combine butter and shortening in the bowl of an electric mixer. Beat with the paddle attachment until combined. Add the powdered sugar and vanilla and mix on low until combined then turn the mixer up to medium high and beat for 2-3 minutes until fluffy.

Transfer the filling to a pastry bag with a very wide tip, or a ziplock bag with the end snipped off and pipe about a teaspoon or so of filling onto half the cookies. Top each with another cookie and push down until the filling reaches the sides.

dunk in milk!
Makes 22 cookies

It might seem like there is not enough filling for all the cookies, but trust me there is! Were off to the finish line now!


Thursday, July 15, 2010

Soba Noodles with Shiitakes


It's no secret that I love to cook. However, I have had my share of flops in the kitchen and 8 times out of ten the culprit is Chinese/Asian food. I love and adore this kind of food and crave it on regular basis. When we are in Denver we make it a point to either go to PF Changs or Pei Wei (or Tokoyo Joes) if not both, multiple times. Now I know they are chain restaurants people, and there are probably so many other, better more authentic choices out there, but I don't know about them. So, if you know the Denver area well and like this type of food, please send me a shout-out!

While this type of cuisine is delicious it tends to be daunting in the kitchen. That whole balancing perfectly the salty, sour, sweet, spicy thing just messes me up. I have made decent Pad Thai, but it wasn't great or anything. I have made good cold Asian cucumber salads, but come on, not too many people could screw that up. I did make good orange shrimp once, come to think about it...hmmm, I might have to dig that recipe out and test it again. OK, but my stir-fry's are pathetic and most of the time taste like burnt soy sauce and just the other week I made an atrocious (and I mean that) Asian salmon noodle bowl. It was foul. I don't even know how I could mess it up that badly. Well, in my defense, the recipe itself was messed up first, but I did absolutely nothing to save it. I managed to make it worse, actually.

Anyway, given my track record, I was shocked I tell you, when I made this (which is Chinese-ish) and it tasted really good. Dang good actually. It wasn't especially complex and maybe that is why I succeeded. Whatever the reason, I am feeling victorious! And after you make this, you will too.

It's light but hearty. It's a great summer dish but would be equally good in cold weather and just take note; it tastes better if you eat it with chop sticks. I admit, I steal a couple wooden ones whenever I am at Pei Wei. I know, its horrible. Please don't think less of me. The only thing is I would have liked something else to go with this. My husband thought it was great on its own so it's not a must, but a little cold Asian cucumber salad would have been nice. Or dessert. I guess if I had had dessert after I might not have felt this way. You make the call!

Soba noodles with Shiitakes and Cabbage
adapted from Gourmet Magazine August 2007

For the sauce:
1/3 cup water
1/3 cup soy sauce
2 teaspoons korean hot-pepper paste (or sriracha, which is what I used)
1 tablespoon packed brown sugar

For Noodles:
3 tablespoons sesame seeds
1/4 cup vegetable oil
1 tablespoons finely chopped peeled ginger ( I omitted this b/c I don't enjoy ginger)
1 tablespoon finely chopped garlic
10 ounces fresh shiitake mushrooms, stemmed and thinly sliced
6-8 cups Napa cabbage, thinly sliced
6 scallions, thinly sliced
8 to 9 ounces soba noodles (buckwheat noodles)
1 cup frozen or fresh shelled edamame

Stir together all sauce ingredients until brown sugar is dissolved, then set aside.

Toast sesame seeds in a dry skillet (not nonstick) over medium heat, stirring until pale golden, then transfer to a small bowl.

Heat oil in skillet over medium-high heat until it shimmers, then saute ginger and garlic, stirring, until fragrant, about 30 seconds. Add shiitakes and saute, stirring frequently, until tender and starting to brown, about 4 minutes. Reduce heat to medium, then add cabbage and most of the scallions (reserve some for garnish) and cook stirring occasionally, until cabbage is crisp-tender, about 3 minutes. Add sauce and simmer 2 minutes.

While cabbage is cooking, cook soba and edamame together in a pasta pot of boiling, salted water until noodles are just tender, about 6 minutes. Drain in a colander and rinse under cool water to stop the cooking and remove excess starch, then drain well again. Transfer to a large bowl and toss with vegetable mixture. Serve sprinkled with reserved scallions and sesame seeds.

*If you aren't able to find Korean hot-pepper paste (or sriracha) substitute 3/4 teaspoon chinese chili paste and reduce the amount of soy sauce to 1/4 cup.

Serves 4

I didn't feel like spending $18 for all the fresh shiitakes called for in this recipe. If you don't either, just buy one carton (usually 3-4oz) of fresh shiitakes and one pouch of dried shiitakes. Reconstitute the dried shiitakes in a small bowl of very warm water for about 45 minutes. Save some of the water you soaked the mushrooms in for the 1/3 cup water called for in the sauce. it will add more flavor. Just make sure to only use the first third of the liquid so you don't get any of the grit at the bottom that have fallen off the mushrooms. Then slice up all the mushrooms and saute as directed, except them remove them from the pan and set aside. That way, you can sprinkle the mushrooms on top of every ones dish rather than them being randomly mixed in. Then, you can make sure everyone has a nice portion.

Did I mention how healthy this is for you? Buckwheat is actually a vegetable and that is what soba noodles are made from. It's awesome.

Monday, July 12, 2010

Spumoni Sundaes with Espresso Hot Fudge Sauce


I am, at this very moment sitting, gobbling down slippery spoonfuls of this very dessert in my smart martini glass very, very thankful for having made this sundae mid-day just for the heck of it! I love spumoni. My husband does not. Therefore, If I was going to have this dessert I was either going to have to make it for other people (oh, and I will!) or indulge in a little lunch time decadence, which is exactly what I did and highly recommend.

Real spumoni is a classic Italian frozen dessert of ice cream, whipped cream, rum, nuts and candied fruit. Usually, we see it here in the states as an ice cream with 3 flavors (cherry, chocolate and pistachio) like neapolitan. Those three flavors are the essence of spumoni and this sundae channels it like none other. Its a very tasty, and sexy dessert in my opinion. It's also sophisticated, especially served in a martini glass. Oh, and it also only took 20 minutes to make from start to finish. A very nice plus!

I first had spumoni ice cream at a restaurant in Camarillo, CA called Ottavios. We used to go to that restaurant when we would visit my great-grandfather. His wife, my Nani, died when I was about 12 or so and he usually ate out. Later in life we he would frequent the Wood-Ranch Grill, but for a long while, we only went to Ottavios. I don't remember how great the food was, but since my Grandfather was Italian, I bet it was pretty good. But what I do remember was the spumoni ice cream that I would get each visit! It was so good! There is just something magical about that chocolate/cherry/pistachio combination and It holds a certain sort of nostalgia for me.

This spumoni inspired sundae is my new favorite. Because it has fresh ingredients, it breaths new life into the classic dessert taking it up a notch or two. I was a bit afraid of the espresso powder in the hot fudge sauce since a coffee flavor would not be authentic, but never fear, it was perfect. It didn't overwhelm, it just added a special something and was delicious. What I didn't put on top was whipped cream and honestly, it doesn't need it one bit but it would look pretty if you had some on hand.

Spumoni Sundaes with Espresso Hot Fudge Sauce
adapted from Bon Appetit, August 2010

1/4 cup amaretto or other almond liqueur
3 tablespoons cherry preserves
1 cup (6 ounces) fresh cherries, pitted, halved
2/3 cup heavy cream
1 tablespoon honey
1 1/2 teaspoons instant espresso powder or coffee powder
4 ounces semi sweet or bittersweet chocolate, chopped
2 tablespoons unsalted butter
2 pints pistachio gelato or ice cream
lightly sweetened whipped cream, for garnish (optional)
chopped pistachios, for garnish (optional)

Bring amaretto and preserves to a boil in saucepan. Reduce heat to medium; boil gently until mixture is reduced to 3 tablespoons, stirring often, 3 to 4 minutes. Remove from heat . Add cherries; let soak at room temperature at least 3 hours. You can make this up to 1 day ahead.

Bring cream, honey and espresso powder to a simmer in another small saucepan over medium heat. Remove from heat. Add chocolate and butter; whisk until smooth. You can make this 1 day ahead. Cover and chill. Rewarm just until pourable before using.

Spoon 1 tablespoon fudge sauce into each of 6 dessert glasses. Add 2 scoops of ice cream in each glass. Drizzle about 1 tablespoon fudge sauce over gelato on each. Top with whipped cream, cherry mixture, and pistachios.


I said I made this in 20 minutes, but really if you are doing this correctly you are supposed to let the cherries marinate in it's sauce for at least 3 hours. True, this would have made the cherry flavor more concentrated and thus better...but it was outrageous without letting it sit, so there.
I don't own a cherry pitter so I just cut the flesh off the cherry around the pit, like you would a mango. It's very easy.

Thursday, July 8, 2010

Peanut Butter Cookies


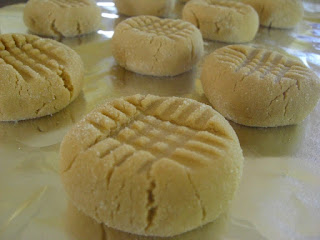
These peanut butter cookies, dare I say, are the best you could ever possibly make. I will never try a different recipe again. That's how good these are (I'm not too terribly dramatic, am I?). These are a version of what they sell at the Magnolia Bakery in New York. They are cakey and soft and covered in sugar. I'm a peanut butter cookie purist and don't like a lot of add-ins but I think the original recipe calls for chocolate chips and peanuts. I can see why as they are very rich and very plain, although, I mean that in the best way possible. But, the addition of a semi-sweet chocolate chip or two might cut the peanut-butterness of it down a notch which might be welcoming for some people. If you like a lot of things going on in your cookies, by all means, add them in at the end after you have made your dough and then bake.

I used to eat at this place called BJ's Brewery when I lived in California and they used to have something on the menu called a pazooki. I don't know why it was called that as it seemed it was just cookie dough baked in a skillet instead of on a sheet with ice cream on top. Whatever it is, they were incredible. It's a chain restaurant, I believe, so it's strange to me that something from there could be that delicious. It's probably because they were just baked and who doesn't loved fresh baked cookies? My favorite version of this pazooki was the peanut butter, so imagine my delight when I first bit into this very cookie and it took me right back to the memory of the pazooki. I have yet to try making this cookie into a pazooki, so I can't give specific instructions, but if you just happened to have individual sized skillets on hand (or another heavy, bigger baking device like an oval gratin dish) you could just pat some of this dough in an even layer across the bottom of the dish and bake until done (probably just a bit longer than it takes to bake a cookie). Place a hefty scoop of vanilla bean ice cream down over it while still warm and voila! However, if you just choose to make the cookies instead like I did, they won't taste any less incredible.

Peanut Butter Cookies
adapted from the Magnolia Bakery Cookbook

1 1/4 cups all-purpose flour
3/4 teaspoon baking soda
1/2 teaspoon baking powder
1/4 teaspoon salt
1/2 cup unsalted butter, softened
1 cup peanut butter, at room temperature (I used smooth, but you can use chunky)
3/4 cup sugar
1/2 cup packed light brown sugar
1 large egg, at room temperature*
1 tablespoon milk
1 teaspoon vanilla extract

Optional: 1/2 cup chocolate chips and 1/2 cup peanut butter chips or peanuts

For sprinkling: 1/4 cup regular sugar

Preheat oven to 350 degrees. In a large bowl, combine the flour, baking soda, baking powder, and the salt. Set aside.

in a large bowl, beat the butter and the peanut butter together until fluffy. Add the sugars and beat until smooth. Add the egg and mix well. Add the milk and the vanilla extract. Add the flour mixture and beat throughly. Stir in the peanut butter and chocolate chips and peanuts/peanut butter chips, if using. Place the sprinkling sugar (about 1/4 cup) on a plate. Drop by rounded teaspoonfuls into the sugar, and roll them around in it, then onto un-greased cookie sheets, leaving several inches between for expansion. Using a fork, lightly indent with a criss-cross pattern but do not overly flatten the cookies. Bake for 10-12 minutes. Do not over bake. Cookies may appear to be underdone, but they are not.

Cool the cookies on the sheets for 1 minute, then remove to a rack to cool completely.

makes about 30 smaller cookies or 20 bigger ones

*oh snap, you started making the cookies and just now realized your egg should be at rom temperature, but it's not. No problem! Just put the egg in a bowl of warm water for about 5 minutes to take the chill off and use.

The only thing I beg of you is to not skip the step of rolling the cookies in the sugar. That's what makes them in my opinion. Also, use regular sugar for the rolling. In the most recent batch I made of these I used bakers sugar, which is very fine granulated sugar and it didn't have the same effect. Enjoy!


Monday, July 5, 2010

Zucchini Ribbon Pasta with Basil Oil


Your first bite with all it's long and ribbony strands of zucchini just barely cooked and still deliciously fresh is just that. Delicious. Running through whole wheat al dente pasta that tastes faintly of basil and garlic and all tied together with salty parmesan cheese and a light dressing of oil. It's light but substantial and a perfect summertime dinner for anybody.

See my note down below to make this dish vegan.

I have the obvious suggestions like make sure you only make this dish when zucchini are in season and to use freshly grated parmesan cheese. When you have a meal like this that uses only a few choice ingredients, it's important that they be of high quality. It sometimes can mean the difference between a good meal and a great one.

I'm not sure who to credit this dish to. I suppose Michael Chiarello. I saw him make it a long time ago on food network and had seen it in one of his cookbooks at my friends house and had wanted to make it but never got around to it. Isn't that always the way? Then, while perusing that wonderful Smitten Kitchen blog I saw she had made it and brought it to my attention once again. So here it is, probably changed a bit from the original as Smitten tweaked it and then I tweaked it a little bit more. Well, thats not really true since all I did was change the way you cut the zucchini. The original recipe calls for a mandoline so you can cut the zucchini with the fine french fry cutter to make long, thin matchstick strands that resemble spaghetti. This makes total sense and would be easy to eat it that way with the pasta and all but I don't own a mandoline. So, I shaved zucchini into long ribbons by using a standard vegetable peeler and it worked out very well. The point is to have the zucchini very thin so that there is no need to cook it. You just add it into the hot pasta and it slightly wilts and becomes absolutely perfect.

Zucchini Ribbon Pasta with Basil Oil
adapted from Michael Chiarello

3/4 pound whole-wheat dried spaghetti
3/4 pound zucchini
1/4 cup olive oil
2 tablespoons minced garlic (about 6 cloves)
1/2 teaspoon red pepper flakes
3 tablespoons coarsley chopped basil leaves
1/2 cup freshly grated parmesan cheese
basil oil (or your favorite store bought flavored oil)


Basil Oil:
makes 1 1/3 cup

4 cups packed basil leaves
2 cups good olive oil

For the oil: In a blender, puree the herbs and oil together until completely smooth. Put the mixture in a saucepan and bring it to a simmer over moderate heat. Simmer for 45 seconds, then pour through a fine mesh strainer into a bowl. Don't press on the mixture, but you can tap the strainer against your and to get the oil through faster.

Note: fresh herb oils are better to toss into pasta at the end rather than cook with, so the oil keeps it's fresh, uncooked taste.

For the pasta:

Bring a large pot of water to a boil and add salt (at least 2-3 tablespoons. You want it salty to flavor the pasta) Add the pasta and cook until al dente, about 10 minutes.

While the water comes to a boil and the pasta cooks, run a vegetable peeler over the zucchini to create long, thin ribbons. Or, cut with a mandoline or by hand into the longest and finest juilenne you can manage. Assuming you zucchini is very finely cut it does not need to be cooked. Otherwise place it into the pot of water with the pasta for the last minute of cooking and drain with the pasta. The zucchini should still be slightly crunchy.

heat 1/4 cup olive oil in a small skillet over medium heat until hot. Add the garlic and saute briefly until light brown. Add the red pepper flakes. Quickly mix in the basil and remove from the heat. When the pasta is al dente, drain through a colander, reserving about 1/2 cup of the pasta cooking water.

Pour the pasta into a warm serving bowl; add the zucchini, basil oil (recipe above) the garlic mixture, and 1/2 cup of the cheese. Toss well, adding cooking water as needed to make a smooth sauce. taste for seasoning and add salt and pepper if needed. Grate about 2 tablespoons parmesan cheese over top and serve at once

My kids ate this up like it was candy, so it's a winner all around. I have to admit that I didn't use the basil oil for this recipe as written. I have made this oil before and it is incredible but my Grandma just brought me back fresh tuscan herb olive oil from the wine country a week ago and I used that. It, was also incredible. If you have flavored oil on hand by all means use it too.

You could make this vegan by omitting the parmesan cheese. It has so much flavor that it would be equally delicious.


Sunday, July 4, 2010

Fourth of July Flag Cake


Every 4th of July, I am expected to make an American flag cake for my families annual BBQ. Every year my side of the family gets together on this day either at my Grandparents or my house to celebrate and eat food. We used to go to the rodeo and stay to watch the fireworks. It was tradition, that just what you did. Now my allergies are too bad to tolerate the dust so mostly we end up going back home to watch the display which works out better for a family with young kids anyway.

My side of the family is very predictable. They get together at every single holiday imaginable and it is always the same. For years, Christmas to me meant "Eggs Grillo" at my Grandma's house and then later, my Aunt Kellie's. Now it means "Eggs Grillo" (which is basically eggs benedict with a beer cheese sauce instead of hollandaise) at my house. I love this tradition and tend to find comfort in doing the same things. However it is just now dawning on me that most families I know don't operate like this. Sure families in general like to get together, but it's done differently in each. In Jeremy's family, if they have a get together, it is almost always unexpected and last minute. The attitude is if you can make it, great, we would love to see you but we are going to have a great time with or without you. That might sound slightly mean or weird and for a while I thought it was, but really, it's awesome. There is freedom in that attitude. Freedom from expectations. Freedom in saying no if you have (or would like to make) other plans. Freedom in knowing their feelings will not be hurt if you decline because they are secure in your love for them. Freedom. Freedom. Freedom. And do you know ultimately what that freedom does? It makes you rarely want to say no. Why would you? You want to be with them and at the party that is flexible, unfussy and relaxed where you are free to do whatever it is you want to do whether it be nap on the couch or play bad mitten in the backyard because anything goes there.

When Jeremy's side had a family reunion last year I was sort of shocked at how it was conducted. Jeremy's Mom has 4 brothers and sisters so there are 5 families who's sole purpose was to see and visit each other during the course of a week. In my family, that might be a stressful situation for me personally because when you have a family reunion it is expected (probably as it should be) that you will be together, doing things together, eating together, etc. This is the general idea when Jeremy's family gets together, but there are no expectations of what the time will look like. Basically, each family went off and did their own things. Dan and Sandy's family went river rafting. Gracie's family was hiking. Tim and Sherry went out to lunch with Laura and Randy (and no one else's feelings were hurt that they were not formally invited!) and Cindy was home with her Mom who was napping while she cleaning her house for that night's dinner. When it was time for dinner there was no set time to come. You just came whenever you were done with your nap, or with the activity you were doing. No expectation, no judgement. Just family wanting to be together, unselfishly without their own agenda in mind. If you couldn't come because you had a headache there was no reason to feel badly. You would just see everyone the next day if you were up to it. It was strange. It was downright weird but in the end I rather liked it (shocker huh?)

My family is not flexible. I don't mean to say that in a bad way. They are just not flexible and that's the truth. There are expectations. On the fourth of July the flag cake must be made, we must have a BBQ and we must get together come hell or high water. If you had another invitation from anybody to do anything else you must decline it because you have already committed to do this same thing year after year. It's like an unwritten code. They are not Nazi's. I just read this paragraph over and it sounds like my family might be Nazi's. I assure you they are not and they are lovely people but they just march to the beat of a different drum. On the other hand, Jeremy's family description sounds like they are hippies. HA! They are sooooo not hippies. I remember when we first got married Jeremy saying to me "Your family gets together for every single holiday. That's kind of strange". Poppycock! Your family are the strange ones! Jeremy would sometimes say something like "Let's go to the Heit's for Thanksgiving, wouldn't it be fun?" Fun?!?! Thanksgiving is a holiday. It is for families (the un-written code). The Heit's are our friends. I couldn't call my Grandma or my Mom and say "oh yeah, were not going to make it tonight. Oh, no were fine. No, no ones sick. We just want to go to our friends house who doesn't have any family in town to celebrate with, instead". Yeah no. That would not go over well.

Somewhere along the line, after 6 years of marriage, Jeremy's logic is starting to make more sense to me. I'm sure, somewhere at sometime, during some holiday I will make that fateful call to my family to tell them I will not be coming, but yes I am in town and that I have other plans that year. In a good relationship you should have the freedom to be able to do that. Your family should know and rest in the fact that you like to be with them and will be, just not maybe on this particular day. It should be no big deal. Just writing that, however, makes me kind of dizzy. It won't be this year. It won't be this fourth of July. Nope, today I will log off this computer, march straight into the kitchen, allergies and poor sleep be damned and make this flag cake. After all, it is tradition!

American Flag Cake
adapted from Barefoot Contessa Family Style

2 1/4 sticks (18 tablespoons) unsalted butter, at room temperature
3 cups sugar
6 extra large eggs, at room temperature
1 cup sour cream, at room temperature (or plain yogurt or buttermilk)
1 1/2 teaspoons pure vanilla extract
3 cups all-purpose flour
1/3 cup cornstarch
1 teaspoon kosher salt
1 teaspoon baking soda

For the icing:
4 sticks (1 pound) unsalted butter, at room temperature
1 1/2 pounds (3 8-oz packages) cream cheese, at room temperature
1 pound confectioners sugar
1 1/2 teaspoons pure vanilla extract

To Assemble:
2 half-pints blueberries
3 half-pints raspberries

Heat the oven to 350 degrees. Butter and flour an 18x12x1 1/2-inch sheet pan.

Cream the butter and sugar in the bowl of an electric mixer fitted with the paddle attachment on high speed, until light and fluffy. On medium speed, add the eggs, 2 at a time, then add the sour cream and vanilla. Scrape down the sides and stir until smooth.

Sift together the flour, cornstarch, salt, and baking soda in a bowl. With the mixer on low speed, add the flour mixture to the butter mixture until just combined. Pour into prepared pan. Smooth the top with a spatula. bake in the center of the oven for 20 to 30 minutes, until a toothpick comes out clean. Cool to room temperature.

For the icing, combine the butter, cream cheese, sugar, and vanilla int he bowl of an electric mixer fitted with the paddle attachment, mixing just until smooth.

Spread three fourths of the icing on top of the cooled sheet cake. outline the flag on the top of the cake with a toothpick. Fill the upper left corner with blueberries. Place two rows of the raspberries across the top of the cake like a red stripe. Put remaining icing in a pastry bag fitted with a star tip and pipe rows of white stripes below the raspberries. Alternate rows of raspberries and icing until flag is completed. Pipe stars on top of the blueberries (optional).

This isn't about the cake. Can you tell that? it's all about the decor on top so feel free to you use your favorite vanilla or chocolate (or carrot, banana, etc) cake recipe. You don't need to use this one as most recipes for a 2-layer cake will be the perfect amount of batter for the sheet pan. Just make sure to use white icing or it won't look like the flag. I use a different recipe almost every year, but it's supposed to be the same so don't tell my family! :) Serve this cake right in the sheet pan. If you want to be able to remove it after it's baked then put parchment paper in the bottom of the pan before you butter and flour it. But for best results I'd say to serve it in the pan.

Another thing is I never have my eggs at room temperature when I need them to be. Eggs add more volume when they are not cold so in order to achieve this last minute, I put the amount of eggs called for in a bowl of warm water for a couple minutes. It does the trick!

I was in a hurry today and didn't add the stripes of icing in-between the raspberry lines like I usually do. It looks better if you do it, but as you can see it's a beauty anyway. God bless the USA and all our families too.

Thursday, July 1, 2010

Refrigerator Dill Pickles-Isabella's Summer Snacks


This week Isabella and I made refrigerator dill pickles for her summer snack. She loved the idea of actually making pickles instead of just buying them. What she didn't love is having to wait for them to pickle. The recipe said we would have to wait 10 days until they would be done, but on day 3, although not totally ready, they are pretty pickely. Were very happy wih the results!
I chose refrigerator pickles because they don't require traditional canning which is a long process not suitable for my 8 year old. Instead you just mix up the vinegary solution and spices, add the cucumbers and set in the refrigerator to marinate. They don't keep long term like when you can them correctly, but rather for about a month in the refrigerator. Pickles don't last a day in my house, let alone a month so I am not really worried. I also chose them because, like most kids, Isabella loves pickles!

These have good flavor, although maybe a little heavy on the vinegar side. I will write the recipe exactly how we made them, but if you don't love very pronounced vinegar, reduce it by about 1/4 cup, substituting with water and it should be perfect.

Refrigerator Dill Pickles
adapted from allrecipes.com

6 pickling cucumbers, or 1 regular cucumber cut into wedges to fit the jar
1 cup water
1 cups white vinegar (3/4 cup for milder pickles)
1 package (.66oz) fresh dill
2 tablespoons white sugar
4 cloves garlic, smashed
2 tablespoons kosher salt
1/2 tablespoon pickling spice
In a large canning jar, combine the vineagr with the salt and sugar and let stand a minute. Add the garlic cloves, fresh dill and pickeling spice. Place the cucumber wedges in an fill to the top with water, about 1 cup. More if you didn't add as much vinegar. Secure with the lid and shake. Place in the refrigerator and shake once everyday. Pickles will be ready in 10 days, but Isabella thinks they are fine after 3!
Use within 1 month.