Thursday, November 4, 2010

Apple and Pecan Salad with Vidalia-Honey Vinaigrette


I don't usually make great salads. I'm going to just admit that one off the bat. I love a good salad but I find the ones I make at home just are not that exciting. Therefore, I don't make them a whole lot. My go to side salad is lettuce, cucumbers, avocado, green onion, cherry tomato and Italian dressing. It's fine, but nothing special. I like very put together salads. Kind's who have the perfect crisp lettuce to match the dressing and a great combo of ingredients (something kinda salty, something kinda crunchy, something kinda sweet) that compliment and balance each other. Basically, the salad has to speak to me. It has to say "I have tons of flavor and I'm very interesting, try me".

That's exactly what this salad did. It spoke to me. I have always loved Vidalia onion vinaigrette's but did not know how to make one from scratch until now. It's a great dressing. Slightly sweet and tangy with a solid carmel-y, onion-y foundation that just sings. It's perfect with greens, nuts (kinda crunchy), apple (kinda sweet) and well, cranberries, which are also kinda sweet, but, you could throw in some aged cubed cheddar if you are really wanting that kinda salty element.

We ate this along side a casual soup and it just stepped up the entire dinner. This salad is homey, special and so Fall. You could also eat this alone as a main course with a dinner roll because it's that satisfying. And I don't take eating salad for dinner lightly.

Vidalia-Honey Vinaigrette
adapted from Southern Living, Oct. 2010

1/2 cup chopped Vidalia onion
3/4 cup plus 1 tbsp vegetable oil(I used 1/2 cup)
1/4 cup cider vinegar, divided
1/4 cup honey
1 Tbsp Dijon mustard
1/2 tsp kosher salt
1/2 tsp pepper

Saute onion in 1 tbsp hot oil in a medium skillet over medium heat, stirring often, 8 minutes or until caramel colored. Add 2 tbsp. vinegar, stirring to loosen particles from bottom of skillet. Remove from heat; cool 5 minutes.

Process onion mixture, honey, salt, pepper, mustard, 1 Tbsp vinegar, and remaining oil (I recommend adding 1/2 cup oil and tasting before adding the other 1/4 cup to see if you even need it) in a blender or magic bullet for 30 seconds or until blended. Cover and chill 3 to 24 hours.

Apple and Pecan Salad
serves 4

5-6 cups salad greens (I used a mixture of green and purple butter lettuces)
1 large honeycrisp apple, chopped
a couple handfuls of toasted pecans
1 handful of dried cranberries
a handful of cubed of aged cheddar (optional)

Toss together with the vinaigrette and serve immediately

You won't need all the dressing for the salad. Just use enough to coat the leaves nicely and reserve the rest for another time. You can use whichever salad greens you prefer, but I used the butter leaf mix plus a few handfuls of baby arugula because it's hardy and can stand up nicely to the vinaigrette. This dressing is thick and will weigh down delicate greens such as arugula alone. Butter lettuces are a perfect match for this salad.

Monday, November 1, 2010

Summer Squash Risotto with Parmesan and Sage


As I write this post, I will be leaving every couple minutes to stir this risotto, which is happily simmering on my stove this very minute. Lucky us. It smells like a bona fide restaurant in here, I kid you not. Every time I make something by Tyler Florence, as this dish happens to be, it smells like that. The man does not disappoint. His measurements are off sometimes, but if you are a seasoned enough cook, you can remedy them pretty easily. (stir count so far since writing started: 2) But I've already stirred it about 10 times.

I have had a super productive day. So far I have baked 3 cakes (without frosting), done the dishes, 2 loads of laundry, tidied up the house, taken care of my 3 kids, visited with my friend, and now I'm making this stellar dinner. I feel quite accomplished and deserving of my glass of wine. That's the best part about risotto, in my opinion. Most of the (good) recipes call for wine to be added to the rice and it's a perfectly good time to pour yourself a glass, turn the music up and stir, stir, stir, baby! (stir count: 4)

Risotto has a bad rap. Most people think it is labor intensive and in need of babysitting. Both are true, but not bad. You just have to be in or around the kitchen, then add a little liquid and stir every few minutes. It's not hard or bad. It's actually enjoyable and the vegetables roast while the risotto is cooking and honestly it's a cinch to make. It's impressive though with a wonderful wine-y, parmesan-y depth of flavor, so make it when you want to impress. Or for casual Friday night dinner like me. It can go either way. If you make risotto once, you'll make it over and over. (stir count: 6)

Summer Squash Risotto with Parmesan and Sage
adapted from Dinner At My Place by Tyler Florence

serves 4 to 6

4 small summer squash
4 small zucchini
4 pattypan squash
1 large onion, sliced
1/4 bunch fresh thyme sprigs (4 sprigs), leaves only
extra-virgin olive oil
Kosher salt and freshly ground black pepper

Risotto:

Extra-virgin olive oil
1 bunch fresh sage springs, leaves only
1 medium onion
2 cups Arborio rice
1/2 750-mililiter bottle dry white wine
2 quarts vegetable or chicken stock
1/2 stick unsalted butter, cut into thirds
1 cup grated Parmigiano-Riggiano cheese
kosher salt and freshly ground black pepper

Preheat oven to 350 degrees. Cut squash, zucchini, and pattypan squash into circles and slice onion. Set out on a roasting tray and scatter thyme leaves over the top. Drizzle with olive oil and season generously with salt and pepper. Roast in a preheated oven for 20 minutes, until golden brown and fragrant (It took my veggies about 45-50 minutes to cook through, so the cooking time could vary drastically depending on your oven. If you know your oven runs a bit cooler, like mine, bump the temperature up to 375 degrees and roast until vegetable are tender).

While the vegetables roast, start the risotto. Set a large heavy-based pot over medium heat. Pour a 3-count of oil (about 3 tablespoons) into the pot and fry the sage leaves until they are crispy and crackly. Drain leaves on paper towels and set aside. Add onion to the pot and saute until fragrant and slightly translucent. Add rice and cook for 2-3 minutes over medium heat as you stir with a wooden spoon. Add the wine; cook until mostly evaporated. Begin adding broth, a little at a time, allowing the rice to absorb the broth each time before adding more. Continue to do this until the rice is tender but still has a little bite. (add water if necessary, if you use all the broth before the rice is done.) To finish, add butter and Parmigiano-Riggiano and stir to combine. Serve risotto with roasted vegetables on top.

This recipe adapts well to your preferences. Don't love zucchini? Roast butternut squash, onion and sweet potato with some spinach. Or eggplant and tomato. The possibilities are endless. Can't cook with alcohol? First of all I feel SO sorry for you, but just substitute the total amount of wine called for with more vegetable or chicken broth. It won't be AS flavorful, but you'll still rock it. Here's a little tip; you don't have to add the liquid in such small amounts. You can add about a cup at a time which will cut down the cooking time, but you will have to sit and stir the whole time, so I leave you to pick your method.

Friday, October 29, 2010

Truffle Brownies

Hi there! I wrote this post back in June...June 29th actually, so I am posting this 4 months to the day after the fact. Why? Because I am currently on a much needed vacation in Denver alone with my husband, where we are doing whatever we want, when we want. Ahhh, this is the life...

Truffle brownies don't sound like something I would usually gravitate toward. I'm just now learning that I really like brownies in general. I used to think I didn't. Probably becuase they are overdone and so cliche. Also, a cop-out dessert for so many who use the box kind. I'm not trying to hate on boxed brownies, but they are not very "me". Sure, Ghiradelli got me through a few sad nights when I was about 8 months pregnant and craving brownie sundae's, but usually I'm a from scratch sort of girl.

The other thing is I used to think I didn't really enjoy dense and rich chocolate desserts. I don't much care for flourless tortes or chocolate molten lava cakes. So, when I saw this recipe in Bon Appetit for this rather dense, fudgy brownie with chocolate frosting on top and ran, literally ran to the kitchen to make them right away, I was quite surprised. I thought "well, this is odd". Then as I was measuring the sugar, I began to realize that one of my favorite desserts as a teenager was always brownie sundaes. Then, another startling revelation...My favorite dessert in the world (on most days) is a big piece of chocolate cake with chocolate icing. And, I always order a chocolate shake at In-N-Out burger. And, whats that dessert I love at that restaurant? Chocolate velvet pudding cake, is it? Hey now, maybe just becuase I don't care for certain rich chocolate desserts, doesn't mean I don't like them all together. Sometimes I don't think I know myself at all!

This particular species of brownie would fall into more of the fudgy catagory with a bittersweet, rich chocolate ganache on top. The recipe calls for bittersweet chocolate to be used for both the brownie and the topping, but if you are someone who likes their chocolate desserts a little more on the sweet side, I suggest you use semi-sweet chocolate for the ganache frosting. I used walnuts but they are optional.


Truffle Brownies
adapted from Bon Appetit Magazine

12 ounces bittersweet chocolate, chopped and divided (or chips)
11 tablespoons (1 stick plus 3 tablespoons) unsalted butter, cut into 1-inch cubes
1 1/4 cups sugar
3 large eggs
1 1/2 teaspoons vanilla extract
1/4 teaspoon salt
1 cup unbleached all purpose flour
1 cup walnuts, toasted, coarsley chopped
3/4 cup heavy whipping cream

Position rack in the center of the oven a preheat to 350 degrees. Line a 9x9x2 (I used a square 9" cake pan, but an 8x8 glass pyrex dish would work) with foil, leaving overhang (this is so you can lift the brownies out of the pan later for good cutting) Spray foil with nonstick vegetable spray. Combine 6 ounces bittersweet chocolate and butter in a meduim bowl. Set bowl over a saucepan of simmering water and stir until chocolate and butter are melted and smooth. Alternately just combine the butter and chocolate in a glass bowl and microwave in 30 second increments, stirring between until melted. Set melted chocolate mixture aside until lukewarm, 5-10 minutes.

Whisk sugar, eggs, vanilla extract, and salt in alarge bowl to blend. Whisk in chocolate mixture. Stir in flour, then chopped toasted walnuts. Transfer batter to prepared baking pan. Bake brownies until tester inserted into center comes out with moist crumbs attached, 26-28 minutes. Transfer pan to a cooling rack and let brownies cool completely. Bring cream to a simmer in a small saucepan over medium heat. Add remaining 6 ounces chocolate to hot cream and let stand 5 minutes to soften, then whisk until melted and smooth. Pour chocolate ganache over brownie sheet in pan and spread to cover completely. Let stand at cool room temperature until topping is set, about 4 hours. Can be made 1 day ahead. cover and store at room temperature.

Using foil as aid, lift brownie sheet from pan. Fold down foil edges. Using a large sharp knife, cut brownie sheet into 25 squares, wiping knife with hot moist cloth after each cut. Arrange brownies on a platter and serve.

Makes 25 squares

The key to perfectly moist, fudgy brownies is not to overcook them. As soon as the tester comes out with moist crumbs attached, remove the pan from the oven. My brownies were not done at 26 minutes, but at 29 minutes, they were perfect. If you are using an 8x8 pyrex pan, your brownies will be thicker and will need to bake slightly longer, but make sure you check them at the 30 minute mark.

Tuesday, October 26, 2010

Roasted Potato Leek Soup


Roasted Potato Soup

When the weather starts to get chilly I undoubtedly turn to my good friends, soup and stew to help bring me comfort. I make all different kinds and am always trying new recipes. I love potato soup and I make three different versions of it regularly in the cold months. The three versions I make fall into different categories: humble and casual (the usual suspects, potato, onion and bacon boiled to together) the crowd pleaser (a baked potato variety with skin and all the fixings) and a fancy schmancy pureed one with leeks, wine and lots of cream. That's the one I'm talking about today.

I didn't know potato soup could be elevated to such a high place. This version is without a doubt the most flavorful, complex, restaurant quality one that I've made. It does require a few extra steps, such as roasting the potato and leeks in the oven before pureeing and finishing it off, but trust me, it's simple and well worth it. It does take some time though, so make sure you start dinner at least an hour before you want to serve. Then, as the potatoes are roasting measure out all the other ingredients so they are ready to go when you are. I don't know about you but I hate having to stop and grate 1/4 cup of cheese while my soup is bubbling away waiting for me to hurry up already. You can also make the optional fried shallots to garnish while the potatoes are roasting. If you prepare ahead of time, you can be done in just over an hour from start to finish. Most of that time is to allow the potatoes to cook through.

This soup calls for a strange ingredient as far as potato soup is concerned: arugula. I'm not sure why, other than it adds pretty little green flecks throughout, that people will probably mistake for leeks. It does look gorgeous, while adding to the nutritional value so I always use it. You can't taste it at all, and like I said, people will take them for leeks so if you need to sneak some veggies into certain people in your family this is an ingenious way! Win-win!

Roasted Potato Leek Soup
adapted from Barefoot Contessa Back to Basics
serves 6 to 8

2 pounds Yukon Gold potatoes, peeled and cut into 3/4-inch chunks
4 cups chopped leeks, white and light green parts, cleaned of all sand (4 leeks)
1/4 cup good olive oil
Kosher salt and freshly ground pepper
3 cups baby arugula, lightly packed
1/2 cup dry white wine, plus extra for serving
6 to 7 cups chicken stock
3/4 cup heavy cream
8 ounces creme fraiche (or sour cream)
1/4 cup freshly grated parmesan cheese, plus extra for garnish
Crispy shallots, optional, for garnish (recipe to follow)

Preheat the oven to 400 degrees

Combine the potatoes and leeks on a sheet pan in a single layer. Add the olive oil, 1 teaspoon salt, and 1/2 teaspoon pepper and toss to coat the vegetables evenly. Roast for 40 to 45 minutes, turning them with a spatula a few times during cooking, until very tender. Add the arugula and toss to combine. Roast for 4 to 5 more minutes, until the arugula is wilted. Remove the pan from the oven and place over two burners. Stir in the wine and 1 cup of the chicken stock and cook over low heat, scraping up any crispy roasted bits sticking to the pan.

in batches, transfer the roasted vegetables to a food processor (*see note) fitted with the steel blade, adding the pan liquid and about 5 cups of the chicken stock to make a puree. Pour the puree into a large pot or Dutch oven. Continue to puree the vegetables in batches until they're all done and combined in the large pot. Add enough of the remaining 1 to 2 cups of stock to make a thick soup. Add the cream, creme fraiche (or sour cream), 2 teaspoons salt, and 1 teaspoon pepper and check the seasonings.

When ready to serve, reheat the soup gently and whisk in 2 tablespoons white wine and the parmesan cheese. Serve hot with an extra grating of parmesan cheese and crispy shallots, if using.

* be sure to use a food processor to blend the soup. If you use a blender it will cause the potatoes to get gummy. They are fickle things!

Crispy Shallots

1 1/2 cups olive oil or vegetable oil
3 tablespoons unsalted butter
5 to 6 shallots, peeled and sliced into thin rings

Heat the oil and butter in a saucepan over medium-low heat until it reaches 220 degrees on a candy thermometer (or until hot)

Reduce the heat to low, add the shallots, and cook for 30 to 40 minutes, until they are a rich golden brown. the temperature should stay below 260 degrees. Stir the shallots occasionally to make sure they brown evenly. Remove them from the oil with a slotted spoon, drain well, and spread out to cool on paper towels. Once they have fried and crisped, they can be stored at room temperature, covered for several days, if not using right away.


So, the recipe calls for creme fraiche, as you can see, but I have made it both that way and using sour cream to substitute. There is no big difference, so use the sour cream if budget is a concern to you (and who isn't it a concern to?) But, there's no doubt that creme fraiche is special so use that if you are feeling fancy.

Saturday, October 23, 2010

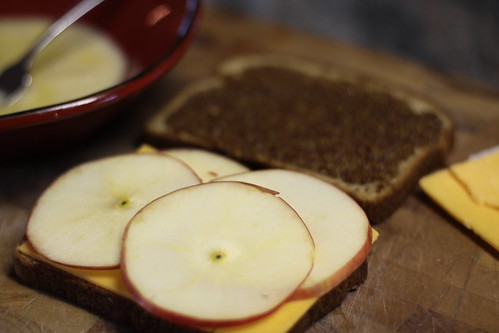
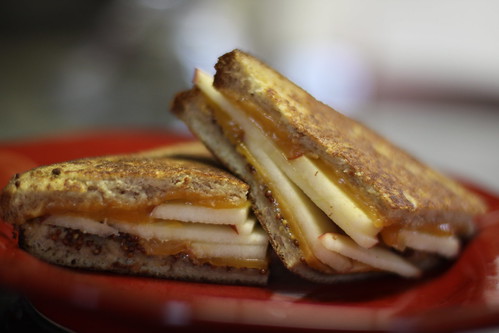
Apple and Sharp Cheddar Grilled Cheese Monte Cristo with Maple Mustard


Apple, Cheddar maple Monticristo

It is done. There is snow on the ground in here, probably never to melt again before Spring. *sigh*. I'm not ready. I was outside 2 days ago, soaking up the warm autumn light, admiring trees with yellow leaves and bushes with red berries and it was so bittersweet because I knew what the weather forecast said. I knew a storm was coming. The next day I awoke to gray clouds and overcast skies with rain coming later in the day and lasting into the night. This morning I woke up to a white haze and a blanket of snow across the whole valley. There was enough for my kids to make a respectable snowman outside, who they named "Jolly" and while it was cute indeed, I just don't think I'm ready for this.

Apple, Cheddar maple Monticristo

I like the snow, don't get me wrong. I just wish It wouldn't fly until after Halloween every year and then abruptly stop after New Years. Instead, it usually starts in the beginning on October and doesn't begin to thaw until April, and even then, isn't officially gone until June. we have long winters in the mountains. We are blessed with more than our share of bluebird days (where the sky is bright blue, the sun is shining, the snow is crisp and clean and the air bitter cold), which gets us through. The other thing that gets me through is having an arsenal of comforting meals that are hearty on a cold day. When it's nasty out, I like to cook, and cook and cook, so it works out. It gives me something to do with purpose, while you wouldn't want to be outside anyway. I am homebound, so I might as well make the most of it, ya know? On days like today I love making soup and stews, chili's and the like while I also like to braise things, slow bake and therefore draw out the process. I love it. The world just seems like a better place when you have something bubbling away on the stove for dinner, hot chocolate heating up for the kids when they come stomping in from the cold, teeth chattering and noses red. And, a little hot lunch. Again, something hearty, warm and out of the ordinary does the trick on days like today. This apple, sharp cheddar and grilled cheese monte cristo with maple mustard...yes, you heard it right people, this sandwich is ridiculous...is perfect and takes little effort for big results. I use the honey crisp apples because they are sweet and crunchy and in peak season this time of year. They are also a perfect match for sharp cheddar.

In the picture I took of the sandwich It looks chock full of apples. It would probably be better with only one layer of them, but I love apples, so what can I say? This is a monte cristo, not just a grilled cheese, because after you have assembled your sandwich you roll the whole outside in some egg, thinned out with a little milk and spiced with a bit of cinnamon, like you would french toast. Then you cook it in a skillet until the egg is cooked through in the bread and becomes custardy and then cheese is melted inside. The result? Perfection.

Apple and Sharp Cheddar Grilled Cheese Monte Cristo with Maple Mustard
adapted from Rachael Ray

Yield: 2 sandwiches, or 8 appetizer bites/snacks

4 1/2-inch thick slices good quality bread
2 tablespoons stone ground mustard
2 teaspoons dark amber pure maple syrup
8 slices sharp cheddar cheese
Honeycrisp apple, thinly sliced (McIntosh or Gala work too)
2 large eggs
1/4 cup half-and-half or whole milk
freshly grated nutmeg
a generous pinch of cinnamon
butter

Combine the mustard and maple syrup together and stir to combine. Build 2 cheese and apple sandwiches. I used enough cheese to cover the bottom of the bread, with a layer of apples and more cheese on top with a layer of the maple mustard on one half.

heat a griddle pan over medium-low heat.

beat the eggs with the half-and-half or milk and season with nutmeg and cinnamon. Turn the sandwiches in the egg and cook in butter melted on the hot griddle pan. Grill the sandwiches until deeply golden and the cheese has melted.

Cut sandwiches into triangles or four square pieces to serve.

If you are not much into the maple mustard, you can substitute for prepared fig spread. The sweetness compliments this just as well. Well, I'm off to finish the rest of my day doing exactly what I have suggested here. I going to make us a big pot of chili, brew some peppermint tea and let the good times roll!

Tuesday, October 19, 2010

No Bake Cheesecake (no jello, thankyouverymuch)


Yes it's true. You can have cheesecake without the hassle of baking and the addition of a Jello starter kit that (dare I say it?) actually tastes like a respectable cheesecake. Some might even prefer this to a classic baked cheesecake for it's creamy texture. It's thick and rich tasting strongly of sweetened cream cheese and cream, which is very reassuring since that is exactly what's in it. A few drops of lemon juice in the filling help it to taste fresh and lighter than it is, which is nice.

This was a Sk8 church dessert. It was a perfect pick because the filling could be doubled easily and make two cakes at once, plus it only took about 5 minutes to make. OK, maybe 6, but that's all. What had me sold though was that you could make it in advance (I made them that morning) and it could be sitting in the fridge all day just waiting for you to dump some fruit on top and call it dessert. Since I didn't know which fruit topping 16-18 year old hoodlum skaters would prefer (I say that with all due respect), I made sure to have a nice assortment. I made a couple fresh raspberry sauce topped ones, which is shown in the picture and I will include in the recipe. I also kept one plain for all the purists and I have to admit I cheated and unleashed some canned pie filling over the others in blueberry and cherry. I was specifically warned against this. I watched the episode in which Nigella Lawson made this and she pleaded with us to not use pie filling. Instead, she wanted us to use cherry conserve, which is different from jam, and since we don't live in Britain, hard to find. Pie filling it was. You can choose whatever you would like for your dessert.

No Bake Cheesecake
Adapted from Nigella Lawson

Yield: 1-9" cheesecake

1 1/4 cups graham cracker crumbs (about 10 crackers if making your own)
2 tablespoon sugar
3/4 stick soft unsalted butter
10 ounces cream cheese
1/2 cup powdered sugar
1 teaspoon vanilla extract
1/2 teaspoon lemon juice
1 cup heavy cream
1 (10-ounce) jar black cherry spread, pie filling, or fresh raspberry sauce (recipe to follow)

Blitz the graham crackers in a food processor until beginning to turn to crumbs, then add the sugar and butter and whiz again to make the mixture clump. if using graham crackers crumbs, you can use a bowl and wooden spoon to mix the butter in, with the sugar added.

Press this mixture into a 8 or 9-inch spring form pan or a pie plate. press a little up the sides to form a slight ridge.

lightly beat the cream in a bowl of an electric mixer fitted with whisk attachment. Take whipped cream out and place on a separate plate and set aside. Wipe the bowl clean (or not) and use it to combine the cream cheese mixture.

Beat together the cream cheese, sugar, vanilla and lemon juice in a bowl until smooth. The lightly fold the whipped cream into the cream cheese mixture. (I stirred with the mixer on low until it combined all the way after folding just to make sure it was well incorporated).

Spoon the cheesecake filling on top of the crust and smooth with a spatula. Put in the refrigerator for 3 hours or overnight. When ready to serve, un-mold, if using a spring form pan, and spread your desired topping over the top.

Fresh Raspberry Sauce: Optional

1 cup red jelly (not jam) such as currant, raspberry or strawberry
3 half-pints fresh raspberries

melt the jelly in a small pan over low heat. In a bowl, toss the raspberries and the warm jelly gently until well mixed. Arrange the berries on top of the cake.

I used a pie tin to make this cheesecake instead of the traditional spring form pan. You can use either. The only reason I choose it is because I needed multiple cheesecakes for Sk8 church and only had 1 spring form pan.


Saturday, October 16, 2010

Chorizo and Black Bean Soup with Avocado Cream


This is black bean soup at it's finest. I recently had a black bean soup at Winonas, a local restaurant in our area and it was very good. So good that when I came back with a friend I ordered it again, had her try it and together we tried to figure out what was in it. After some debate we settled on the fact that there must be a huge amount of jack cheese in it to get that kind of flavor and texture. A heck of a lot. Figures. The reason someone (me) would make black bean soup at home is because it's supposed to be healthy. If it's not, why would I waste precious calories and dairy intake on black bean soup? Bring on the French onion, the garlic cheesy mashed potatoes with a cup of cream, but not...black bean soup. You get what I'm saying? I like black bean soup alright, but it A) better taste good and B) Not be riddled with calories. I'll save that for another meal, thank you. Or even better, dessert!

This soup fits my criteria perfectly. There is just enough heft and background flavor from the fat of the smokey chorizo and just enough richness from the avocado cream (which contains a bit of sour cream) to elevate this soup to a whole new level. It's good and warming and satisfying all the while being healthy for you (well, about that...I took the pretty picture with the chorizo rounds as garnish on this soup just as the recipe says to do, but before I ate it, I took them off, thus making the dish that much healthier). If you are a meat eater, go ahead and leave it on, but if you don't mind you can leave it off without missing anything. All it's flavor is in the soup anyway and doesn't need it to carry any flavors. If you are not a wasteful person this will be hard for you because it means all you will use the package of chorizo for is to render it's fat and since the recipe calls for Spanish chorizo, it's not a whole lot. Worth it though. Very worth it.

Please make sure and buy Spanish chorizo (or Italian sausage or Kielbasa will work too) and not Mexican chorizo. Spanish chorizo tends to be clean, containing only respectable parts of the pig while the Mexican variety can contain nasty things like lymph nodes, as my friend Danielle found out earlier this week. That's all I'm saying on that. Buy Spanish people! Spanish! If the label does not distinguish clearly, it's easy to tell which specimen you have. Mexican chorizo will be squishy, look like ground beef and render TONS of fat. Spanish chorizo is sausage or hot dog like, comes in links and is firm and cured.

Chorizo Black bean Soup with Avocado Cream
adapted from The Rachael Ray Show

Yield: 4 servings

1 tablespoon extra virgin olive oil
1 pound cured chorizo, casing removed and chopped
1 small onion, chopped
3 to 4 cloves garlic, finely chopped or grated
2 serrano peppers, seeded and chopped
2 teaspoons smoked paprika
Salt and ground black pepper
3 14-ounce cans black beans, drained
3/4 to 1 quart chicken stock, depending on desired thickness
2 ripe avocados
1/2 cup sour cream
Zest and juice of 1 lime
1/2 cup (about a handful) cilantro, chopped, for garnish

Place a large saucepan over medium-high heat with 1 turn of the pan of olive oil, about 1 tablespoon. Add the chorizo to the pan and cook until crispy, 4-5 minutes. Remove from pan and reserve.

Add the onion, garlic, serrano, paprika, some salt and pepper to the pan, and cook until the onions are tender, 5-6 minutes. Add the black beans and chicken stock to the pan, and bring the liquids up to a bubble.

Ladle a couple o scoops of the soup into the bowl of a food processor, or blender (I used a stick blender) and process until smooth. Return the pureed soup to the pot and keep warm.

After pureeing the beans rinse the food processor bowl out and return it to the base. Remove the pit from the avocados and scoop them out into the bowl along with the sour cream, lime zest and juice, and process until smooth.

Serve the soup topped some avocado cream and reserved crispy chorizo and cilantro.