Tuesday, April 27, 2010

Award Winning Slow-Cooker Chili


I love chili. Most any kind of chili. Two years ago when our town started to do a "Chili Cook Off" I was in heaven, counting down the days until it began. I'm not usually a huge beer fan, but with chili (and the Superbowl, and those really hot summer days on the deck) I have to have a corona with lime and salt. Unfortunately, last year the "Chili Cook Off" began the day after we had planned to leave for our annual California trip. I seriously tried to change our dates, to accommodate the cook-off. Alas, I am married to Jeremy who is very practical and didn't see the urgency in staying, so off we went. Our first morning in Cali we went to breakfast and low and behold, on the door was a flyer advertising the "Malibu Chili Cook Off" that weekend! A ray of light! I had been to the legendary "Malibu Chili Cook Off" as a kid with my Dad a couple times and it holds a special place in my heart. I remembered it as being fun, festive and happenin' and I was really looking forward to it!

The day came and everyone knew my expectations were high. The only problem was, for some reason or another, the kids hadn't napped on time that particular day and we were going to have to wake them to get to the festival. Also, it was really hot outside. Another thing was that both Jeremy and I were really tired. We woke the kids up early, rationalized that it would be a lot cooler in Malibu than in the valley where we were, and off we went. I know Jeremy didn't really want to go but he was trying to act excited for me.

The whole thing was kind of a disaster. It was held in a dirt lot, which is where it had always been held, but Jeremy hates walking in dirt, so he had to get over that. Then, we had to pay to get in. Then, I realized the carnival rides that used to be spread throughout the chili stands were in a separate lot next to us so we couldn't get to it without leaving the festival. Then lastly, and most disappointingly, you had to pay each and every vendor for tastes of their chili!!! Ugh! We only had a limited amount of cash, so Jeremy just wrangled the kids together and kept them out of the way while I went from booth to booth to get my fix. Turns out, chili tasting is not very fun when it's just you and you know your kids are acting like wild banshees and complaining about the sun and standing around doing nothing. We lasted about 30 minutes before we were back in the car, by my own initiative. Bad experiences really do make for fun stories later. That's the only upside.

Needless to say, because of my love for chili, I make it quite a lot. I made it last night, in fact. This chili recipe is my favorite as it is straight forward and what I personally want when I think about chili. There are other versions I really like as well, and when you make chili as often as I do, you have to change it up a bit. I'll probably be sharing the other chili recipes with you as this year goes on, but for now I'd like to start with this one.

I originally thought this recipe was a secret. Well, I think it was for a while as it had won a couple chili cook off's it was entered in. However, I got the feeling the last time I was with the family who's recipe it was, that it really didn't matter much anymore, and I am so glad because now I can share it with you (My Aunt Kellies cookies are a different matter entirely). The recipe comes from My Aunt's Husbands parents, actually. I don't know how else to say that...My Uncle in law's parents, maybe? I had wanted to not be that formal and just say it's my Uncles parents recipe, but then you would have thought it was my Grandparents and it would have been weird. I digress.

You make this chili in the crock pot which I think is fabulous because you can do it in the morning and it just cooks all day. Chili in general, I've found is much better in the crock pot because it takes a while for the meat to get soft enough to meld into everything else and for all the flavors to slowly marry. This recipe is specific. I am going to write it the way it was given to me, with certain brands of tomatoes and so fourth, but just know it's okay to substitute for another. It's certainly best when made as written, but I can't find everything called for in my grocery store and it's still incredibly awesome. Hardez Mexican Tomato Salsa makes all the diference in the world if you can find it. I think as long as you stick to kidney beans (red and white are ok and I am known to use both) or sometimes I use a can of navy beans, you are okay. Don't do black beans or pinto or anything crazy like that or it won't be the same. I mean, you would probably like it and all...well you get the idea.

Award Winning Slow-Cooker Chili
adapted from Tom Brukiewa

2 lbs. 80/20 ground beef
1 large onion, diced
2 cans kidney beans, drained
1 30 oz. can hunts small red beans, drained
2 14.5 oz. cans S&W ready diced tomatoes
1 15 oz. cans Hardez Mexican tomato salsa (aka. "casara"- I can only buy this is glass jars)
1 15-oz can of tomato sauce
1 green bell pepper, chopped
2 Anaheim peppers, chopped
1 jalapeno, or Serrano or red jalapeno, diced
2-3 tablespoons chili powder (schilling brand)
1/4 teaspoon ground cayenne pepper
1 tablespoon kosher salt

*see note below for making this vegetarian

Brown the ground beef and onion in a frying pan over medium heat with a sprinkle of salt. Put the meat mixture in the bottom of a crock pot and add all other ingredients and stir. Cook all day on low, or at least 6 hours.

Topping time! I like to top this chili with chopped, fresh red onion, cilantro and cheddar cheese with maybe a small dolop of sour cream. If you can't find the 30 oz. can of the red beans and are going to substitute, just remember that 30 oz. is a big can, so you will probably need 2 more cans of beans to make up for it since beans typically come in a 15 oz can. If you like your chili spicier, add another jalapeno because one doesn't really add that much kick. Oh, and about that, I don't dice my jalapeno up or else it ends up all over my hands and I always end up touching my eyes, ouch! Instead, I just cut it in half, long ways and put it in the pot. That way all the flavor gets in but I don't risk getting jalapeno juice everywhere. Just make sure to not serve someone the whole half. Well, unless it's my Mother or Isabella, my daughter. Those two would probably ask you for both of them!

*I should note that I made this vegetarian last night to accomidate our diets right now. I just put everything except the meat in the crock pot, with an extra can of beans and let it cook all day. It tasted really good but wasn't as thick. I guess that's just the price you have to pay!

Thursday, April 22, 2010

Frozen Berries with Hot White Chocolate Sauce

This is the dessert I made for my Grandparents when I was out in California. It's one of my very favorites, especially in the Summertime because it's easy, light, but not too light, and satisfying. Basically, you just freeze seasonal berries (I like lots of raspberries mixed with blueberries and blackberries) on a sheet pan so they don't stick together. When they are frozen you just put them down in a pile in a pretty, shallow glass bowl and ladle a scrumptious hot white chocolate sauce over them. The hot-ness from the sauce will defrost your berries halfway making them the perfect texture for eating.

Frozen Berries with Hot White Chocolate Sauce
adapted from Ina Garten

1/2 pound plus 2 tablespoons good white chocolate, coarsely chopped
1 1/4 cups heavy cream
1 tablespoons pure vanilla extract
2 1/4 pounds mixed berries, or raspberries, frozen on a cookie sheet

Combine chocolate, heavy cream, and the vanilla in a heat proof bowl and set it over a pan of simmering water until the chocolate melts (Or just combine it in a saucepan and warm it over low heat until melted, stiring occasionally)

About 5 minutes before serving, remove the berries from the freezer and place them on individual serving plates or bowls. Ladle the warm chocolate sauce over the berries and serve immediatly.

serves 6

I usually, instead of dealing with pounds, figure a carton of berries per person and combine them all. But, you could serve more generous portions if you wish as no one will complain. I also combine the chocolate (sometimes I buy good quality chips and skip the chopping step, but don't do this with less expensive chips becuase they have too many stabilizers and it will not melt well) cream and vanilla in a small saucepan and put it over very low heat just as I am about to sit down to dinner. It is usually almost ready and melted when we are done. Also, if you don't care for white chocolate, use bittersweet instead, it would be delicious. Although, the sauce does not primarily taste of white chocolate.

Friday, April 16, 2010

Linguine with Shrimp Scampi


I have been gone for the past 2 weeks, soaking up the sun in California, my home state. Last night I had the pleasure of cooking dinner for my Grandma and Grandpa Burgos at their house in Camarillo. I was feeling very uninspired and didn't really know what to make. My Grandma is a great cook even though she doesn't do it much anymore because her chemo treatments leave her with limited energy. After days of thinking about it (am I the only one who obsesses over food like this?) I decided I would just make linguine shrimp scampi. I make it a couple times a year and so it is considered a "regular" at my house. I think I have mentioned before that even regular meals only get made a couple times a year since I am usually trying new recipes and techniques out.

This pasta is so good! It's very fresh and lemony despite all the oil and butter called for. Honestly, it looks like a lot, but when you consider it's the sauce for the whole dish, it's not too bad relatively speaking. I love it because it's one of those dishes where you prep everything in advance (chopping parsley, mincing garlic, zesting lemons, extracting lemon juice, measuring salt, pepper, and red pepper flakes) but once it's done the whole dish takes 5-8 minutes to make. It's great for company because you can whip it out in no time. And as long as the people you are serving like lemon, it's a real crowd pleaser!

I used whole wheat pasta because it's healthier, and normally I would say you can't tell the difference, but in this case you can. It's still great with the whole wheat, but I think white pasta better suits this particular meal. It's your call.

Linguine with Shrimp Scampi

adapted from Barefoot Contessa Family Style

Kosher salt

1 pound linguine
6 tablespoons unsalted butter (I use 5)
5 tablespoons olive oil
9 garlic cloves, minced
1 to 2 pounds large shrimp, peeled and deveined, tails on (I use 1 lb, but you can use as many as you want)
1/2 teaspoon ground black pepper
3/4 cup chopped fresh parsley
Grated zest of 1 lemon
1/2 cup freshly squeezed lemon juice
1/2 lemon, thinly sliced in half rounds
1/4 teaspoon hot red pepper flakes

Measure out and chop all ingredients so they are waiting for you

Cook the linguine in a large pot of boiling water for 7 to 10 minutes, or according to package directions.

Meanwhile, in another large (12 inch) heavy bottomed pan, melt the butter and olive oil over medium-low heat. Add the garlic. Saute for 1 minute. Be careful, the garlic burns easily! Add the shrimp, 1 tablespoon salt, and the pepper and saute until the shrimp have just turned pink, about 3-5 minutes, stirring often. Remove from the heat, add the parsley, lemon zest, lemon juice, lemon slices, and red pepper flakes. Toss to combine.

When the pasta is done, drain the cooked linguine and then put it back in the pot. Immediately add the shrimp and sauce, toss well, and serve.

serves 4-5

This is great served with bread for dipping and a green salad with italian dressing (home made is better). Don't be scared by all the garlic called for in this recipe. It's the perfect amount.

After dinner I served a dessert consisting of fresh frozen berries in a hot white chocolate sauce. I'll post that in a few as it is easy, impressive and yummy-licious. One disclaimer. tThis is NOT my photo. I didn't have my camera when I made this and so I just snapped a picture from my cook book. It looks exactly like this, though, every time I make it.

Monday, March 29, 2010

Potato Gratin


This is a definitely one of my go to recipes. It's no wonder then, that I turn to this very recipe when I needed it most. You see, on Thursday it's my turn to make my monthly dinner for sk8 church. Not just any dinner, but an Easter dinner. They didn't ask me to do it, but my day (the first Thursday of every month) happens to fall 3 days before Easter this year and I just had to make them a meal to celebrate it. Who knows, for some of them it might be their only Easter meal. When you are making a meal for 60-70 or so people there are lots of variables to consider. The main dish was easy. Ham is what you eat on Easter, It's traditional. Plus it comes fully cooked and when you order honeybaked hams, like me, it's even easier since they are best served at room temperature. No prep and No oven space needed, which is awesome because then I can make something like Potato Gratin, which does need the oven.

Potato gratin might not seem like a logical first choice when trying to make it for lots of people, but I beg to differ. I would argue that it's much easier than say- mashed potatoes. For mashed potatoes I would have had to peel an incredible number of potatoes and dice them all up--In batches, like 6 or 7 batches, I might add--and boil them all and them mash them all and season them all. Did I mention I would have to do that 6 or 7 times?!?!? Then there would be the issue of keeping them warm. You can't re-heat mashers with a lot of success so it's not something that can be made ahead. Potato gratin on the other hand can.

Sure, I will still have to make it in batches, but it won't be half as much a pain. You are "supposed" to peel the potatoes when you are making a gratin, but I think it would be absolutely fine to skip this step. I own a food processor so I can slice those un-skinned potaotes razor thin in about 30 seconds flat. Then You just toss those with cream and cheese and bake. And since it re-heats like a charm I can make and bake this the day before the dinner and reheat. Now, that's what I'm talking about!!

Potato Gratin
adapted loosely from The Barefoot Contessa Cookbook

1 yellow onion, thinly sliced
2 tablespoons good olive oil
1 tablespoon butter
5 large russet potatoes
2 cups plus 2 tablespoons heavy cream
2 1/2 cups grated gruyere cheese (1/2 pound)
1 teaspoon kosher salt
1/2 teaspoon freshly ground pepper

Preheat the oven to 350 degrees

Butter the inside of a 10 cup baking dish. Saute the onion in the olive oil and butter on medium-low heat for 15 minutes, until tender.

Peel the potatoes, then thinly slice them by hand or with a mandoline. Mix the sliced potatoes in a large bowl with 2 cups of cream, 2 cups of Gruyere, salt and pepper. Add the sauteed onion and mix well.

Pour the potato mixtur ein the buttered baking dish. Press down to smooth the potatoes. Combine the remaining 2 tablespoons cream and the 1/2 cup of gruyere and sprinkle on top. Bake for 1 1/2 hours, until the potatoes are very tender and the top is browned and bubbly. Allow to set for 10 minutes at room temperature and serve.

Serves 10
This gratin can be made days before and reheated at 350 degrees for about 30 minutes.

This recipe is originally called "Potato Fennel Gratin" and calls for 2 fennel bulbs to be sliced thinly and sauteed with the onions and then added to the potatoes. I have never done it that way though. I love fennel, I just have never tried it, is all. It would be delicious. If you try it let me know how it turns out!

I love this particular gratin mostly because the cheese is perfect. Gruyere is the quintessential gratin cheese. To me there is no substitute. It is so warm and gooey and nutty. Spectacular. It's also the only cheese I will put on top of my French onion soup. If you have never used it before, consider it a definite must.

Like I mentioned above, the ham is fully seasoned and cooked and spiral cut. The rolls are pre made. Once I have the potato gratin ready, all that will be left to do the day of is to assemble the spinach and strawberry salad. I feel triumphant!


Saturday, March 20, 2010

Quinoa Stuffed Peppers

I'm not all health all the time, I'm really not. I eat my fair share of ice cream ( like the chocolate malt I had with my kids last night at Jonny B Goods) peanut butter cookies (like the two I put away last week and then again another two this week) and let's not forget about the carmel corn (like the huge bag I ate after lunches during the course of this whole week). My point is, I have a sweet tooth. And a bad one at that. However, I feel much better eating said sweets and more free to do so if I nurish my body properly with whole foods the rest of the time. Which is why today for lunch I am making quinoa stuffed peppers. I don't know much about quinoa except it's a whole grain, and I should definitely be eating more of it. The problem is I once had quinoa plain, served like rice would be on the side of my plate and was not impressed. It had a neutral if not an ever so slight bitter after taste. If I was going to be eating quinoa it was going to have to taste good. Period. So, I present to you today this recipe that packs so much nutritional punch and yet still doesn't taste like "health food" just good fresh food.

I like to consume lots of fresh wholesome foods like healthful salads, tabbouleh's, fresh fruit, smoothies, sauteed spinach and the like. If you are trying to add healthy good for you foods to your diet, I recommend you actually try to like the food you are eating or it's not going to work. So you hate quinoa plain? Find a way you do like it, perhaps in this stuffed pepper recipe. Your vegetarian tacos are boring and bland? Figure out how to spice it up. What could you add in? What flavors could you introduce to make it taste awesome? That's mostly what I do. I try and figure out ways to eat healthy and still love it. However, every now and then you need to eat filet of beef au poivre or lemon chicken with croutons, oh, and creamy chicken with 40 cloves of garlic. And I will be posting those recipes, I promise. But for now, quinoa stuffed peppers sounds and smells pretty fantastic.

Quinoa-Stuffed Peppers
adapted from Vegetarian Times

1 medium onion, finely chopped
2 TBS olive oil
2 ribs celery. finely chopped
1 TBS ground cumin
2 cloves garlic, minced
1 10-oz pkg. frozen spinach, thawde and squeezed dry
2 15-oz cans diced tomatoes, drained, liquid reserved
1 15-oz can black beans
3/4 cup quinoa, uncooked
3 large carrots, grated
1 tsp. salt
1 1/2 cups grated pepper jack cheese, divided
4 large red bell peppers, halved lengthwise, ribs and seeds removed

Heat oil in saucepan over medium heat. Add onion and celery, and cook 5 minutes, or until soft. Add cumin and garlic, and saute 1 minute. Stir in spinach and drained tomatoes. Cook 5 minutes, or until most of the liquid has evaporated.

Stir in black beans, quinoa, carrots, and 2 cups water. Cover, and bring to a boil. Reduce heat to medium-low, and simmer 20 minutes, or until quinoa is tender. Stir in 1 cup of cheese. Season with salt and peper, if desired.

Preheat oven to 350 degrees. Pour liquid from the tomatoes in the bottom of a baking dish.

Fill each bell pepper half with a heaping 3/4 cup quinoa mixture, and place in baking dish. Cover with foil, and bake 1 hour. Uncover, and sprinkle each pepper with 1 tbs remaining cheese. Bake for 15 minutes more, or until tops of stuffed peppers are browned. Let stand for 5 minutes. Transfer stuffed peppers to serving plates and drizzle with pan juices, if desired.

serves 6-8

Ok, That was the actual recipe. My version of this was a hot mess, given that I used the recipe merely as a guidline. The real way sounds delicious, but I already had cooked quinoa, so I had to improvise.

Basically I sauteed the onions and celery as directed. Then I added the garlic and cumin as directed. Then, instead of cooking the spinach seperately and adding it in, I just dumped the box of frozen spinach into the saute pan with the onions and celery and added about 1/4 cup of water, to help thaw the spinach out. Once it was thawed, I added in the black beans, tomatoes and carrots (you could also buy pre shredded carrots if you don't want to grate them yourself). Then I added in the cooked quinoa and seasoned everything with garlic salt and stuffed it in the bell peppers. I omitted the cheese in the filling, but I did top the peppers with cheese towards the end. It really seems to need more salt than the recipe calls for. Maybe if I would have put in the cheese it called for I wouldn't have needed it. Cheddar would work well if you don't like pepper jack.

If you don't read your recipe well and accidentially don't save your tomato liquid and you realize you need it for the bottom of your pan, don't fret. Just add about a cup of water to the bottom of your dish instead. All the juice is really doing is helping to steam and cook your peppers in the oven.

Also, this make A LOT of filling! bascially almost double what you need. Again, don't fret. This is actually excellent because the filling freezes very well. Just cool leftover filling and stick it in a freezer ziplock bag, freeze it, and then thaw it out when you need it for a quick dinner down the road.

Tuesday, March 16, 2010

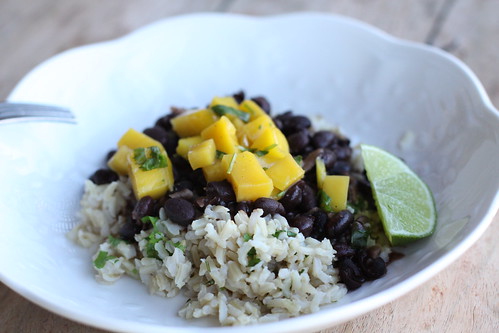
Rice, Black Bean and Mango Salsa Bowl

black bean mango salsa bowl

So, I made this recipe up. I saw a facebook post about black beans and mango salsa a few days ago and it got me thinking...The weather has been beautiful here lately and any time it warms up to 50 degrees, it has all of us thinking about Spring, beloved Spring! Spring equals warmer weather and lighter food which, for me, always includes Cuban. I had decided that I would make brown rice and season it up with some lime juice, cilantro and salt once cooked. Then I would saute up a load of garlic (5 ginormous cloves!) in a wee bit of olive oil and add a couple cans of black beans with their juice and let it simmer for a while to reduce. Then I would squeeze in fresh lime juice and add some garlic salt and chile powder. Then I would dish up the rice in a shallow bowl and top it with a ladel or two of beans, whose juice would drip down and flavor the rice. Then, I would top the whole thing with fresh mango salsa. You could probably make the dish just fine from the description above seeing as how it's rustic, but I'm going to provide the recipe below. It was really, really good.

Jeremy loved it, which is no surprise since it's basically a vegetarians dream dish. The fresh salsa paired so well with the earthiness of the beans and the sweet tart combination along with the garlic was divine. A snap to make too, by the way, and oh, so satisfying.

So get this. I was actually all geared up to make this dinner last night, but I had a showing on my house around 3pm and had to leave. I went to Danielle's house and never left. We ended up having dinner there, but it was kind of funny because she was making black bean patties with a mango rice. I don't know whether it was in the air or what, but black beans and mangos were popular in Steamboat this week. The dinner last night was delicious as well, but I figure I'd better ration out my black bean posts so as not to cause a revolt. Besides, I will be making Danielle's dinner again and will share the recipe at that time. Until then, make this...

Rice, Black Bean and Mango Salsa Bowl
serves 4

2 cans black beans, left undrained
whole grain rice or white rice (enough for 4 people according to package)
5 fat garlic cloves (or 7-8 smaller ones) minced
2 tablespoons olive oil
2 juicy limes, each cut in half
1/2 teaspoon chili powder
1/2 teaspoon garlic salt
1 mango, chopped into bite sized chunks
2 tablespoons red onion, finely diced
1 cup cilantro, chopped, divided
Kosher salt
Black pepper

For the rice:
Cook enough rice for 4 people according to the package directions. (I usually need enough rice for 6 people to feed 4).

For the mango salsa:
While the rice is cooking, make the mango salsa. Mix the chopped mango, red onion, half of the cilantro, with the juice of half a lime and a pinch of salt and black pepper. Set aside until ready to use.

For the black beans:
While the rice is cooking, set a saute pan over medium low heat and add the olive oil and garlic. Cook for garlic for a minute or two, then add the cans of black beans with their juice. Turn the heat up to medium high and bring it to a boil, then turn the heat back down to medium to medium low and simmer, stirring occasionally for 12-15 minutes until some of the beans juices have evaporated away and it is a bit thicker. Don't boil away all the juice because that is what will flavor the rice when you dish it up. Add the chili powder, salt and the juice from 1 whole lime and stir to combine.

When the rice is done cooking, squeeze in the juice of the remaining half a lime and add a generous pinch of salt and the remaining cilantro. Stir to combine. Cover to keep warm.

To serve: Scoop a portion of the seasoned rice on the bottom of your bowl and top with beans with its sauce, then top with mango salsa. Dig in!

You can make the mango salsa up to a day in advance. It re-heats beautifully too! I would make this for company. Just serve an appetizer like cucumber spears with lime juice, salt and chili powder, pass the mojitos or coronas and you are golden. Flan with toasted coconut flakes for dessert wouldn't hurt you either. Oh, my, I'm hurting for Summer!

Sunday, March 14, 2010

Tuna Salad with Apple, Pepper Jack and Red Onion

I first started to eat tuna salad when I lived with my Grandparents for a time after high school here in Colorado. I never really ate it before then except maybe a tuna melt or two at Carrows with my friend Jessica. The whole fish from a can thing creeped me out too much to be able to make it myself at home. However, if somebody else made it I could manage. That was lucky for me becuase at the time I was living with them, my Grandpa Grillo made tuna salad reguarly. Well, that and hot dogs that he would boil and wrap up in a lonely piece of bread. I didn't like those, unless I was absolutely starving, but let's get back to the tuna. I liked his tuna becuase he would put lots of vinegary, spicy inredients into it. I love vinegary, spicy ingredients. My Grandma made it too, but usually she would make it "old school" with diced onions and celery with fresh lemon juice, a little mayo and lawrys salt and pepper. She and my Grandpa both added in dill pickles whenever we had them and, let me tell you, that for me anyway, took it up another notch. Soon, when Grandpa would made his version he started to add diced dill pickels, and diced pickled jalapenos to the tuna along with fresh lemon juice, lawrys salt and just enough mayonnaise to bind it.

Heres a note: When you are around my Grandpa, make sure you really pronounce the word mayonnaise correctly. Most of the time, I would refer to it as "man-naise". As soon as you made the mistake, you knew it was coming. He would say "You know Krysta, it's not "man-naise" it's "May-o-naise". Yes, Grandpa, I know.

The tuna salad with the jalapenos and pickles was officially my favorite. We always ate it the same way. Either in a cold sandwich between two pieces of bread, or open faced, baked in the oven with cheese on top, otherwise known as a tuna melt. I had made tuna this same way for over 5 years when I went to my friend Melissas house one day.

She had made tuna salad. It was not prepared like the tuna salads I was used to, and furthermore she served hers with crackers instead of bread. It was surprisingly delicious and unlike anything I had ever seen before (which makes me snicker now. I must have been new to the possibilities of food). She had mixed the tuna with mayonaise, lemon juice, garlic salt, cubes of cheddar cheese, red onion and halved green grapes. I know, it sounds a little odd right? It was really good. She said she made it that way becuase her husband Shawn liked it and that was the way his mother made it. She said sometimes she used grapes and smetimes she used chopped apple. I liked the idea of the crunchiness of the apple.

Then, after a while I had tuna salad yet again at her house. This time with the apple instead of the grapes and pepper jack instead of cheddar. I had hit the mother load! This tuna was nothing short of awesome. The pepper jack brought in the spicy taste I so love, and the apple provided this beautiful sweetness that complimented the lemon juice and galric salt in lovely ways. I can't say for sure that It's my absolute favorite way to eat tuna becuase it just depend on the mood im in. But I can say that for the past year and a half, I have only made tuna this way and served it with water crackers, no bread. You just dip the crunchy cracker in and scoop out a heaping potion of tuna and bite. Oh, my gosh, you won't go back.

Tuna Salad with Apples, Pepper Jack and Red Onion

1 big can of solid white albacore tuna (or two smaller cans)
1 1/2 tablespoons mayonaise
a quarter of a red onion, chopped
1/2 of a big apple, chopped in cubes (or 1 whole smaller apple)
1 1/2 inches from a block of pepper jack cheese, cut into small bite sized cubes
garlic salt to taste
juice from half a lemon

Mix together and enjoy with thin water crackers (carrs cracked pepper are my fav)

Make sure you have solid white albacore and not chunk light. There is a huge difference. I can't even really eat this if it's not with solid white albacore. I like the Starkist brand. Cut all the ingredients in relatively same size. I make sure to add in a good amount of galric salt to this. I don't like it salty, but I like to be able to taste it. It brings all the other flavors together.

I just ate this last week with Melissa. Shawn says you can add some diced up pickled jalapenos to it if you want some more kick. Oh, yes Shawn. You don't have to tell me twice.