Thursday, December 30, 2010

Udon with Shiitake Mushrooms and Kale in Miso Broth


I was little nervous about making this being that it has Chinese roots and all but I have to admit it was really easy, really healthy, and really good. All things we like at this time of year. I got this recipe from a vegan cookbook which I think I kind of love (thanks for the Christmas gift, Craig).

I don't know about you but I'm watching my waistline after all the abuse I've given it this holiday season. I'm not talking about a diet, but rather, just feeding my body foods that help it recover and refuel with the good stuff without feeling like I am depriving myself. Udon soup with healthy greens and veggies, check! The broth tastes just like miso soup with the volume kicked up from the mirin and soy sauce. It's mild but flavorful and just what I'm craving this night. Too often, brothy-veggie based dishes are boring and bland. Not the case here. Super-simple ingredients result in super-flavorful returns.

Speaking of that, it's beautiful out tonight. I guess you could call it the calm before the storm since we are expecting a whopper tomorrow. The photos were taken off my back deck this evening. That view always reminds me of the "little town of Bethlehem". I'm not sure why as I have never seen Bethlehem, but it's a soothing sight so maybe that's why I associate it to that. Whatever the reason it makes me happy. I love the lights of the town and the little valley I live in nestled between majestic mountains. It's breathtaking, really. Come visit. You should experience it.

These noodles are supposed to be swimming in a little broth when you serve it, but I left my mine in the broth a little too long because, as luck would have it, my husband and I were having a riveting conversation and by the time we were done the noodles had soaked all the broth up! It was still delicious.

Udon with Shiitake Mushrooms and Kale in Miso Broth
adapted from "Veganomicon"

serves 3-4

1/2 pound fresh udon noodles or dried udon noodles
2 tablespoons vegetable oil
1 medium sized red onion, sliced into thin half-moons
4 ounces shiitake mushrooms, stems trimmed, sliced
3 cloves garlic, minced
2 teaspoons ginger, minced
2 tablespoons mirin (optional)
2 1/2 cups water
3 tablespoons miso (see tip)
4 cups chopped kale (see tip)
2 1/2 teaspoons soy sauce, or to taste

Bring a pot of water to a boil. Cook the udon according to the package directions, about 10 minutes. When done, drain and rinse with cool water until read to use.

Meanwhile, preheat a large skillet over medium heat. Saute the onion and mushrooms in the oil for 5 to 7 minutes, until the mushrooms are tender and the onions are softened but still have some crunch. Add the garlic and ginger, and saute for another minute.

Add the mirin, water, and miso, and bring to a gentle boil. Lower the heat to a simmer and add kale. Toss the mixture around with tongs until the kale had wilted. Add the noodles and use a pasta spoon to stir them into the broth for about 2 minutes.

Divide the udon and vegetables among bowls and spoon some broth over each serving.

Did you know it was good luck to eat noodles on New Years Day? It is! Go ahead and slurp away! Also, just a note, I couldn't find straight miso, so I used a miso and tofu soup mix. It was basically the same thing. TIP: The recipe is based on a strong, dark miso; if you are using a light, mellow miso, you may want to add another tablespoon or so.

TIP: I separate the leaves of kale off either ends of the tough stem so I only have tender leaf pieces. Then I soak the leaves in a bowl of water for a couple minutes to rinse off any dirt. I then remove the leaves from the water, squeezing them out as I go and placing them on a paper towel to drain, and finally, discard the water with all the grit.

Also I am trying to verify my blog with another and I need to publish this code to do it:E547BAH78JAP Please ignore, or don't. Whatever.

Tuesday, December 28, 2010

Roasted Beet Salad


I'm a little behind with all the Christmas madness and am in need of down time, so this is a post I wrote a couple weeks back. I meant to post it the week I made it but other things kept coming up and taking priority (It's funny how seriously I take this blog). Also, coincidentally, today, December 28th is my blog-a-versary! One year baby! I had wanted to celebrate with something a little sexier than beet salad but hey, I'll take what I can get at this point! So here it goes...flash back to a couple weeks ago...

Jeremy's heart will skip a beat when he learns we are having roasted beet salad with dinner. He loves beets. He loves me when I make beets. What? Your husband doesn't share the same enthusiasm? He just might if you make them this way...

Most people don't make beets because you have to handle them, usually peel them, and they dye your hands red. They are messy and ugly to say the least. The other reason why some people don't make beets is because they taste like dirt. There. I said it. It's out in the open and I agree with that statement. However, when you prepare beets this way, dare I say, correctly, it will take minimal effort of your part, leaving your hands stain free, and leaving you with a beet that tastes fresh and bright, if not a bit earthy. You can't totally transform the taste of beets. I mean let's get real, this recipe is not for people who hate beets, after all. No, this recipe is for people who don't mind beets and are looking for a way to make them taste good. Enter cool, sliced beets matched with herbs and vinaigrette.

I haven't gone vinaigrette crazy (I blogged about leeks vinaigrette not too long ago) but there is no doubt that a good tangy vinegar can take certain vegetables from ordinary to extraordinary. The oil rounds everything out and fresh herbs and red onion give it freshness. Beets in my opinion taste better cold or room temperature, like this salad. It helps to diffuse the dirty taste that is more foreword in a warm beet.

Roasted Beet Salad
adapted from Bouchon by Thomas Keller

1 1/2 pounds (4 large) red beets
3 tablespoons extra virgin olive oil
Kosher salt and freshly ground pepper
about 1 tablespoon red wine vinegar
2 tablespoons fresh orange juice
1/2 red onion, peeled
1 tablespoon chopped tarragon
1 tablespoon minced chives

Preheat the oven to 375 degrees. Wash the beets and trim the stems, leaving about 1/4 inch attached. Place them on a large piece of aluminum foil and toss with 2 tablespoons of the oil, 2 tablespoons water, 1/2 teaspoon salt, and 1/8 teaspoon pepper.

Lift up the edges of the foil and squeeze together to form a packet. Place in a small baking pan and roast for about 1 1/2 hours, or until beets are tender, offering no resistance when pierced with a knife. Carefully unwrap the beets and let stand just until cool enough to handle.

Rub each beet with a paper towel to remove the skin. Cut off and discard the stems. Cut the beets into quarters, then cut the quarters crosswise into 1/4-inch thick slices and place in a bowl. Season with a light sprinkling of salt and pepper. Add red wine vinegar, orange juice, and remaining 1 tablespoon oil. Toss and season to taste with additional salt and pepper. (I added a bit more vinegar as well).

Let the beets marinate for at least 30 minutes, or up to a day, in the refrigerator. Bring to room temperature before finishing the salad.

About 30 minutes before serving, cut three or four 1/8-inch -thick slices crosswise from the onion and separate the slices (reserve the remaining onion for another use). Toss the beets with the onion, tarragon, and chives. Just before serving, check the seasonings and add additional sat, pepper, and/or vinegar to taste.


Friday, December 24, 2010

Cinnamon Apple Cake and The Stocking Exchange Party


I had a stellar idea this year if I do say so myself. It was the first week of November and I had heard a few friends talk about the holiday season in general, and more specifically about Christmas stockings. The problem was they didn't usually get one and let's face it, stockings are one of the best parts of Christmas day, right?

So I took to email and invited a few girls I know to take part in The Great Steamboat Stocking Exchange. The rules would be simple. Each person buys something to put into each of the girls stockings. The money limit was anywhere from $5 to $15 a person and you could put one or two or three (whatever you wanted) into everyone stocking. Think along the lines of Starbucks gift cards, nail polish, lip gloss, etc. The only real guideline was it had to be something you would want for yourself. Then on a weekend near Christmas we would all get together for a Christmas tea (although we ended up drinking coconut hot chocolate) and swap presents. The idea was so everyone would have a stocking to open on Christmas morning. It didn't work out that way as I seemed to be the only one wanting to wait that long. My friend Danielle was practically foaming at the mouth ready to tear into hers. My friend Kel kept dropping "tic-tac" comments about wanting to open them, which later progressed to a full on talk about the importance of not waiting. Melissa and Caroline seemed neutral about it, but I could tell they wouldn't mind opening them. I'm not sure how Rebecca felt come to think of it, but I decided to put it to a vote. We didn't even get to vote as it was explained to me that I would surely be out-voted. So, we opened them. Right then and there. Danielle was extremely delighted. And I have to agree, it was better that way. We all had fun fawning over our gifts complimenting one another on our outstanding taste. ;) A cocktail ring, one mini grapefruit body butter, a rosebud salve, lip gloss and perfume samples, tweezers that looked like little ladies and cuticle oil, and one guava body gel and hand lotion later we were happy campers. Oh, and Danielle got a wooden spoon in her stocking, compliments of me, who is tired of using heavy metal when cooking at her house. Ha ha.

I guess I should start talking about this cake now that I have gone on and on about the stocking exchange. I adore this cake because it is so unassuming yet fabulous. It is a great breakfast food because it's not too sweet and would go perfect with coffee. I love it because the cake itself is moist, but toothy meaning it feels great to chew. Is that weird to anyone? Maybe it would just suffice to say it has excellent texture. The apples are mildly spiced with cinnamon and the whole thing has a crunchy top due to a nice coating of cinnamon sugar. It's sort of coffee cake-esque but if you dressed it up with some cinnamon whipped cream it would be a fine dessert, anytime. It's made in a cheesecake pan which is a little out of the ordinary, but it makes for a handsome presentation. This is my recommendation on what to serve the family before they leave your house this holiday.

Cinnamon Apple Cake
adapted from Steamboat Seasons

1 3/4 cups sugar, divided
3/4 cup (6 ounces) block style cream cheese, softened
1/2 cup (1 stick) butter, softened
1 teaspoon vanilla extract
2 eggs
1 1/2 cups all-purpose flour
1 1/2 teaspoons baking powder
1/4 teaspoon salt
2 teaspoons cinnamon
3 cups chopped Rome apples (about 2 large)

Preheat the oven to 350 degrees. Spray an 8-inch springform pan with non-stick cooking spray.

Beat 1 1/2 cups of the sugar, the cream cheese, butter and vanilla in a bowl at medium speed for about 4 minutes or until well blended. Add the eggs one at a time, beating well after each addition. Set aside. mix the flour, baking powder and salt in a bowl. Add the flour mixture to the creamed mixture and beat at low speed until blended. Combine the remaining 1/4 cup sugar and cinnamon in a small bowl. Mix 2 tablespoons of the cinnamon mixture and the chopped apples in a bowl. Stir the apple mixture into the cake batter.

Pour the batter into the prepared pan and sprinkle with the remaining cinnamon mixture. bake at 350 degrees for 1 hour and 15 minutes or until the cake pulls away from the side of the pan. Cool the cake completely in the pan on a wire rack. Serve warm alone or with whipped cream or ice cream.

Tuesday, December 21, 2010

Red Pear, Grape, Pomegranate, Pecan Salad & Christmas Card


Merry Christmas from the MacGray Family! Nice little "Mommy Kissing Santa Claus" action going on over here.

I have said it before and I'll say it again. I like salads with character. Salads with lots of flavors and textures and great dressing and this one fits the bill! So, I give you a salad with a ridiculously long name that can actually live up to it. This is festive salad. It's holiday celebration salad what with all the pecans, blue cheese and grapes, pears and pomegranate seeds. I'm a sucker for stuff with pomegranate seeds.

I served this with honey baked ham, rolls and roasted potatoes with herbs for our White Elephant Christmas party this past weekend. I didn't have to do anything with the ham or rolls but set them out, so I decided I had to put some effort into the side dishes, not that it was much. You do have to make the dressing, but it's easy and takes 5 minutes of your time and can be done way in advance. Then there is the prep. The prep is a tad extensive (seeding pomegranates is not exactly my idea of a good time) But my secret is to fill a medium sized bowl with water and to rip apart and seed the pomegranate directly in the water, picking out large pieces of pith as you go. That way you don't get red juice splattering all over your kitchen and clothes and run away seeds on your floor. Just strain the seeds into a fine mesh strainer or colander and you are ready to rock.

As for the rest of the prep, I like to cut the pears first (about 1-2 hours before I will serve the salad) and toss them in the bottom of the serving bowl with a tiny bit of the dressing so they will not brown. Then I cut the rest of the ingredients (grapes, onion, cheese crumbles, pecans and pomegranates) and add them in with the pears. I pile the lettuce loosely over the top and keep in the refrigerator until ready to serve. When it's time, just toss the salad together with the dressing (you probably will not use all the dressing. See note below) and add the orange zest and ta da!

Red Pear, Grape, Pomegranate, Pecan Salad
Adapted from Country Living, October 2009

makes 8-10 servings

3/4 cup balsamic vinegar
1/2 cup olive oil
6 tablespoons brown sugar
1/2 teaspoon salt
1/4 teaspoon ground black pepper
1/2 pound red leaf lettuce
1/2 pound butter lettuce
1 pomegranate, seeded
30 large, dark seedless grapes, halved
1 medium red onion, sliced in thin strips
1/2 cup crumbled blue cheese
2 ripe red pears, cored and sliced thinly
1 cup toasted pecans
Zest of 2 oranges

Combine vinegar, brown sugar, salt and pepper in a small saucepan over medium heat and stir until sugar is dissolved, about 4-5 minutes and set aside to cool. Whisk the oil into the vinegar mixture until well blended, or pulse together a few times in a magic bullet or small blender until emulsified. Refrigerate until ready to use.

Tear lettuces into 1-inch pieces and wash and drain in a salad spinner. Put lettuce in a big salad bowl and add pomegranate seeds, grape halves, onion slices, blue cheese, pecans and pears. Drizzle vinaigrette on top an toss together. Sprinkle top with orange zest. Serve.

Simplify entertaining by making the salad in advance, keeping in the fridge and dressing just before serving. One thing to note is that this salad dressing is relatively thin. It's supposed to be that way. It sort of absorbs into everything in the bowl.

NOTE: This recipe makes a lot of dressing, but it is hard to half so I left it as is. I doubled the recipe for the salad and kept the dressing amounts the same for my party and still didn't use it all.

Sunday, December 19, 2010

Cranberry Champagne and a White Elephant Party


So, I had a White Elephant Party last night. In short, it was awesome. I included a couple pictures from the night so you could get a feel for the party. That's my friend Melissa kissing her "Santa" husband, Shawn. And that's me in the bottom picture to the left with my friends Angie and Danielle. This party did not seem like it was going to happen in the days leading up to it. Well, I knew it HAD to happen, but people were canceling and rsvp-ing "no" left and right. (Oh, you're passing a kidney stone? Bummer. You're teaching dance lessons tonight? Dang! You forgot you were hosting bible study at your house? We will miss you! Your husband has to work till 8pm? Oh my, I really wish you could come, but, I understand. No babysitters available? really? You just started a major detox and have stuff coming out both ways? Oh, man! That's sick, but at least you have a fantastic excuse. You just want to stay home with the family? Oh. You are going to do family movie night instead? Oh. You have been too busy lately and need to be home for the weekend? OK, WTF is going on here anyway? Did I possibly pick THE ABSOLUTE WORST DAY OF THE YEAR to have this party? Wheres the holiday spirit?) And, when I thought about who, exactly was for sure going to come it made me nervous. Not because I don't love everyone, but because they all didn't know each other. There were some essential "glue" people that we not going to come to help and tie it all together. I thought it might be an awkward party. I am not a huge fan of awkward parties, let alone of throwing them, so I was sort of concerned.

With help from my sister, I decided to let it all go and just enjoy the day. I mean, I really liked everyone coming and was confident they would in turn, all like each other. Plus my best friends would be there to serve as a buffer. My sister reminded me that one of the points of having a party was so you could mingle and meet people. Uh-duh, yes. Why didn't I think of that? In the end, I preferred it just as it was. I talked longer to people I might not have if I had more people over. Even then, there are people I wished I would have talked to more because I enjoyed their company so. Originally, I had in mind a huge party with lots of people and commotion and laughter and memories. In the end, I had a party with 20 people and commotion and laughter, memories and cranberry champagne. It was perfect and merry and this Champagne was the definite drink of choice for the night. We actually ran out. Ouch, party foul numero uno! Luckily it was at the end of the night (11:30pm-ish) so it was pardoned.

This is really simple to make but I recommend it for this time of the year because it's festive and red and apparently, it makes people with little kids stay out till midnight, laughing and giddy saying to hell with the babysitter costs, let's have another!

Cranberry Champagne

makes enough for 8 glasses of champagne

1 cup fresh cranberries
4 tablespoons water or cranberry juice
1 tablespoon sugar
Champagne

Combine the cranberries, water or juice and sugar together in a small sauce pan and cook over medium-low heat until cranberries have mostly all popped (about 5 minutes or so). You should have a cranberry sauce of sorts. Cool and set aside until ready to use. The mixture will thicken upon standing. Pour glasses of champagne, adding about a tablespoon of the cranberry mixture to each glass. Enjoy!

Thanks to everyone who came last night! I had a ball and can't wait to do it again!

Monday, December 13, 2010

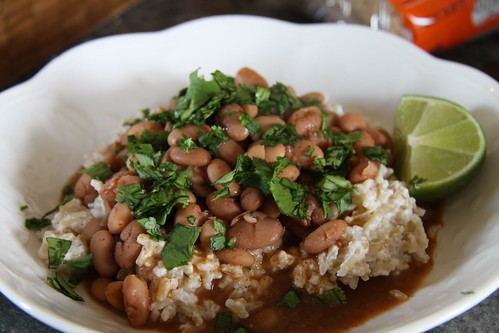
Panamanian Pinto Beans with Ham and Rice with Coconut Milk


Panamanian Pinto Beans with coconut rice


note: this recipe is vegetarian, better yet, vegan if made without the pork.

My friend Becca wrote that she was making this for dinner last week on good ole Facebook. I wrote back something like"Um...YUM! I need the recipe". She was good enough to oblige and now I have a solid introduction to Panama cuisine that I can share with you guys!

Becca got this recipe from her Au Pair a few years back. She was Panamanian and it is a staple out there. The kind of food you make over and over through the generations..."no big deal" food, which is my favorite, especially when it's ethnic. She says it's usually served with these small red beans which we can't get in the states (or not that she knows of anyway) so she uses pinto beans. When you cook the rice with the coconut milk it get's thicker, not unlike rice pudding. Glorious things happen in this bowl!

Panamanian Pinto Beans with Ham and Rice with Coconut Milk

serves 4-5

1 package dried pinto beans
2 cups brown or white rice (or whatever you need to serve 4)
1 can coconut milk
sea salt
1 package of salt pork or ham hock (you can skip this and make it vegetarian)
2 garlic cloves, smashed
1 bay leaf
1 1/2 tbsp chili powder
1 teaspoon garlic salt
2 teaspoons garlic powder
1 teaspoon cumin
Sea salt, to taste (about 2-3 teaspoons, at least)
a few handfuls of cilantro, chopped
lime wedges for squeezing over top

For the rice:
Make rice according to package instructions substituting 1 can of coconut milk for part of the amount of water called for and adding 1 teaspoon of sea salt. (I made 2 cups of rice. The coconut milk measured out to about 1 1/2 cups and I filled the rest of the liquid called for with water. (I needed to add more water towards the end because my rice was not cooked through and all the liquid was absorbed. My pot boiled over twice though, so, If need be, you can do that too.)

For the beans:
Place a bag of dried pinto beans in a large stockpot with enough water to cover the beans by 2-3 inches. Place the pot on a stove and bring to a boil. Turn the heat down, place the lid on and take off the heat. Let it sit for 1 1/2 hours. Alternately, you can soak the beans overnight in room temperature water before using.

Drain the beans, then fill the pot with enough fresh water to cover the beans by two and a half inches if using a wide large pot, three inches if using a smaller to medium sized pot. The beans will soak up more water and also evaporate some during the cooking process. Add the salt pork, bay leaf and 2 garlic cloves. (It is very important not to add salt to the beans until they have cooked through. It will make them tough). Simmer, covered all day (5-7 hours) until tender. Remove and discard the pork. At this point, the beans should be swimming in the water with maybe about a 1/2" of water covering them (less than that is okay). If you have more, remove some of the water. Add the chili powder, garlic salt, garlic powder, cumin, sea salt to taste, and stir. Taste the broth and adjust seasonings as necessary. It will probably need more salt. Let the beans simmer with the newly added spices for five minutes. Taste and adjust seasoning as necessary (important to taste since you will have varying amounts of water in your pot to season). 

Serve beans with a bit of their juices on top of the coconut rice and top with a generous amount of cilantro and fresh lime juice.

This is a meal within itself. I wrote the recipe with the amounts of spices I used when making this. Becca's original directions were much more relaxed. It sounded something like this: you just replace the water for the rice with a can of coconut milk, adding more water if you have to make whatever amount of liquid necessary. You will want to add sea salt. I cook the beans on the stove all day long and season them well with chili powder, cumin, and fresh garlic and serve the beans over the rice with fresh squeezed lime and cilantro.

My point in saying that is if you are comfortable, take Becca's directions and wing it. I am more comfortable following directions so that is why I included measurements here.

Friday, December 10, 2010

Leeks Vinaigrette


Did I ever tell you that I meal plan every week? I do. I usually look at the coming weeks weather forecast and plan meals according to how cold or blustery and or how sunny and warm it's supposed to be and come up with meals according to that. Warm=Salads, grilled fish, etc. Cold=soups, stews, roasts and cozy sides like leeks vinaigrette. It's cold this week.

I meal plan because there is an art to cooking, and that's why I so adore it. Thought goes into which member of the family likes what, to planning time to cook, and yes, looking at the weather to make sure what I serve is going to be appropriate. Call me crazy but I don't want chili when it's 55 degrees and sunny (55 degrees in Steamboat during the winter is like summer time). So I meal plan. Sometimes shopping for a full weeks worth of food is daunting, especially if I have 3 little kids to haul to the store, so I break it up into two shorter trips for those times. I'll shop on Monday for groceries through Thursday and then go again at the end of the week.

I like to be thoughtful about food because the pace of life today is so quick, and we often feel so rushed and disconnected from one another, that it's easy to forget how powerful the ritual of eating together can be. To be able to sit at the table, passing food, sharing stories of the day, with the sense that for an hour or so, the outside world can be set aside, is a gift to embrace. Some days life is sweet, other days life can be hard, but the one thing we can always strive to do, is to partake of the comfort and pleasure of sharing a meal with those we hold dear. Thank you to the great Thomas Keller, for helping me define that in my life.

Dinner to me is almost like a love letter to my family. I'm fortunate enough to enjoy the preparation of such meals. There are other areas of my life (ahem...laundry) that are not as pleasurable for me, but I do it anyway for the same reason. It is an honor for me to be the wife of a husband I respect and adore and the mother to children I am honored enough to be around. I love them and take care of them. Of course there are nights when I don't take delight in the precision of my cutting skills while chopping vegetables. I'm tired. I'm done. I don't want to make dinner EVERY night. And I don't. But when I need to, I dig down deep and remember why I do this. That it is my great privilege to serve my family in this way. And sometimes, that includes meticulously cleaning leeks.

Leeks might not be a familiar side dish to us Americans, but to the French, it's about as everyday as it can gets. You boil trimmed leeks in very salty water until soft and toss them with homemade vinaigrette and because of the method in which you cook them, they transform from leeks with vinaigrette to something finer, to leeksandvinaigrette, rich and saucy, or so Molly over at Orangette likes to say. She got this recipe when she lived in France for college. Her host mother, Corentine, would make these weekly. I imagine she had been making them her whole life and that they amounted to nothing special in her mind...just some cooked leeks tossed in vinegar and oil. Those French just don't know how very chic they can be sometimes. Actually, I take that back. They probably most definitely do.

Leeks Vinaigrette
adapted from the blog, "Orangette" by Molly Weisenberg

2 to 3 Tbsp. white wine vinegar
1 to 2 tsp. Dijon mustard
¼ tsp. salt, or more to taste
6 Tbsp. olive oil
1 small to medium shallot, minced
2 lb. small leeks (about 7 or 8)

Optional garnishes
:
Finely chopped bacon
Finely chopped hard-boiled egg

In a small bowl, whisk together 2 tablespoons white wine vinegar, 1 teaspoon mustard, and salt. Gradually whisk in the olive oil, mixing until emulsified. Taste. This dressing should be fairly bright, and the mustard flavor should come through, but not too powerfully. Adjust as needed with vinegar, mustard, and/or salt. When you’re happy with it, add the shallots, whisking to blend. Set aside. Be sure to taste it again later, just before tossing it with the leeks, so that if necessary, you can adjust it according to their flavor.

Lay a clean kitchen towel on the counter near the stove. Bring a large pot of water to a boil, and salt it well. It should taste like sea water.

While the water comes to a boil, prepare the leeks. Trim away the hair-like roots, but take care not too cut in too far; you want the leek to stay intact. Cut off and discard the dark green leafy parts, leaving just the white and pale green stalk. Starting about 1 inch from the root end, so as to keep the white part intact, cut lengthwise down the middle of the leek. (If you were to splay the cut leek open, it should look like a stubby Y.) Wash the leeks well under running water, flushing any dirt from between the layers. Boil until they are very, very tender and yield easily to a knife. Their color will become muted, and they may be falling apart a little. That’s okay. To be sure they’re done, taste one: it should taste sweet, with no trace of raw flavor. The amount of time that this will take depends on their size, but it will probably take longer than you think. Ten minutes is a good bet.

Draining the leeks as well as you can, transfer them to the kitchen towel on the counter. Blot and press them dry. (Don’t burn yourself!) While they’re still hot, put them in a bowl, and toss them with a generous amount of the dressing. Allow to cool at least slightly before serving.

These leeks are slightly sweet and oniony. They would be perfect as a side to a steak dinner, but really, anything works with these guys. We had an all veggie night where we just prepared a lot of vegetables different ways, got out a loaf of fantastic bread made by a local bakery and called it dinner. It was delicious.

Tuesday, December 7, 2010

Mexican Pot Roast Tacos


I talk a lot about taking a casual food, such as tacos, and elevating it to a level of greatness, or restaurant quality by raising the bar with it. I don't change things drastically. After all, a taco should still be a taco in that it's something familiar and unfussy. But what takes a Mexican seasoned ground beef, iceberg lettuce and cheese topped taco from "everyday" to "wow" is what I absolutely love. This recipe is a perfect example of that. I adore this recipe because it tastes genuine, real and authentic. All the familiar flavors of Mexico are there...chilies, tomatoes, beef, cilantro, onion, chile powder and cumin, but you can't discern that from one bite. All the ingredients meld together to form something else entirely and you know, right away that it's special. It's the type of taco that you would order and come back for. The type of thing you make for your friends once and for every other time you invite them, they forever request tacos.

You top these babies with cool shredded lettuce, cilantro sprigs, lime, quesco fresco cheese crumbles and a fresh salsa. The right toppings can make all the difference in authenticity and I don't suggest you stray far from this. Somehow, throwing some cheddar on top of this beautiful roast meat would degrade it in a humiliating way. There's that drama I'm known for. No but really, stay true to the Mexican cuisine when making this, it really will make it or break it. I made a quick blender salsa to go with these (tomatoes, cilantro, onion, serrano pepper, garlic, lime, lemon, a touch of cumin and lots of salt) and it was perfect.If you must buy salas from the store, lean towards the refrigerated pico de gallo varieties and stay away from the jarred stuff which is too sweet.

Mexican Pot Roast Tacos
adapted from "Dinner At My Place" by Tyler Florence
serves 6

Pot Roast:

Extra-virgin olive oil
3 pounds shoulder of beef (or pot roast)
Kosher salt and freshly ground pepper
1 large onion, cut into wedges
2 cloves garlic, smashed
1 28-ounce can whole San Marzano tomatoes (or regular canned plum tomatoes)
3 dried red chilies
1 tablespoon ground cumin
1 tablespoon ancho chile powder
1/2 bunch fresh cilantro
Water
2 tablespoons red wine vinegar

For serving:
Fresh medium corn tortillas, warmed over an open flame
3 cups finely shredded romaine lettuce
1/2 bunch fresh cilantro
1/3 pound Cotija cheese, crumbled (also sometimes called queso fresco)
2 limes, cut into wedges for garnish
Fresh salsa

Drizzle beef shoulder with oil, then season with plenty of salt and black pepper. Set a large, heavy-based pot over medium-high heat. Sear on all sides until you have a nice brown crust, adding additional oil to the pan as necessary to prevent sticking. Add onion and garlic to the pot and stir until they caramelize a little and have contact with the bottom of the pot. Add tomatoes with juice, chilies, cumin, chile powder, and the 1/2 bunch of cilantro. Add about 2 inches of water to the pot. You want the liquid to almost cover the meat. Crush tomatoes with the back of a wooden spoon. Cover and simmer until the meat is is fork tender and comes apart with little resistance, about 4 hours. Once cooked, use a wooden spoon or two forks to break apart the meat. Mix the meat with the tomato pieces and onion from the pot and add a ladle of the liquid for moisture. Discard the rest of the liquid. Season the meat with salt and pepper and add the vinegar and mix to combine.

The rule of thumb, generally, is the longer you cook this the more tender it will be. If you need this tender faster, cut your meat up into smaller pieces before searing. Just check the meat with a fork after a couple hours. If it's falling apart tender, it's ready. If it's not, keep cooking it making sure to keep a low simmer.

Seasoning the meat with the salt, pepper and vinegar once cooked is key. The vinegar is a perfect compliment to the meat, making it come alive and taste fresh. When getting ready to cook the roast, you shouldn't need to add much more than a cup to 2 cups or so of water to your pot. If you need much more you should use a smaller pot so as not to water down the spices, especially since the vegetables will generate more liquid naturally, as they cook. When I made this, I noticed the meat that was under water was more tender than the meat that was poking out, which is fine, but is just a testimony to make sure there is ample liquid in your pot. You can double this recipe easily. I used a dutch oven and crammed all the ingredients in it and I think it made for a better pot roast.

My Safeway doesn't always have a "pork shoulder" like the recipe calls for. You can use any shape or sized pot roast for this recipe, however, if it's bigger than 3 pounds, I suggest cutting your meat into smaller pieces, like in thirds so it will get tender, faster.

Sunday, December 5, 2010

Italian Hot Cocoa


The snow is snowin', the wind is blowin', but I can weather the storm. What do I care if icicles form? I've got hot cocoa to keep me warm!

I took some liberties with that Christmas song. Forgive me. Don't know it? It's "I've Got My Love To Keep Me Warm" by Billie Holiday and it happens to be one of my favorites this time of year.

I meant what I said though. I don't give one iota that it's dumping snow right now. You know why? Because I am home, nestled it it's warmth and love, slowly sipping thick and rich homemade cocoa topped with really sweet, softly whipped cream. How's that for adjective overload? Oh, I forgot to mention the best part, which is it's Italian. Everything is more fabulous with an accent.

Italians like a very dense cocoa and thicken it with cornstarch so that it attains an almost puddinglike or chocolate sauce consistency. More chocolate sauce than pudding, but you get the point. For a thinner version, add more milk, water, or half and half or mix in some strong brewed coffee or espresso.

Iv'e heard of the famous hot chocolate that you get in Paris. It's famous for the very same reason as the Italian, namely being thick and rich. The French hot chocolate you get is mostly milk and real chocolate that's been melted into it. The real chocolate (as opposed to a cocoa powder) makes it thick. American hot chocolate is mostly cocoa powder, some sugar and water or milk and very thin. the Italians, like I mentioned above prefer to thicken with cornstarch and it makes for a very smooth and velvety drink. Think decadent.

Italian Hot Cocoa
adapted from "The Joy Of Cooking"

Makes 2 1/2 cups. Serves 2

Stir together in a medium, heavy saucepan:
1/2 cup unsweetened cocoa
1/3 cup sugar
1 teaspoon cornstarch or arrowroot

Stir in thoroughly and slowly while whisking and set over medium low heat:
1 cup water
1 cup whole milk

Cook, stirring occasionally, over medium-low heat until the mixture is thickened and coats a spoon, about 10 minutes. Stir in:
1/8 teaspoon vanilla extract

Top each serving with:
Very sweet whipped cream

VARIATION: For and Italian Mocha, prepare Italian Hot Cocoa above, substituting 1 cup strong brewed coffee, or 1/2 cup water and 1/2 cup espresso, for the water.

Make sure to cook this until it thickens up properly. It should take most of the 10 minutes to do so. In-between stirrings, a"skin" might form on top but don't worry, it will mix together easily. This is not so thick that it feels wrong drinking it. I once had some "chocolate soup" and it was too thick for my liking. This is just thick enough. Bellisimo!

Thursday, December 2, 2010

Chipotle Kissed Red Bean and Sweet Potato Chili


I bought a cookbook last summer called "Fresh From The Vegetarian Slow Cooker" and have made this recipe from it three times. I have not made any other recipe from that book. I guess I need to branch out, but this chili is so original and so fun I can't pass it up when I open the book. The texture varies a bit each time I make it only because I'm working with sweet potatoes. The longer it does it's thing in the slow cooker, the thicker it will be, like in this picture. If you cook this for only 4-5 hours it will be a bit thinner and the food will be more defined, Which is more ascetically pleasing to the eye. Whether you like it thick or thin, the taste is the same. People who don't usually like sweet potatoes will like them in this because as with any chili, the whole dish takes on it's own flavor and everything tastes like everything else. It's a beautiful thing.

"Vegan Craig" Is staying with us for a couple days. He was never "Vegan Craig" but rather, just Craig until a few days ago when his wife called him by that name in a text and I laughed so hard, I've been calling him it ever since. You see, Craig is vegan now. He used to be rather large and eat a block of cheese a night. Before dinner. Now he is svelte, healthy and well...vegan. This chili, coincidentally is vegan, so it was only fitting that I make this for him while he was here. He left this morning sadly. Craig is a great guest. My husband and Craig have been friends forever and he and Sally, his wife, used to live here but alas, they moved a couple months ago. Luckily they are the traveling type so we will be seeing them from time to time for sure.

I don't like to label things as being "vegan" up front, or like in the title, because I feel it turns people who are not vegan off. I like lots of dishes that happen to be vegan, but probably wouldn't have tried them out had they been labeled "vegan". You know what I mean? Maybe I am the only one with this fear.

Chipotle Kissed Red Bean and Sweet Potato Chili
adapted from "Fresh From The Vegetarian Slow Cooker" by Robin Robertson

serves 4-6

1 medium-sized yellow onion, chopped
1 medium-sized red bell pepper, seeded and chopped
1 large garlic clove, minced
1 1/2 tablespoons chili powder, or more to taste
3 small sweet potatoes, (1 1/2 lbs) peeled and cut into 1/2 inch chunks
One 28 ounce can crushed tomatoes
2 (15.5-ounce) cans dark red kidney beans, drained and rinsed
2 cups water (more if necessary. You need to just cover all the ingredients with it)
1 tablespoon kosher salt, or more to taste
2 teaspoons garlic powder
1 tablespoon minced canned chipotle chilies in adobo sauce, or to taste
cilantro, fresh tomato, red onion for topping (optional)

Add all ingredients except the chipotle chiles, into the slow cooker. Make sure you add enough water to just cover the top of all the ingredients. You can add more than the 2 cups of water if necessary.

Cook on low for 6 to 8 hours. When ready to serve add the chipotle chilies to the slow cooker and taste for seasonings and adjust if necessary.

Serve and top with chopped cilantro, fresh diced tomatoes and red onion.

Keep in mind the chipotle chiles in adobo are pretty spicy. My kids can eat this with the 1 tablespoon recommended but they like spicy things. If you are sensitive, try adding 1/2 tablespoon first (about 1/2 a pepper) and tasting before adding more. The chipotles are what give this a pleasing smokey flavor so don't leave them out all together.