Tuesday, August 31, 2010

Rosanne Cash's Potato Salad

We had an "End of the Summer/Back to School/Jeremy Hates Winter" BBQ at our house 2 weekends ago. We invited friends, grilled burgers, drank watermelon lemonade and sangria, had cobbler, built a fire, made dough boys and played a round of gin rummy. Good times, indeed. We also ate this potato salad.

It's a very Americana style potato salad. How could it not be given that it is Roseanne Cash's (Johnny Cash's daughter) recipe? It's classic in every way and if you want potato salad that tastes as it ought to, I recommend it highly! Sure, there are times where a french style potato salad, with a vinaigrette dressing instead of mayo based, is more appropriate; but not at a down home BBQ...I'm just sayin'.

The dressing is in fact mayonnaise based, but it is highly flavored with mustard and vinegar so it's not heavy. You mix it in with the usual suspects (hard boiled eggs, onion and celery) and a not so usual suspect (dill pickle). Do you add dill pickles to your potato salad? I've never heard of it, but apparently people do it, and you should too because it's just perfect here. You use the small red skinned potatoes, un peeled, which is awesome and fresh dill finishes it off perfectly. It would certainty be a great addition to your Labor Day weekend menu.

Rosanne Cash's Potato Salad
Adapted from Bon Appetit via Smitten Kitchen

Serves at least 8

3 pounds medium red-skinned potatoes, un peeled, scrubbed
8 dill pickle spears or a handful of cornichon, coarsely shopped (about 1 1/2 cups)
3 celery stalks, chopped (about 1 cup)
1 small red onion, chopped (about 1 cup)
4 hard boiled eggs, peeled, chopped
2/3 cup mayonaise
2 tablespoons apple cider vinegar (I only had white vinegar so I used that)
2 tablespoons Dijon mustard
2 tablespoons minced fresh dill
salt and pepper to taste (salt brings out all the flavor, so don't be shy)

Cook potatoes in a large pot of boiling salted water until fork-tender, about 30 minutes. Drain and cool, then cut potatoes into chunks and transfer to a large bowl. Stir in pickles, celery, onion, eggs, mayonnaise, vinegar and dill. Season potato salad with salt and pepper to taste.

Do ahead: Vegetables and dressing can be prepared and stored separately a day or two in advance. mix and let stand at room temperature one hour before serving.

We were lucky enough to have potato salad left over to munch on. In fact, I believe it's the ONLY thing we ate for lunch the day after. It's addicting. Be warned.

Thursday, August 26, 2010

Texas White Sangria


Sangria is one of my favorite cocktails during summer. It's usually made with red wine instead of white. I love both, but something about the crispness of a cold sauvignon blanc with fruit won out this time around. My friend Sally made this once when I came to dinner one night. She made both a red and white version and I was struck at how much I liked the white version. I asked for the recipes immediately, and I can honestly say there is no need to ever try another sangria recipe again. This is it. This is ultimate.

The drink itself is a refreshing blend of white wine (I used savignon blanc as I think it best compliments a sangria) fresh fruit and club soda, with undertones of mint and cinnamon. You make a simple syrup with sugar and water with fresh mint and cinnamon sticks and let them simmer together to make a flavored tea of sorts. When you go to actually make the drink, you mix the wine with cinnamon-mint simple syrup mixture and the chopped fruit together and let it sit for a couple hours and up to overnight in the refrigerator so that the wine tastes of fruit and the fruit tastes of wine. You add the club soda later, just before serving.

This drink is a bit on the sweet side, but welcomingly so in my opinion. I'm not a huge sweet drink fan, but somehow this combo works for me. If you are worried about the sweetness, just add about 3/4 of the simple syrup in and taste. If you like it how it is, leave it. If you want it sweeter add the rest in. It's easy to tailor it to your tastes.

Texas White Sangria
adapted from Southern Living

1 1/3 cups water
1/2 cup sugar
3 (3-inch) cinnamon sticks
1 cup fresh mint leaves, divided
1 (750-mililiter) bottle dry white wine
1 lemon, sliced
1 orange, sliced
2 peaches, peeled and sliced
2 cups club soda, chilled

Bring first 3 ingredients and 1/2 cup mint leaves to a boil in a saucepan medium heat. Reduce heat, and simmer 5 minutes. Remove from the heat, and cool. Cover and let stand up to 8 hours, if desired. Remove cinnamon sticks an place them in the sangria pitcher and discard the mint leaves.

Combine the sugar mixture, remaining 1/2 cup mint leaves, wine, and next 3 ingredients in the large pitcher with the cinnamon sticks. Chill overnight, if desired (and at least 4 hours) Stir in club soda before serving. Serve over ice.

Makes about 6 servings
Although the original recipe says it is enough for 10 servings. I strongly disagree.

I made this for a gathering at my house a week or so ago and it's kind of funny because I underestimated the amount I would need and made too little. When the pitcher was half empty and it was clear it would be gone soon, I quickly poured in more wine and club soda, so it watered the fruitiness down a bit but seriously, it was still so good. I don't recommend this but good to know if your in a pinch and need to stretch it!

Sunday, August 22, 2010

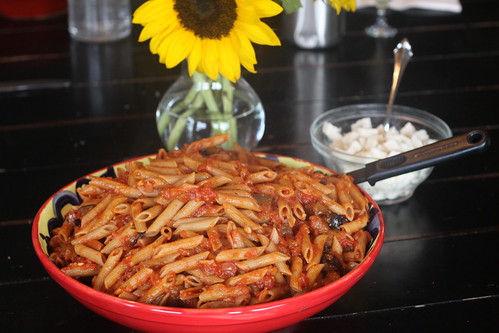
Penne with Eggplant, Tomatoes, and Mozzarella

Penne with Eggplant

We love this pasta at our house. I make it a couple times a year, usually from about August-April when it is cool in the evenings. I like it best in the fall because It's comforting and warming on crisp nights. And I don't know about your neck of the woods, but up here the weather is already starting to act fall-esque. I'm not complaining. Fall is the best with it's warm days and cool mornings and nights. It is arguably the most beautiful of all the seasons as well, especially if you live in a place where the leaves get out of control gorgeous like they do up here. They paint the mountains shades of yellow, red and orange and berries start to appear on every shrub and the air smells clean. All I want to do that time of year is take long walks by day to soak in the beauty and eat eggplant pasta by night.

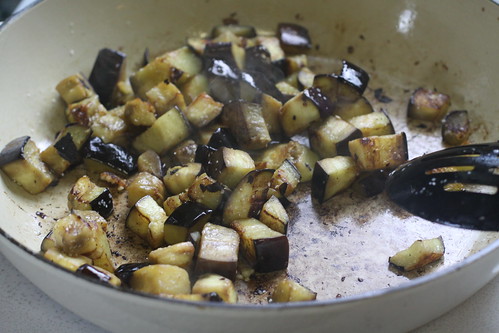
Eggplant

Eggplant is such a versatile vegetable, which blends so well with the heartiness of the pasta and the richness of a full-flavored tomato sauce. I'd venture to say you should feed this to people who think they don't like eggplant and see if they don't change their minds. It's that good. Simple, as almost all authentic Italian cooking is, and soul-soothing. That's what sums up this dinner in a nut shell. It's actually Sicilian in origin, but served all throughout Italy in small trattorias. This is what I sent out for my families Christmas recipe exchange last year. Or was it the year before that? Oh well, now I can't remember but this recipe did indeed go out. It was worthy.

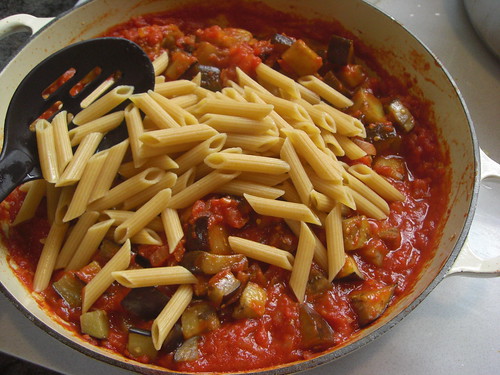
CIMG1483

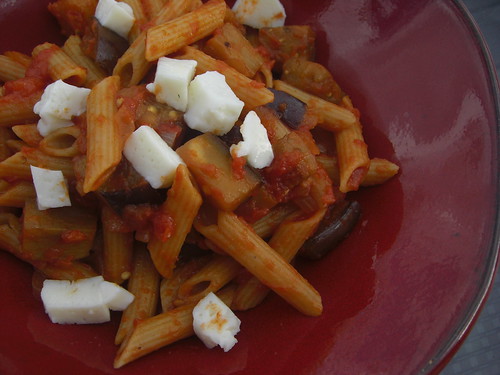
CIMG1486

Penne with Eggplant, Tomatoes, and Mozzarella
adapted from Patricia Wells "Trattoria"

3/4 cup extra virgin olive oil, divided
1 small onion, minced
2 plump fresh garlic cloves, minced
sea salt or kosher salt
one 28-ounce can crushed tomatoes in puree
1 firm medium eggplant (1 pound) cubed (do not peel)
1 pound dried Italian tubular pasta such as penne, gemelli, ziti or fusili
2 cups cubed whole-milk mozzarella

In a large deep skillet, (large enough to hold the pasta later on) heat 1/2 cup olive oil over moderately high heat. When the oil is hot but not smoking, add the eggplant and cook until lightly colored, about 5 minutes. (the eggplant will soak up the oil immediately, but allow it to cook without added oil, keeping the pan moving to avoid scorching.) Season generously with salt. Remove the eggplant from the pan and onto a plate and set aside. Allow the pan to cool off while you cut the onions and garlic.

In the same skillet used for the eggplant, (which should be relatively cool at this point) combine the remaining 1/4 cup olive oil, the onion, garlic, and a pinch of salt, stirring to coat with the oil. Cook over moderate heat just until the garlic turns golden but does not brown, 2 to 3 minutes. Add the can of crushed tomatoes and stir to blend, and simmer, uncovered, until the sauce begins to thicken, about 15 minutes. Taste for seasoning.

Meanwhile, in a large pot, bring 6 quarts of water to a rolling boil. Add 3 tablespoons salt and the pasta, stirring to prevent the pasta from sticking. Cook until tender but firm to the bite. Drain thoroughly.

Add the eggplant and pasta into the pan with the tomato sauce. Toss to blend. Cover and let rest off the heat for 1-2 minutes to allow the pasta to absorb the sauce. transfer the pasta to warmed shallow bowls and sprinkle each serving with cubed mozzarella. Serve immediately.

Yield: 6 servings

Sometimes I use 2 eggplants instead of one because I love it so much. Make sure to buy the real deal mozzarella (it should be soft) because it's much better than the string cheese like processed stuff. I also add the eggplant back into the sauce before I add the pasta in, although you don't have to do that. I just think the eggplant absorbs the sauce and tastes better if you let it sit a few minutes and allow the flavors to mingle.

Tuesday, August 17, 2010

Red Velvet Cake


Lots o' pictures! Sometimes, that's just how I roll. I made Red Velvet cake for Jeremy's Uncle Randy the other week because he was visiting over his birthday. Red Velvet is his favorite. It's a lot of people's favorite. Laura, his wife, asked me to make a "real" red velvet since sometimes people just make white cake and dye it red. A travesty. White cake is NOT red velvet cake. There are a few things that separate authentic red velvet from regular white cake. Number one being, red velvet, by nature, is not white cake. It's like a half chocolate, half white cake. Cocoa is always added to enhance the deep red color it is supposed to have. You don't add enough of it to deem it a chocolate cake though, however, once you add any cocoa and it's definitely not a white cake. It's a hybrid of sorts. The more cocoa you use, the deeper the red color (and the more red food coloring you have to use) but as you can see from the picture of the finished slice itself, mine is a very pretty deep scarlet color. We use lots of cocoa and lots of food coloring! The pictures make the batter and unfinished cake look sort of brownish red, but really it should be red, red. My camera bites the big one...but I won't have that problem for long! My sweet generous husband informed me last night that he bought me a brand new, wonderful camera. This is all on his own, mind you. I mentioned I wanted one and he did some research on the one I had previously specified and just bought it! That stuff doesn't happen too often anymore, so I was thrilled! Food photography is tough with a point and shoot! It's tough anyway, but maybe this will help.

The other thing about Red velvet cake is it does not have any butter, just oil. This might not seem weird to anyone who is used to making box cake mixes (they all call for oil) but from scratch, it's not all that common. Most require you to beat the butter with sugar for a while at the start of any cake recipe. Then there is the addition of the baking soda and vinegar. Baking soda, OK, but vinegar is another strange ingredient called for that lends itself to the mystery of red velvet. Actually its not a mystery. Baking soda mixed with vinegar makes a chemical reaction. It foams up and you in turn fold this mixture into your cake batter. It's equivalent to folding in egg whites, really. It makes for a tender, fluffy cake.

Let's get real for a minute. Most people love red velvet for the cream cheese icing. I don't love cream cheese icing. I don't not like it, it's fine and all but sometimes I prefer a creamy vanilla icing on my red velvet. I'll provide both recipes down below and you can make the call for yourself.

FYI: You are going to need A LOT of red food coloring...6 tablespoons to be exact, so buy a couple bottles of it!

Also, since this is a layer cake I had wanted to give you a few pointers about how to handle and frost such things because it will make your life way easier a yield a better looking result.

1) When the cake has cooled after baking, wrap each layer in plastic wrap and place in the freezer for 30 minutes to 1 hour. The cake will be stiff enough to work with without the danger of flaking or breaking apart. Then I take a serrated knife and cut the cakes across the top so the surface is flat. To achieve this best, cut the cake about 1" in all around, rotating as you go (like in picture 3) that way when you cut across the middle it will be perfectly straight. Sometimes if you just cut all the way through you can't get it as even. I bend down and look at it eye level to ensure it's even after I've cut it, then I trim if needed.

2) Whenever you frost a cake that is darker than the icing you are applying, you will want to do a crumb coat. A crumb coat is just a very thin layer of frosting all the way around the cake as demonstrated in picture #4. It seals in all the crumbs so you don't see it all in your frosting. Then you refrigerate said cake with the crumb coat for about 30 minutes until it's set (if you are in a hurry, you can skip this step and the crumb coat will still be helpful) applying the rest of the icing generously over.

Red Velvet Cake
adapted from "The Confetti Cakes Cookbook" by Elisa Strauss via Smitten Kitchen

Yield: 2 tall cake layers or three thinner layers

1 tablespoon unsalted butter
3 1/2 cups cake flour
1/2 cup unsweetened cocoa (not Dutch process)
1 1/2 teaspoons salt
2 cups canola oil
2 1/4 cups granulated sugar
4 large eggs
6 tablespoons (3 ounces) red food coloring
1 1/2 teaspoons vanilla
1 1/4 cup buttermilk
2 teaspoons baking soda
2 1/2 teaspoons white vinegar

Preheat the oven to 350 degrees

Place a teaspoon of butter in each round 9-inch layer cake pans and place in oven for a few minutes until butter melts. remove pans from oven, brush interior bottom and sides of each with butter and line bottoms with parchment. Alternately, butter and parchment your pans how you normally would. Just please, parchment, people! Please!

Whisk cake flour, cocoa and salt in a bowl (or sift together on some aluminum foil if you re like me and want to save a dish)

Place oil and sugar in a bowl of an electric mixer and beat at medium speed until well blended. beat in eggs one at a time. With machine on low, very slowly add the red food coloring. (Take cake: it may splash.) Add vanilla. Add flour mixture alternately with buttermilk in two batches, beginning and ending with the flour mixture. Scrape down sides of bowl and beat long enough to just combine.

Place baking soda in a small dish, stir in vinegar and add to batter with machine running. beat for 10 seconds.

Divide batter between the two prepared cake pans and place in the oven and bake until a cake tester comes out clean, 40-45 minutes (check at 40 min.) Let cool in the pans on cooling racks for 20 minutes. Then remove from pans, flip layers over and peel off the parchment paper. Cool completely before frosting.

Cupcake variation: yield 35 cupcakes. Fill cupcake liners 3/4 of the way with batter, and bake between 20-25 minutes, but check them 2/3 of the way through in case your oven gets the job done faster.


CREAM CHEESE FROSTING:

2 packages cream cheese (8 ounces each) at room temperature
2 sticks of unsalted butter, at room temperature
2 cups confectioners sugar (powdered sugar)
1 teaspoon vanilla extract
1 dash pure maple syrup (optional)

Beat together the butter and cream cheese until well combined. Add the powdered sugar and mix on low until combined. Add the flavorings and mix thoroughly.


CREAMY VANILLA FROSTING: to use if you don't care for cream cheese frosting

6 tablespoons flour
2 cups milk
2 cups (4 sticks) unsalted butter
2 cups sugar
2 teaspoons vanilla extract

Whisk flour into milk in a medium sized saucepan. Place over medium heat and stirring constantly, cook until mixture becomes thick and begins to bubble, about 10 minutes. Cover with waxed paper placed directly on the surface and cool to room temperature.

Beat butter until smooth; gradually add sugar beating continuously for 3 minutes, until fluffy. Add vanilla then add cooled milk mixture and beat on medium high speed for 5 minutes. Cover and refrigerate for 15 minutes. Use immediately.

Saturday, August 14, 2010

Roasted Shrimp Cocktail

We had to go to our annual HOA meeting a little over a week ago. It's funny, really. Our HOA is comprised of 9 homeowners (2 of which are never here) over the age of 50, except us, and is held at our closest neighbors house ever year during the summer. Everyone brings an appetizer (although I wish I had dessert duty) and drinks wine. That's mostly what we do. We drink and eat and eventually call the official meeting to order. It lasts all of 10 minutes, complete with motions and "I"'s and then we all go home to our respective houses.

This year I brought this roasted shrimp cocktail. I had to step it up since last year I totally copped out and brought bread and pre-packaged dipping oil. I forget what I had going on last year but it must have been huge for me to take that desperate route. Ah, but tis necessary sometimes isn't it?

I'm obsessed with cocktail sauce. Let's start there. My Grandpa Grillo makes great cocktail sauce and so this is his recipe, although it is so simple I don't really understand why people buy the pre-bottled stuff. Maybe because cocktail sauce using ketchup for a base is gross (in my opinion) and that's what most recipes call for. This cocktail sauce's base is made from a bottle of Heinz Chili Sauce, which you can find above the ketchup in most supermarkets (unless you are Steamboat's Safeway, argh!) That's what it's called and I have no idea what you are supposed to use it for (chili?) other than making outstanding cocktail sauce. It's fresh and not sweet like ketchup so it's an ideal match for perfect cocktail sauce. Is it just me or have I written the phrase "cocktail sauce" way, way too many times already? Add fresh lemon juice and horseradish and it's done.

Shrimp cocktail might just be my very favorite appetizer. I love big juicy, meaty, cold poached shrimp that usually accompany cocktail sauce that you order in restaurants. However, I find it's sort of hard to poach shrimp perfectly at home. Not to mention rather time consuming considering you should poach shrimp with the shell on, then peel them after they cool and then refrigerate them till cold. It's much, much simpler to open a package of peeled and deveined shrimp, tail on, and roast them for a couple minutes and serve at room temperature.

Roasted Shrimp Cocktail
method adapted from Ina Gartens, Back To Basics. Cocktail sauce from my Grandpa

FOR THE SHRIMP

2 pounds medium shrimp, peeled and deveined*
1 tablespoon olive oil
1/2 teaspoon kosher salt
1/2 teaspoon pepper

FOR THE COCKTAIL SAUCE

1 bottle Heinz Chili Sauce
the juice of 1/2 a juicy lemon
3-4 tablespoons horseradish (I used prepared horseradish)

Preheat the oven to 400 degrees

Place shrimp on a sheet pan with the olive oil, salt, and pepper and spread them in one layer. Roast for 4-5 minutes, just until pink and firm and cooked through. Set aside to cool.

For the sauce combine the chili sauce with the lemon and horseradish. Stir to combine and taste. If you like it spicier, add more horseradish to taste.

Serve the shrimp and sauce on a platter with a few lemon wedges for squeezing.

serves 6-8

*If you are using larger shrimp (like 12-15 count) great! I would have too except they are hard for me to find. In that case, roast for 8-10 minutes.

This appetizer is delicious and quick. As Ina would say "how easy is that?"...actually, I just found out she has a new cookbook slated to debut this Fall under the title "Barefoot Contessa (wait for it) How easy is that?" HA! I laughed out loud to myself. If I had a nickel for every time Ina said that phrase during one of her shows, I'd have ten bucks. Five at least.

Thursday, August 12, 2010

Mango Lassi-Isabella's Summer Snacks


This sweet Indian-style smoothie like drink is a blend of fresh mango's, honey and yogurt. Some recipes call for milk and cardamom to be added but I don't keep either in my house so I went for more of a western version. This is traditionally served with Indian fare to cool the mouth from all the spices in the exotic food. It works equally as well for Isabella's Summer snack! She loved this drink and consumed it way fast. When I love something like this I tend to savor it, taking slow sips in fear it will run out. Not Isabella. When she likes something she wolfs it down as fast as she can. I don't get it, but then again she doesn't get my approach either.

This Summer has been going by way too fast. I really can't believe it's almost over. I'm in denial that school will be starting soon. I have a meeting with the principal of the Christian Heritage School today to possibly see about Isabella going there this year instead of her usual public school, Soda Creek and I just can't believe it's already time to decide. I bought a bento lunchbox system for her this school year as I try to pack as many lunches from home as possible. The bento system is super cool because it's much more versatile than traditional lunch boxes with all it's compartments and organization. I'll post pictures and back to school lunch ideas soon. The lunch box is where the back to school thinking stopped, however, because I have not shopped for supplies and I have no idea exactly which day school starts. Part of me doesn't want to know and that's why I don't find out. I know it's sooner than I think it should start and that's sort of depressing to me. I remember not starting back to school until after Labor Day in September. Now it seems it's more like August 22nd or 23rd. But like I said, I don't really want to know. My friend Melissa is always the one who bursts my bubble (and thankfully lets me know) and tells me that school is starting in 3 days. That's when I kick it into high gear and accept our fate. The school year will indeed start...earlier than it should.

I love my kids and I want them around. I struggle with this every year at back to school time. If I didn't know myself better, I'd attempt home schooling. Thank God I know better as I would be a terrible teacher. I can't teach Isabella jack. She's one of those kids who has to learn from someone else. Someone she's to afraid to rebel against and someone she wants to please. Our mother/daughter relationship is too close to allow that. Especially when we both have a vision for how things should be done. Just so. And it's exactly the opposite way the other was thinking. Plus we both get frustrated easily and have a hard time with self control. It would be a hot mess. To real school she goes. Jeremiah will be starting pre-school this year as well. It's only one day a week but already I'm morning that the time has officially passed when he is just little enough to be home with me. I found some peace in this when I realized that he was born in October so he can't start kindergarten next year anyway. He will have another whole year with me at home with the exception of one day. I can handle that for now. I love cooking during the day with my little helper, Bud-Bud. I know he doesn't technically have to start this year, but he needs it. He would love it. The kid is smart and he needs that stimulation more than I need to indulge my selfishness in keeping him home. Oh, how I wish we just had that extra week and a half of sweet summer! We will have to milk it now that were in our final days. And it will probably involve at least one more Mango Lassi.

Mango Lassi
adapted from various sources on the Internet

1 mango, in chunks
1/2 cup plain yogurt
1 tbsp lime juice
1 tablespoon honey
1/2 cup ice
pinch of salt

Puree all ingredients together in a blender until smooth

makes 2 drinks

Let's unite and milk these last days of Summer together. What will you do? I think I will take my kids for a walk through the botanical gardens one morning and maybe picnic under the huge umbrella on the lawn. Were going to eat lunch outside at Sweet Pea and Bamboo Market. We will go to little toots park. We will go for another family bike ride down the bike path and stop for snacks along the way. Were going to have a big dinner at our house with our friends and let the kids run and make a fire and eat smores and dough boys until late. We'll go school shopping and make one more round of homemade Popsicles. I'll take Isabella to the movie theater, just her and I to see "Ramona and Beezus". The school year may be approaching rapidly, but I'm not going out without a fight! I'm taking Summer back. I'm taking it all back. HA! I just had a Goonies moment. (yeah...well this wish? This is MY wish and I'm taking it back. I'm taking them all back) Oh, Corey Feldman, get your act together will you?


Monday, August 9, 2010

Zucchini Bread

If theres one thing I trust Paula Deen to make well, it's baked goods and boy oh boy, she did not let us down here! I'm really excited about this zucchini bread. Not because it was beautiful (it wasn't) but because it's the best one I've ever had! I mentioned it wasn't the prettiest bread I've ever made and that's the truth. It was downright ugly, actually. It rose dramatically in the oven and I was feeling pretty proud of myself, right up until I took it out when done, only to realize it fell again...dramatically. Cest la vie! Honestly, I knew it was coming. This recipe calls for 3 whole cups of sugar! Any baked good with that amount of sugar is going to fall at this altitude. Usually I don't put in more than two cups of the stuff for any one recipe, but I knew leaving out the whole additional cup of sugar would not be good, so I put it in. I'm glad I did because 3 cups of sugar or not, it was delicious and not sweet. Well, not very sweet anyway. It definitely needed all 3 cups. Don't be afraid to serve this to company. Once cut, you can hardly tell there is a narrow dent on top. Besides, when they try it, they won't care and neither will you. You'll both be in hog, zucchini bread, heaven. Eyes rolled back, willing yourself not to take another piece. Oh, but you will.

Now to be very clear, I need to disclose one tiny thing. I eat my zucchini bread warm (either fresh out of the oven or warmed in the microwave for a couple seconds) with a generous pat of salted butter that melts slowly into it. And sometimes, I even put a drizzle of honey on top of that. Soooooo, that might have had to do with why I think this particular zucchini bread is the best one ever. Just a suggestion...Just a suggestion.

I made this bread because my Mom dropped off some monster zucchini fresh from her garden. I couldn't possibly eat it all, so I thought, ah, zucchini bread would be perfect! Oh, yeah. It was.

Zucchini Bread
adapted from Paula Deen

preheat the oven to 350 degrees

3 1/4 cups all purpose flour (I used 1 cup whole wheat and 2 1/4 cup all purpose)
1 1/2 teaspoon salt
1 teaspoon nutmeg
2 teaspoons baking soda
1 teaspoon cinnamon
3 cups sugar
1 cup vegetable oil
4 eggs
1/3 cup water
2 cups zucchini
1 teaspoon lemon juice
1 cup walnuts

Mix oil, eggs, water, and lemon juice together in a bowl and set aside. Mix the flour, salt, nutmeg, cinnamon, baking soda, and sugar together in a large bowl. Mix the wet ingredients into the dry and stir with a wooden spoon to combine. Stir in the zucchini and walnuts to combine.

Spray two loaf pans with oil and divide mix evenly into both. Place in the oven and bake for 1 hour or until a toothpick inserted into the center of the loaf comes out clean.

I like zucchini bread anytime throughout the day. Breakfast. Snack. After lunch snack, dessert. It's the most versatile food, isn't it?
I thought everyone knew about zucchini bread since I grew up eating it but I'm finding that some people (mostly men) have no idea what it is and think it's gross that I made bread out of a vegetable. You only have to say 2 words to shut them up. Carrot cake.

Wednesday, August 4, 2010

Cassis a l' Eau


Cassis, ah what? Let's just call this one cassis (cass-cease) shall we? Or in other words the best -middle-of-the-day-cocktail ever. Not that much drinking goes on in the middle of the day around here, except for iced tea but on rare occasion, I'm not exactly opposed. This drink fits the bill perfectly. It's very low alcohol and fruity and sweet and cold and pink and French. It's too cute for words. I'm not a huge sweet fan when it comes to alcoholic beverages, but I really don't mind this because its so refreshing.

Cassis is used for champagne cocktails most notably. If you were to mix a scant teaspoon into your bubbles you would have a Kir. If you used Chambord (raspberry liqueur) instead of Cassis it would be a Kir Royale. You get the point. The French serve this drink which is cassis mixed with water for another excuse to drink in the afternoon without getting too drunk. Quite funny if you ask me, but hey, whatever works.

OK, so this is sort of a cop-out "recipe" because it's only cassis, which is black currant liqueur and water but I'm telling you, I was so impressed that I just had to share it with you. It would be great at a brunch or wedding shower or if you are hanging out in the middle of the day with Danielle Heit, er, or one of your friends and doing absolutely nothing but watching your little ones tattle and hit each other with trucks while trying to force an apology while the other little boy is screaming in the corner. No wonder we were ready for cocktails!

Cassis a l' Eau
adapted from Barefoot in Paris

Makes 1 drink

6 tablespoons creme de cassis liqueur
3/4 cup water
ice

Fill a tumbler with ice. Pour in the cassis and water and stir

How chic is that? And I love Danielle's wedding ring in this pic!

Monday, August 2, 2010

Fried Green Tomatoes


I think I was meant to be southern. Fried chicken was one of the first things I learned how to make (although, I prefer flattened chicken breasts to bone in) along with chicken and dumplings and killer garlic mashed potatoes. I love Paula Deen, peach cobbler, crab/shrimp boils, fried green tomatoes, comfort food in general and collard greens have been on my Thanksgiving table 2 years in a row. And that whole rolling lawns, huge trees, white houses, boating, shrimping, proper, sweet tea, southern belle, cute accent, steel magnolia thing...I'll take that too. If I moved to the south I'd change my kids names to Caroline Marie, Wade Clifton MacGray III and Peyton and we'd fit right in. Of course that would mean Jeremy's name would have to be Wade Clifton MacGray II and I don't think I could pull that one off. Jeremy Scott MacGray III doesn't quite have that same southern charm does it? Oh well, maybe I'll just stick to making the food.

I was at Sweet Pea, our local farmers market after a bike ride through town with my family. I walked in to see what they had, fingers crossed that there would be green tomatoes. Lo and behold there they were right when I walked in the door in a big wooden basket! I immediately packed a bag full, paid up and biked home to cook them. I don't mess around with green tomatoes. I see them maybe once a year up here in Steamboat and I know to buy as many as possible when I do. Then I eat them for days. We had them tonight for dinner, since we had a late lunch and It's all I really wanted anyway. I'll have them again for lunch tomorrow and the next day. My goal is to basically stuff myself full so I don't want them again until next summer. Then I don't feel so bad about it.

I've made fried green tomatoes many, many times throughout my life starting when I saw the movie, of the same name (Fried Green Tomatoes) starring Kathy Bates, Mary Louise Parker and Mary Stuart Masterson. I don't know how old I was, but I was young. My Grandma Grillo who is from Missouri, but likes to think she's southern (well maybe that is???) was nice enough to make me my first batch and I fell in love. If you have never had one before, let me tell you about them in all their glory. They are sturdy with a great toothy, substantial bite to them. They are hot and slightly tangy sour, salty and cornmealy and most importantly, fried. So it crackles in your mouth. It's sooooooo good. That's really the only thing you have to know.

Green tomatoes are just red tomatoes that are not ripe yet. They are never mealy, which is what I hate about fresh tomatoes. Considering the fact that this dish is incredibly simple, it's weird that there are so many versions out there. Different batters and breading each of which have loyal followers. I like them best dipped into and egg and buttermilk mixture and dredged into a cornmeal/flour/garlic powder mixture. But by all means, if you like italian bread crumbs use those (it just won't get as crisp on the outside).

Fried Green Tomatoes

2-3 green tomatoes, sliced a scant 1/2" thick
1/2 cup all purpose flour
1/2 cup cornmeal
2 teaspoons garlic powder
2 eggs
1 tablespoon buttermilk
kosher salt
olive oil

combine the flour, cornmeal, garlic powder and 2 teaspoons kosher salt in a shallow bowl and set aside. Combine the 2 eggs and buttermilk with a pinch of salt and whisk together until well combined and set aside.

Heat a heavy skillet on the stovetop over medium heat, then add enough olive oil to cover the bottom of the pan thickly. Dip and cover each of the tomato slices with the egg mixture first, then the cornmeal mixture, then dip again into the egg and once more into the cornmeal mixture so you have dredged each tomato slice twice. When the oil is hot in the pan add tomato slices and saute for about 1 1/2 minutes on each side or until crust is golden and sprinkle generously with salt while still hot. When done, drain on paper towels and eat fresh while still warm.

If your tomatoes are bland at all, add more salt but they shouldn't be. I like to pick these up and eat them with my hands but you can also place them on a plate and eat them with a fork and knife. You can also make a sandwich with them. Just place them between two pieces of hearty bread, like a baguette or sturdy whole grain and add some bacon and lettuce to make a BLT of delicious sorts, or grill with pepper jack cheese and make a ridiculous high calorie grilled cheese with fried green tomato. However you eat these, you won't be sorry and the possibilities are endless so have some fun ya'll! Yeah, Iv'e got this southern thing down pat.