Monday, March 29, 2010

Potato Gratin


This is a definitely one of my go to recipes. It's no wonder then, that I turn to this very recipe when I needed it most. You see, on Thursday it's my turn to make my monthly dinner for sk8 church. Not just any dinner, but an Easter dinner. They didn't ask me to do it, but my day (the first Thursday of every month) happens to fall 3 days before Easter this year and I just had to make them a meal to celebrate it. Who knows, for some of them it might be their only Easter meal. When you are making a meal for 60-70 or so people there are lots of variables to consider. The main dish was easy. Ham is what you eat on Easter, It's traditional. Plus it comes fully cooked and when you order honeybaked hams, like me, it's even easier since they are best served at room temperature. No prep and No oven space needed, which is awesome because then I can make something like Potato Gratin, which does need the oven.

Potato gratin might not seem like a logical first choice when trying to make it for lots of people, but I beg to differ. I would argue that it's much easier than say- mashed potatoes. For mashed potatoes I would have had to peel an incredible number of potatoes and dice them all up--In batches, like 6 or 7 batches, I might add--and boil them all and them mash them all and season them all. Did I mention I would have to do that 6 or 7 times?!?!? Then there would be the issue of keeping them warm. You can't re-heat mashers with a lot of success so it's not something that can be made ahead. Potato gratin on the other hand can.

Sure, I will still have to make it in batches, but it won't be half as much a pain. You are "supposed" to peel the potatoes when you are making a gratin, but I think it would be absolutely fine to skip this step. I own a food processor so I can slice those un-skinned potaotes razor thin in about 30 seconds flat. Then You just toss those with cream and cheese and bake. And since it re-heats like a charm I can make and bake this the day before the dinner and reheat. Now, that's what I'm talking about!!

Potato Gratin
adapted loosely from The Barefoot Contessa Cookbook

1 yellow onion, thinly sliced
2 tablespoons good olive oil
1 tablespoon butter
5 large russet potatoes
2 cups plus 2 tablespoons heavy cream
2 1/2 cups grated gruyere cheese (1/2 pound)
1 teaspoon kosher salt
1/2 teaspoon freshly ground pepper

Preheat the oven to 350 degrees

Butter the inside of a 10 cup baking dish. Saute the onion in the olive oil and butter on medium-low heat for 15 minutes, until tender.

Peel the potatoes, then thinly slice them by hand or with a mandoline. Mix the sliced potatoes in a large bowl with 2 cups of cream, 2 cups of Gruyere, salt and pepper. Add the sauteed onion and mix well.

Pour the potato mixtur ein the buttered baking dish. Press down to smooth the potatoes. Combine the remaining 2 tablespoons cream and the 1/2 cup of gruyere and sprinkle on top. Bake for 1 1/2 hours, until the potatoes are very tender and the top is browned and bubbly. Allow to set for 10 minutes at room temperature and serve.

Serves 10
This gratin can be made days before and reheated at 350 degrees for about 30 minutes.

This recipe is originally called "Potato Fennel Gratin" and calls for 2 fennel bulbs to be sliced thinly and sauteed with the onions and then added to the potatoes. I have never done it that way though. I love fennel, I just have never tried it, is all. It would be delicious. If you try it let me know how it turns out!

I love this particular gratin mostly because the cheese is perfect. Gruyere is the quintessential gratin cheese. To me there is no substitute. It is so warm and gooey and nutty. Spectacular. It's also the only cheese I will put on top of my French onion soup. If you have never used it before, consider it a definite must.

Like I mentioned above, the ham is fully seasoned and cooked and spiral cut. The rolls are pre made. Once I have the potato gratin ready, all that will be left to do the day of is to assemble the spinach and strawberry salad. I feel triumphant!


Saturday, March 20, 2010

Quinoa Stuffed Peppers

I'm not all health all the time, I'm really not. I eat my fair share of ice cream ( like the chocolate malt I had with my kids last night at Jonny B Goods) peanut butter cookies (like the two I put away last week and then again another two this week) and let's not forget about the carmel corn (like the huge bag I ate after lunches during the course of this whole week). My point is, I have a sweet tooth. And a bad one at that. However, I feel much better eating said sweets and more free to do so if I nurish my body properly with whole foods the rest of the time. Which is why today for lunch I am making quinoa stuffed peppers. I don't know much about quinoa except it's a whole grain, and I should definitely be eating more of it. The problem is I once had quinoa plain, served like rice would be on the side of my plate and was not impressed. It had a neutral if not an ever so slight bitter after taste. If I was going to be eating quinoa it was going to have to taste good. Period. So, I present to you today this recipe that packs so much nutritional punch and yet still doesn't taste like "health food" just good fresh food.

I like to consume lots of fresh wholesome foods like healthful salads, tabbouleh's, fresh fruit, smoothies, sauteed spinach and the like. If you are trying to add healthy good for you foods to your diet, I recommend you actually try to like the food you are eating or it's not going to work. So you hate quinoa plain? Find a way you do like it, perhaps in this stuffed pepper recipe. Your vegetarian tacos are boring and bland? Figure out how to spice it up. What could you add in? What flavors could you introduce to make it taste awesome? That's mostly what I do. I try and figure out ways to eat healthy and still love it. However, every now and then you need to eat filet of beef au poivre or lemon chicken with croutons, oh, and creamy chicken with 40 cloves of garlic. And I will be posting those recipes, I promise. But for now, quinoa stuffed peppers sounds and smells pretty fantastic.

Quinoa-Stuffed Peppers
adapted from Vegetarian Times

1 medium onion, finely chopped
2 TBS olive oil
2 ribs celery. finely chopped
1 TBS ground cumin
2 cloves garlic, minced
1 10-oz pkg. frozen spinach, thawde and squeezed dry
2 15-oz cans diced tomatoes, drained, liquid reserved
1 15-oz can black beans
3/4 cup quinoa, uncooked
3 large carrots, grated
1 tsp. salt
1 1/2 cups grated pepper jack cheese, divided
4 large red bell peppers, halved lengthwise, ribs and seeds removed

Heat oil in saucepan over medium heat. Add onion and celery, and cook 5 minutes, or until soft. Add cumin and garlic, and saute 1 minute. Stir in spinach and drained tomatoes. Cook 5 minutes, or until most of the liquid has evaporated.

Stir in black beans, quinoa, carrots, and 2 cups water. Cover, and bring to a boil. Reduce heat to medium-low, and simmer 20 minutes, or until quinoa is tender. Stir in 1 cup of cheese. Season with salt and peper, if desired.

Preheat oven to 350 degrees. Pour liquid from the tomatoes in the bottom of a baking dish.

Fill each bell pepper half with a heaping 3/4 cup quinoa mixture, and place in baking dish. Cover with foil, and bake 1 hour. Uncover, and sprinkle each pepper with 1 tbs remaining cheese. Bake for 15 minutes more, or until tops of stuffed peppers are browned. Let stand for 5 minutes. Transfer stuffed peppers to serving plates and drizzle with pan juices, if desired.

serves 6-8

Ok, That was the actual recipe. My version of this was a hot mess, given that I used the recipe merely as a guidline. The real way sounds delicious, but I already had cooked quinoa, so I had to improvise.

Basically I sauteed the onions and celery as directed. Then I added the garlic and cumin as directed. Then, instead of cooking the spinach seperately and adding it in, I just dumped the box of frozen spinach into the saute pan with the onions and celery and added about 1/4 cup of water, to help thaw the spinach out. Once it was thawed, I added in the black beans, tomatoes and carrots (you could also buy pre shredded carrots if you don't want to grate them yourself). Then I added in the cooked quinoa and seasoned everything with garlic salt and stuffed it in the bell peppers. I omitted the cheese in the filling, but I did top the peppers with cheese towards the end. It really seems to need more salt than the recipe calls for. Maybe if I would have put in the cheese it called for I wouldn't have needed it. Cheddar would work well if you don't like pepper jack.

If you don't read your recipe well and accidentially don't save your tomato liquid and you realize you need it for the bottom of your pan, don't fret. Just add about a cup of water to the bottom of your dish instead. All the juice is really doing is helping to steam and cook your peppers in the oven.

Also, this make A LOT of filling! bascially almost double what you need. Again, don't fret. This is actually excellent because the filling freezes very well. Just cool leftover filling and stick it in a freezer ziplock bag, freeze it, and then thaw it out when you need it for a quick dinner down the road.

Tuesday, March 16, 2010

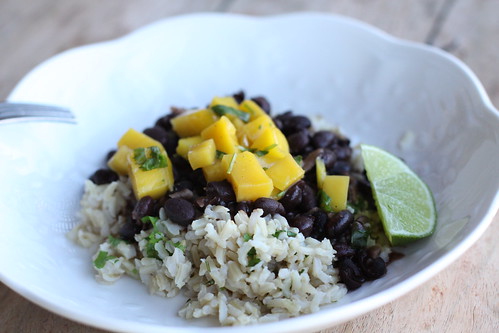
Rice, Black Bean and Mango Salsa Bowl

black bean mango salsa bowl

So, I made this recipe up. I saw a facebook post about black beans and mango salsa a few days ago and it got me thinking...The weather has been beautiful here lately and any time it warms up to 50 degrees, it has all of us thinking about Spring, beloved Spring! Spring equals warmer weather and lighter food which, for me, always includes Cuban. I had decided that I would make brown rice and season it up with some lime juice, cilantro and salt once cooked. Then I would saute up a load of garlic (5 ginormous cloves!) in a wee bit of olive oil and add a couple cans of black beans with their juice and let it simmer for a while to reduce. Then I would squeeze in fresh lime juice and add some garlic salt and chile powder. Then I would dish up the rice in a shallow bowl and top it with a ladel or two of beans, whose juice would drip down and flavor the rice. Then, I would top the whole thing with fresh mango salsa. You could probably make the dish just fine from the description above seeing as how it's rustic, but I'm going to provide the recipe below. It was really, really good.

Jeremy loved it, which is no surprise since it's basically a vegetarians dream dish. The fresh salsa paired so well with the earthiness of the beans and the sweet tart combination along with the garlic was divine. A snap to make too, by the way, and oh, so satisfying.

So get this. I was actually all geared up to make this dinner last night, but I had a showing on my house around 3pm and had to leave. I went to Danielle's house and never left. We ended up having dinner there, but it was kind of funny because she was making black bean patties with a mango rice. I don't know whether it was in the air or what, but black beans and mangos were popular in Steamboat this week. The dinner last night was delicious as well, but I figure I'd better ration out my black bean posts so as not to cause a revolt. Besides, I will be making Danielle's dinner again and will share the recipe at that time. Until then, make this...

Rice, Black Bean and Mango Salsa Bowl
serves 4

2 cans black beans, left undrained
whole grain rice or white rice (enough for 4 people according to package)
5 fat garlic cloves (or 7-8 smaller ones) minced
2 tablespoons olive oil
2 juicy limes, each cut in half
1/2 teaspoon chili powder
1/2 teaspoon garlic salt
1 mango, chopped into bite sized chunks
2 tablespoons red onion, finely diced
1 cup cilantro, chopped, divided
Kosher salt
Black pepper

For the rice:
Cook enough rice for 4 people according to the package directions. (I usually need enough rice for 6 people to feed 4).

For the mango salsa:
While the rice is cooking, make the mango salsa. Mix the chopped mango, red onion, half of the cilantro, with the juice of half a lime and a pinch of salt and black pepper. Set aside until ready to use.

For the black beans:
While the rice is cooking, set a saute pan over medium low heat and add the olive oil and garlic. Cook for garlic for a minute or two, then add the cans of black beans with their juice. Turn the heat up to medium high and bring it to a boil, then turn the heat back down to medium to medium low and simmer, stirring occasionally for 12-15 minutes until some of the beans juices have evaporated away and it is a bit thicker. Don't boil away all the juice because that is what will flavor the rice when you dish it up. Add the chili powder, salt and the juice from 1 whole lime and stir to combine.

When the rice is done cooking, squeeze in the juice of the remaining half a lime and add a generous pinch of salt and the remaining cilantro. Stir to combine. Cover to keep warm.

To serve: Scoop a portion of the seasoned rice on the bottom of your bowl and top with beans with its sauce, then top with mango salsa. Dig in!

You can make the mango salsa up to a day in advance. It re-heats beautifully too! I would make this for company. Just serve an appetizer like cucumber spears with lime juice, salt and chili powder, pass the mojitos or coronas and you are golden. Flan with toasted coconut flakes for dessert wouldn't hurt you either. Oh, my, I'm hurting for Summer!

Sunday, March 14, 2010

Tuna Salad with Apple, Pepper Jack and Red Onion

I first started to eat tuna salad when I lived with my Grandparents for a time after high school here in Colorado. I never really ate it before then except maybe a tuna melt or two at Carrows with my friend Jessica. The whole fish from a can thing creeped me out too much to be able to make it myself at home. However, if somebody else made it I could manage. That was lucky for me becuase at the time I was living with them, my Grandpa Grillo made tuna salad reguarly. Well, that and hot dogs that he would boil and wrap up in a lonely piece of bread. I didn't like those, unless I was absolutely starving, but let's get back to the tuna. I liked his tuna becuase he would put lots of vinegary, spicy inredients into it. I love vinegary, spicy ingredients. My Grandma made it too, but usually she would make it "old school" with diced onions and celery with fresh lemon juice, a little mayo and lawrys salt and pepper. She and my Grandpa both added in dill pickles whenever we had them and, let me tell you, that for me anyway, took it up another notch. Soon, when Grandpa would made his version he started to add diced dill pickels, and diced pickled jalapenos to the tuna along with fresh lemon juice, lawrys salt and just enough mayonnaise to bind it.

Heres a note: When you are around my Grandpa, make sure you really pronounce the word mayonnaise correctly. Most of the time, I would refer to it as "man-naise". As soon as you made the mistake, you knew it was coming. He would say "You know Krysta, it's not "man-naise" it's "May-o-naise". Yes, Grandpa, I know.

The tuna salad with the jalapenos and pickles was officially my favorite. We always ate it the same way. Either in a cold sandwich between two pieces of bread, or open faced, baked in the oven with cheese on top, otherwise known as a tuna melt. I had made tuna this same way for over 5 years when I went to my friend Melissas house one day.

She had made tuna salad. It was not prepared like the tuna salads I was used to, and furthermore she served hers with crackers instead of bread. It was surprisingly delicious and unlike anything I had ever seen before (which makes me snicker now. I must have been new to the possibilities of food). She had mixed the tuna with mayonaise, lemon juice, garlic salt, cubes of cheddar cheese, red onion and halved green grapes. I know, it sounds a little odd right? It was really good. She said she made it that way becuase her husband Shawn liked it and that was the way his mother made it. She said sometimes she used grapes and smetimes she used chopped apple. I liked the idea of the crunchiness of the apple.

Then, after a while I had tuna salad yet again at her house. This time with the apple instead of the grapes and pepper jack instead of cheddar. I had hit the mother load! This tuna was nothing short of awesome. The pepper jack brought in the spicy taste I so love, and the apple provided this beautiful sweetness that complimented the lemon juice and galric salt in lovely ways. I can't say for sure that It's my absolute favorite way to eat tuna becuase it just depend on the mood im in. But I can say that for the past year and a half, I have only made tuna this way and served it with water crackers, no bread. You just dip the crunchy cracker in and scoop out a heaping potion of tuna and bite. Oh, my gosh, you won't go back.

Tuna Salad with Apples, Pepper Jack and Red Onion

1 big can of solid white albacore tuna (or two smaller cans)
1 1/2 tablespoons mayonaise
a quarter of a red onion, chopped
1/2 of a big apple, chopped in cubes (or 1 whole smaller apple)
1 1/2 inches from a block of pepper jack cheese, cut into small bite sized cubes
garlic salt to taste
juice from half a lemon

Mix together and enjoy with thin water crackers (carrs cracked pepper are my fav)

Make sure you have solid white albacore and not chunk light. There is a huge difference. I can't even really eat this if it's not with solid white albacore. I like the Starkist brand. Cut all the ingredients in relatively same size. I make sure to add in a good amount of galric salt to this. I don't like it salty, but I like to be able to taste it. It brings all the other flavors together.

I just ate this last week with Melissa. Shawn says you can add some diced up pickled jalapenos to it if you want some more kick. Oh, yes Shawn. You don't have to tell me twice.


Tuesday, March 9, 2010

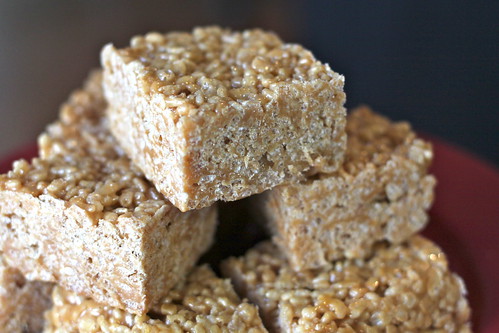
Butterscotch Rice Crispy Treats

IMG_2671

The weekend of February 30th (2 weekends ago) I made 4 batches of rice crispy treats.

It started out innocent enough. I read about a recipe for salted brown butter crispy treats that I just had to try and since the rice crispy cereal box was so huge I thought what the hay, let's make a couple different versions, play around, see if I can make the best rice crispy treat this side of the Hudson. I don't know why I just said that. Anyway, I wound up making 3 batches the first night and another the next night when the other batches were gone. Meaning, we ate them ALL.

I gotta tell you after all my experimenting I think the secret to a great crispy treat is to put it in an 8x8 pan instead of the 9x13 pan because then they are plumper and taller. And, the other secret, in the words of my "friend" Deb, is to put a bit more (coughdouble) the amount of butter and then upping the marshamllow to cereal ratio. Either adding less cereal (like 2 cups less) if using the classic recipe or just do it the way I like it and don't measure just dump more marshmallow in the pot and stop adding cereal when it looks to be not very dry. Actually, it should look gloopy and wet. That way the cereal will absorb all the marshmallow and butter and will remain chewy and not dry out as fast. Have you ever had a rice crispy treat the day after you made it? Its like biting into a rock and it cuts the roof of your mouth up like captain crunch cereal. Not these...

Ok, now the salted brown butter rice crispy treats that I originally set out to make were indeed good but my beef with them was they tasted like the normal treats with maybe a bit more depth of flavor. A deeper flavor if you will-but not different enough to make me want to toast my butter everytime. If you want to try them, just double the butter for the classic rice crispy treats and toast it over medium low heat, it will foam, then turn clear golden and finally start to turn brown and smell nutty. Then you add the marshamallows and melt, then add a heaping 1/4 teaspoon of coarse sea salt. Stir it in, then add the cereal and press into the pan. Maybe I didn't use enough salt? I dunno but I didn't taste it.

My favorite treat were the butterscotch ones! My husbands were the plain orginial ones...of course. But I knew that would be the case going in. He likes classic tastes when it comes to dessert. He did notice however, that by upping the marshamllow to cereal ratio and the addition of more butter made them SO much better. Oh, the butterscotch ones though! let me tell you about those. You see for years now I have been buying butterscotch rice crispy treats from this man named Greg who runs a catering company out here called Fireside Catering. He has a stand at the farmers market every Saturday during the Summer and I almost without fail buy one (or two) of his butterscotch crispy treats becuase they are heaven. It's kind of sad though because my treat tasted exactly like his. Exactly. I would be very, very surprised if his recipe differed from mine in any way. I say it was sad because even though I really wanted to know how to make these for some time, now that I do, it will no longer be a novelty waiting for the farmers market so I can get my fix. Sad also thinking of the pounds I will surely gain from making these anytime I want. Scary.


Butterscotch Rice Crispy Treats


1 stick unsalted butter

1 10-ounce bag of marshmallows (I like the big ones over the small)

Half an 11oz bag of butterscotch chips (next to chocolate chips)

4 1/2 cups Rice Krispies cereal


In a large pot melt butter over medium low heat. Add the marshmallows, stirring occasionally until they melt. Add the butterscotch chips and stir until melted, then, off the heat stir in the cereal until combined. Spray an 8x8 pyrex dish with cooking oil or butter it, then add the cereal mixture. Spray your fingertips with the oil (so they don't stick) and pat down on the cereal until it is even. Let sit until cool, at least an hour, cut into squares and eat.

makes 9 thick squares


I like these best after they have sat for a couple hours at least or even the next day. They are chewier than if you were to just eat them right away and that is just the way I like them. If I were to do this again, I would probably add some more marshmallows in the pot and then up the cereal amount to 5 cups because they would have been prettier just a bit taller in the pan.

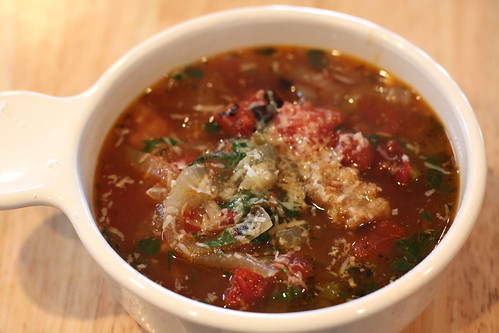
Sausage, Peppers and Onions Stoup

Italian Sausage Stoup

My two good friends Danielle and Melissa and I decided to do a couple recipe exchanges this year. I proposed that we each make something we really enjoy that can be frozen, tripple the recipe and keep one portion for your own family and distrubute the other two into freezer ziplock bags and freeze until the day of our exchange. Then we would exchange the meals to keep in the freezer until we were ready to use them. The first time around I made homeade sausage spaghetti sauce and gave a portion each to Danielle and Melissa along with some spaghetti noodles. Melissa made her famous chili, which is really MY famous chili, which is really Tom Brukiewas famous chili. And Danielle made sausage peppers and onion stoup. That very stoup is the one I am currently defrosing in my refrigerator right now to have for lunch today since my husband has temporarily (hopefully temporarily...please, please, please be temporary) gone vegetarian and will not eat it becuase of the sausage. His loss. Sausage is so good, as I am sure you all already know.

The day this recipe aired on 30 Minute Meals (Rachael Ray's Food Network Show) both Danielle and I were watching in our respective houses. I watched the show and thought "I really need to make that! It looks so good and simple and it has balsamic vinegar in it...how different". Really, anytime a meal has something unexpected and delicious sounding in it's ingredient list I am a sucker to make it. Aside from the unexpected vinegar thrill, it also contained anaheim peppers (which are mild...they're what chili rellanos are made from) instead of bell peppers. I was sold. I knew that sausage peppers and onions stoup was in my near future. But it would have to wait until the next week. I meal plan according to the weather forecast and I only shop once a week. Danielle on the other hand does not and I think she ran straight to the store after seeing this recipe. She called me up the next day or so and raved about the stoup (stoup becuase it's thicker than a soup but thinner than a stew) and I think somehow we wound up going to dinner at her house for it before I got a chance to make it. But, make it I did. And then I made it again, and again and again. It's a regular meal in our household in the winter time. Regular meaning I have made it more than 3 times and a copy of the recipe is in my permanent green binder recipe file. I think it appeals to men and women alike becuase it's hearty, but different becuase of the balsamic vinegar. It's not really spicy but It sort of gives the illusion of being becuase of the balsamic vinegar. and you top it with freshly grated parmesan cheese and fresh basil. It's so good I cannot even tell you.

Last year I ate this on my sofa while watching the 2009 Academy Awards. Yes, I remember that. It was a good night.

Sausage, Peppers and Onions Stoup
adapted from Rachael Ray

3 tablespoons extra-virgin olive oil
1 1/2 pounds hot or sweet bulk Italian sausage
4 cloves garlic, finely chopped
3 to 4 anaheim peppers (or cubanelle) seeded and thinly sliced
2 medium-large onions, thinly sliced
2 tablespoons balsamic vinegar
2-3 cups chicken stock
2 (15 oz) cans diced fire roasted tomatoes
1/2 cup basil leaves, torn
1/4 cup chopped parsley leaves
1 cup shredded Parmigiano-Reggiano

Heat olive oil in a deep skillet, add sausage and brown a few minutes then add garlic, peppers and onions and cook until soft, 6-7 minutes more.

Deglaze the pan with a little vinegar, stir in the stock and tomatoes and reduce the heat to simmer, cook 5 minutes more then stir in the parsley and basil and serve with cheese on top.

A few notes: I buy ground sausage so it is easier to cook, but if all you can find are links just slice through the casings with a knife and squeeze out the sausage in the pot and break up with a wooden spoon. Also, I cut my onions the way you would for french onion soup (another favorite). Just slice the ends off both sides of the onion and cut it in half through one of those ends. Then just slice thinly into half moon shapes. I slice the anaheim peppers into the same half moon shape. Just slice down the center of the pepper the long way and remove the seeds, then slice horizonatally. I don't usually add the basil in the soup becuase I like it as a garnish instead.

Saturday, March 6, 2010

Mediterranean Tabbouleh


Today is a goregous warm blue bird day here in Steamboat Springs. My Husband is spring skiing with Isabella and Jeremiah and I am at home with sweet baby Olivia, who is currently napping. On days like today when you get a taste of Spring in the air I start to crave light fresh food. The kind of food you eat in summertime. And today, even though I have already eaten lunch myself, I wish I had had this Greek style salad becuase it's so dang good! So even though it is too late for me, maybe it is not for you. In which case I suggest you get yourself to a store pronto becuase this recipe is too good to pass up.

This creation is kind of my own taken from two different recipes and put together to create something so delicious it's ridiculas. The first recipe I ran across in the smitten kitchen website. It was for a "Mediterranean Pepper Salad" and becuase of the name (I don't know why I didn't care for the name) I almost passed it up, but then I saw the picture. The picture of this salad was goregous with every color of the rainbow. You eat first with your eyes, it's true. The recipe was especially intriguing to me becuase once I started to read it I saw that you sort of pickle the red onions in a red wine vinager mixture while you prep the other ingredients and it helps to flavor them and also soften their blow. It's genius if you ask me and makes all the difference.

I decided to pair this salad with bulger wheat to make it a tabbouleh. Tabbouleh, for any of you who are not familliar is bulger wheat, which is a grain cooked and mixed with any variety of vegetables and herbs to create a salad. I cook my bulger wheat the same way Ina Garten does with water, lemon juice, olive oil and salt for lots of good flavor. If you have never seen or heard of bulger wheat before it's a whole grain and it kind of looks like cous cous...kind of. It's in the normal grocery store and you have probably just passed it by. Sad thing becuase it's delicious and nutritious once you know what to do with it. Paired with this pepper sald it's flavor its outta this world. Pardon me if I just sounded like Paula Deen.


Mediterranean Tabbouleh Salad

for the bulger wheat:

1 1/2 cups boiling water
1 cup bulger wheat
1/4 cup freshly squeezed lemon juice
1/4 cup olive oil
1 1/2 teaspoons kosher salt

In a heat proof bowl (preferably just big enough to hold the bulger wheat and water becuase if you use a big bowl it doesn't cook all the way because it can't hold it's heat) pour the boiling water over the bulger wheat. Add the lemon juice, olive oil and salt. let stand at room temperature for about an hour.

For the Mediterranean Pepper Salad

1/4 cup red wine vinegar
1/4 cup cold water
1 tablespoon kosher salt
2 teaspoons sugar
1/2 a red onion, cut into 1/2 inch dice
3 bell peppers, your choice of colors (I use one red, orange and yellow)
1 cucumber, preferably English, cut into quarters lengthwise and diced
1/4 pound firm feta cheese
1/4 to 1/2 cup pitted kalmata olives, cut in half
1/2 cup cherry tomatoes cut in half (optional)I personally like this without
1/4 cup olive oil ( I use less)
salt and peper to taste

Swish together the red wine vinegar , water, kosher salt and sugar in a small bowl until the salt and sugar are dissolved. Add the red onion and set it aside.

Meanwhile, time to practice your knife skills. Core and seed your bell peppers and chop them into 1/2 inch pieces. Chop the cucumber and feta into similarly-sized chunks. Put your peppers, cucumber, feta and olives in a large bowl.

By now your onions will have lightly pickled, both sweetening and softening their blow. Drain them and add them to the other vegetables in the large bowl, but reserve the vinegar mixtire. Pour a quarter cup of the vinegar mixture over the salad, then drizzle with olive oil. Add your cooked tabbouleh and toss together, taste and add salt and pepper as needed. Serve at once, or let the flavors muddle together in the fridge for a few hours. This salad gets better and better. It's as great the third day as it is the first.

I don't love tomatoes. Actually I loathe tomatoes for the most part and that is why I don't add them in. Let me explain. When I was little I used to eat raw sliced tomatoes with garlic salt on them. One day I got sick after eating them and the rest is history. The mealy texture of most tomaotes are enough to send me over the edge. My hatred only extends to raw tomatoes in their purist form. Cooked, roasted or tomato sauce do not bother me at all. Love tomatoes? Add them in!

By the way. I didn't finish this blog yesterday when I originally started writting it, so guess what I am making right now as I type? That's right, Iv'e got my onions pickeling and am going to enjoy this salad for lunch. I can't wait!