Friday, January 28, 2011

Chocolate Pudding

chocolate pudding

The art of doing nothing. It's a nice concept isn't it? I never thought much about this until recently. I have been busy beyond belief for a while now. So much so that little things are really getting to me. It's the whole "having to do" certain things throughout the day. I feel a little over committed, over worked, over hobbied (is that a word?)...over everything. And I'm so over it. I'm finding it difficult to even make time to grab lunch with a friend, or visit for a while. It's becoming just another thing I have to fit in and I really don't like it. I feel the need to step back and breathe deeply. You know you need a time out when the things you want to do become the things you "have" to do. I need to create some simplicity in my life.

chocolate pudding

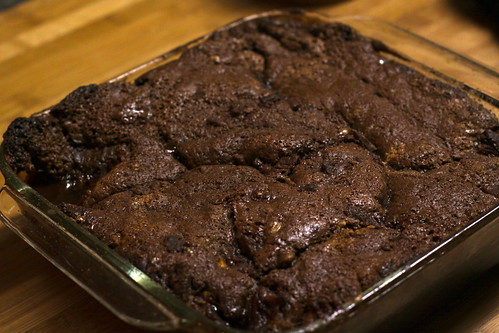
The art of nothingness. You know what popped up on my computer this morning? Two lovely words. "Free today". Just seeing the words calmed me. The fact that it's not true (we have a showing on our house today at 2pm) doesn't even matter because it's only one extra thing. I feel light. It was like this last Sunday too. I was free with no obligations and could do whatever I wanted. So, naturally I made pudding. It was perfect really. Pudding is un-complicated and un-fussy. I am craving simplicity and pudding is about as simple as it gets. Pudding was very symbolic that day. It's also very underrated. Let me be clear about something I believe whole heartedly. Simple is not the same as "easy" or "plain". Some of the most wonderful things in life are beautifully simple and chocolate pudding is one of them.

chocolate pudding

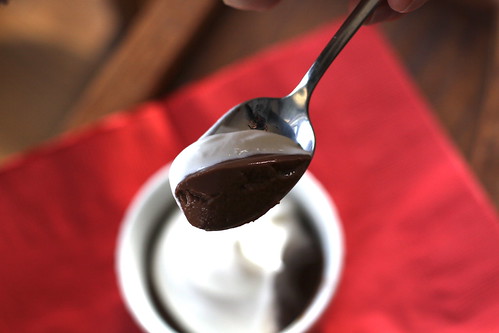
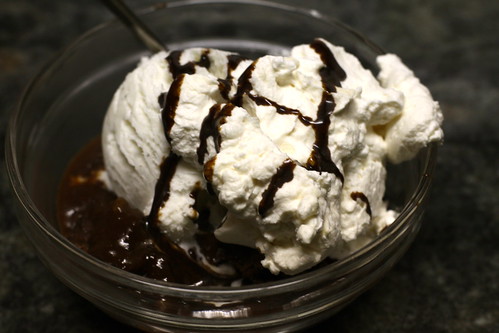
This particular pudding is rich, with a velvety mouth feel. It is made with both cornstarch and egg yolks so the texture is spot on. It takes only a few minutes to prepare and after it has chilled and has been topped sweetened, soft whipped cream it's a stunner. Putting chocolate and cream together is nothing new but it sends me in a way that nothing else can. I also see it as being terribly romantic and nostalgic. I see it as something Elvis would have eaten back in 1955 in Tennessee with Priscilla by his side, singing "I can't help falling in love with you" between spoonfuls. Am I weird for making up food stories about people like that? I don't care. Simple. Nostalgic. Iconic. Comfort food. These are the words that describe this pudding. Those are the words that describe Elvis too, so really, I'm not that far off if you think about it. Ok, maybe that's a stretch. Just go with it, will you?

Take note that the pudding will have to chill in the fridge for at least 4 hours so plan ahead.

Chocolate Pudding
adapted from "Tyler's Ultimate", Tyler Florence
serves 6

2 cups whole milk
1/2 cup sugar
1/3 cup natural cocoa powder
4 teaspoons cornstarch
3 large egg yolks
2 teaspoons pure vanilla extract
1/4 teaspoon salt
3/4 cup whipping cream
2-3 tablespoons powdered sugar

Put 1 1/2 cups of the milk, the sugar, and the cocoa in a nonreactive saucepan. Bring to a simmer, over medium-high heat. Remove from the heat.

Meanwhile, whisk the remaining 1/2 cup of the milk, cornstarch, salt, egg yolks, and vanilla in a bowl. Gradually whisk the hot milk into the egg mixture. Return to the saucepan and cook over medium-high heat whisking constantly, until the pudding comes to a full boil. Reduce the heat to maintain a simmer, and continue whisking until thick, about 2 or 3 minutes more.

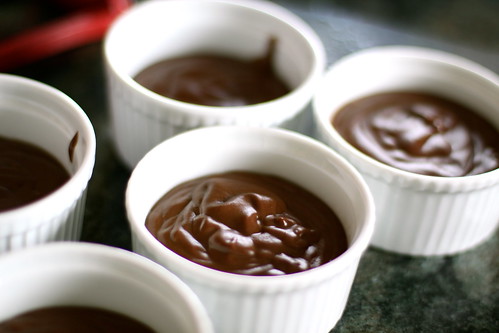
Pour the pudding into 6 small cups or ramekins. Cover with plastic wrap and refrigerate for at least 4 hours or ideally overnight until set.

Just before serving pour the cream into a chilled bowl. Whip the cream with a whisk or hand held mixer and continue beating until soft peaks form. Add the powdered sugar to desired sweetness and beat in. Take care not to over-beat the cream or it will be grainy. Serve each pudding with a dollop of whipped cream on top.

Meanwhile, I have just challenged my friend to a spinach artichoke dip throw-down. Yeah. Stay tuned for that.

Wednesday, January 26, 2011

Tagliatelle with Mushrooms, Marsala, Peas and Cream

Tagliatelle with Mushrooms, Peas, Marsala and Cream

This was originally called "Meat-Free, Easy and Tasty: Mushroom Tetrazzini with Tagliatelle" just in case you thought my title was long...I had to change the name because I associate tetrazzini to being pasta mixed with some cans of cream of mushroom soup and baked. Anyone? Anyway, I realize this is not the case in the real world as "tetrazzini" means any pasta cooked with mushrooms, flavored with sherry or marsala, cream and parmesan cheese and that's exactly what this is.

This is comfort food, people. Creamy, satisfying, stick to your ribs, anything-but-boring comfort food. I realize it is January, the quintessential time for resolutions and I should be blogging about recipes that help out our waistlines, but I just can't this time. I have had lots of naughty food around lately for some reason and with Valentine's Day approaching, I say bring it on! Wouldn't this meal be romantic for a "night in" by the fire?

I couldn't find whole wheat tagliatelle so I substituted for linguini. If you are not married to a man who is scared of regular pasta, like I am, use tagliatelle. It's fatter and a bit more special. I can't think of anyone who wouldn't like this unless you don't like mushrooms. To that I say 1) learn to and if you can't 2) substitute spinach or just add more peas. Also for the wine: Marsala, madeira and sherry can be used interchangeably so use which ever you have.

Tagliatelle with Mushrooms, Marsala, Peas and Cream
adapted from The Rachael Ray Show, January 2011

serves 4-6

1 tablespoon extra virgin olive oil
2 tablespoons butter
1 pound white mushrooms, thinly sliced
2 tablespoons finely chopped fresh thyme
Salt and pepper
1 large shallot, finely chopped (or 1/4 a small onion and 1 clove garlic)
3 to 4 large cloves garlic, finely chopped
1/4 cup dry Marsala wine
1 cup cream
1 pinch freshly grated nutmeg
About 1 cup freshly grated Parmigiano-Reggiano cheese, plus more for topping
1 pound egg tagliatelle pasta or fettuccine
1 cup frozen peas
Finely chopped flat-leaf parsley, for garnish

Bring a large pot of water to boil for pasta.

Heat olive oil and butter in a large skillet over medium heat. Add mushrooms and thyme, and cook to tender, stirring occasionally, until lightly browned, 10 minutes or so. Season mushrooms with salt and pepper, and add shallots and garlic. Saute another 4-5 minutes then deglaze the pan with Marsala. Stir in cream and bring to a bubble then reduce heat to low and simmer. Season with nutmeg. When pasta is just about done, turn off heat and stir in cheese. Cover and reserve.

Cook pasta to al dente. Reserve 1/2 cup starchy cooking liquid, then drain pasta and return to hot pot with peas. Add the starchy water and mushroom sauce, and toss to combine, 1-2 minutes until pasta is coated evenly.

Serve in shallow bowls topped with parsley and pass more cheese at the table.

Use real parmesan cheese if you can. If you buy the pre-grated or powdered kind, it will clump up a bit instead of melt evenly. I knew this, but had the powdered stuff on hand so I used it. It still tasted great but I was sorry.

Please ignore this: TCEFKUPWM8WD it's for technorati.

Sunday, January 23, 2011

Middle Eastern Vegetable Salad

Middle Eastern Vegetable Salad

I have learned that I really enjoy Greek flavors. Greek salad, the kind that's on every lunch menu in town, is not my favorite, but rather tabbouleh type salads with lots of cucumber, feta, lemon and herbs. My standing favorite was Mediterranean Tabbouleh with lots of kalamata olives and bulger wheat, but this middle eastern salad was just different enough with the chickpeas that I had to try it. I'm glad I did. It's a totally different taste and now I have two go-to Greek-like salads up my sleeve.

Fatoush, a Middle Eastern salad with feta and toasted pita bread is definitely the inspiration for this dish. The thing that really makes this salad stand out is the addition of all three fresh herbs; parsley, mint and basil. You put the three of them together and you can't imitate the flavor any other way, so be sure and use all of them.

Middle Eastern Vegetable Salad
adapted from Barefoot Contessa, How Easy Is That? By Ina Garten

serves 4-6

10 scallions, white and green parts, thinly sliced
1 pound ripe tomatoes, seeded, cored, and 1/2-inch-diced (I used red bell pepper)
1 hot house cucumber, halved lengthwise, seeded, and 1/2-inch-diced
1 can or jar (12-16 oz) chickpeas, rinsed and drained
1/3 cup chopped fresh parsley
1/3 cup chopped fresh mint leaves
1/3 cup julienned fresh basil leaves
1/2 cup freshly squeezed lemon juice (3-4 lemons)
1 tablespoon minced garlic (3 coves)
Kosher salt and freshly ground pepper
1/2 cup good olive oil
8 ounces feta cheese, 1/2-inch-diced (I used 4 ounces)
Toasted pita bread, for serving

Place the scallions, tomatoes, cucumber, chickpeas, parsley, mint, and basil in a large salad bowl and toss to combine.

In a small bowl or measuring cup, whisk together the lemon juice, garlic, 2 teaspoons salt, and 1 teaspoon pepper. Slowly whisk in the olive oil to make an emulsion. Pour the dressing over the salad, tossing gently to coat all the vegetables. Add the feta, sprinkle with salt and pepper, and toss gently. Serve the salad with toasted pita bread.

To toast pita: I cut pita bread into wedges (naan bread works too) and sprinkle with a little olive oil, salt and pepper. Then I stick it into a 350 degrees oven for about 5-10 minutes until heated through and lightly dry on the sides. I like mine more like bread than chips.

note: I wanted to make this salad more hefty for a main course so I added 1 1/2 cups of cooked quinoa to the mix.

Make sure to use Greek feta and be sure to dice it rather than crumble it. It's prettier and the cheese doesn't get muddled into everything. Traditionally, the pita would be tossed in with the salad. Ina likes hers on the side but it's up to you how you want to do it. I like to make a big batch of this and snack on it all weekend long. It's the perfect, healthy lunch.

On a personal note, I saw "The Social Network" last night and kinda loved it. Zuckerberg to the Winklevoss (sp?) twins: "If you really were the inventor of Facebook, you would have invented Facebook". Smart flick.

Wednesday, January 19, 2011

Chocolate-Pecan Cobbler with Caramel Whipped Cream

IMG_2132

So, I saw this on the Food Network the other day. It was just on in my living room in the background and I wasn't paying it much attention. Mostly because Tricia Yearwood was the guest on Paula Deen's show. In case you don't know, I think Garth Brooks left his wife for Tricia and so I have carried this dislike for her ever since. To be fair, I have no idea what the scenario was, or if it was even scandalous or not. I don't even know if there was cheating involved and really, I have no desire to find out. I'm unfair like that. I don't have the same dislike or judgement towards others who have made the same choices, just certain people and Tricia and Garth, for whatever unfortunate reason, happen to be two of them. I do the same thing with Amy Grant, but that's another story for another day.

IMG_2131

However, while I was trying to ignore the show (I have no idea why I didn't just turn it off) I saw something remarkable right at the very end. I saw what looked to be a brownie like cake, seemingly, only baked half-way through so that when you spooned a portion into your bowl, there was all this leftover thick, fudgy sauce at the bottom, almost like a chocolate molten lava, deconstructed, and laced with pecans. Then I thought I heard "toffee bits" and "caramel whipped cream" getting thrown around. I ran for the remote right as Paula was topping hers off with a scoop of chocolate and vanilla swirl ice cream. What the? Was this for real? I re-winded the whole segment and watched from the beginning. Thank goodness for DVR.

Do you ever have one of those moments when you see something being made and you just know that you have to drop everything you are doing and make the same thing, like stat? When something looks so ridiculously yummy and too good to be true that you have to find out for yourself right then and there? That's what happened to me during this segment. I marched straight into the kitchen and got to work. And you know what else? By the end of the whole thing, I found Tricia Yearwood to be completely delightful.

This is called a "cobbler" because of the way it's made. You melt some butter in a baking dish and add a simple chocolate batter, which serves as the filling. In a traditional cobbler, this would be the fruit part. Then you cover the batter layer with a mixture of sugar, cocoa, pecans and toffee bits. This of course, serves in lieu of the streusel topping you would add on top to a fruit cobbler. Then, you just have to trust me on this one...you pour a bunch of boiling water over the top of the whole thing. This step is plain weird and not something I have heard of before, and most definitely not something you do with regular cobbler. But then you bake it and it becomes this bubbling chocolate creation all it's own. It will be cooked on top and saucy on the bottom.

It gets a little complicated beyond this step. Only because I made it that way though. I want to change the name of this dessert to "The Hot Mess" because that it the perfect description for it. Here's why: Paula has you make a caramel whipped cream to go on top of this dessert. All you do is add 2 tablespoons (or 4 if you are me) of ready made caramel sauce to your cream after it is whipped. Well, you know I didn't have ready made caramel sauce from the store hanging out in my fridge so I had to make my own. When I added it to the whipped cream, it was good and all, but it would have been just as good if not better if you had just squeezed some of that caramel sauce over the whole dessert, so it was an unnecessary step if you ask me. Also, I only had plain vanilla ice cream, so I added some chocolate sauce to the top of mine to compensate for the chocolate-vanilla swirl that was supposed to be there. In the end it was fantastic. Utterly, fantastic. All you need to know with topping this dessert is to use ice cream and whipped cream. You also want a caramel flavor in there are well as chocolate, so whatever way you can accomplish that by all means do it. Store bought sauce, homemade sauce, carmel in your whipped cream, caramel on top of the whipped cream, whatever is fine. I will write the recipe as Paula wrote it though.

Chocolate-Pecan Cobbler with Caramel Whipped Cream
adapted from Paula's Best Dishes, Food Network

serves 8

6 tablespoons butter
1 3/4 cups sugar, divided
1 cup all-purpose flour
1 1/2 teaspoons baking powder
1/2 teaspoon salt
8 tablespoons unsweetened cocoa powder, divided
1/2 to 1 cup whole milk (see note)
1 teaspoon vanilla extract
1/2 cup chopped pecans, plus a few extra for sprinkling on top
1/2 cup toffee bits, Heath brand recommended
1 1/2 cups boiling water
chocolate-vanilla swirl ice cream, for serving

For Caramel whipped cream:
2 cups heavy cream,
store bought caramel syrup (or my homemade recipe follows)
1/4 cup powdered sugar

caramel whipped cream, recipe follows

Preheat the oven to 350 degrees. Put the butter in an 8 by 8-inch baking dish and put the dish in the oven until the butter is melted, about 3 to 4 minutes. Remove the baking dish from the oven and set aside. In a medium bowl combine 3/4 cup of sugar, the flour, baking powder, salt, and 4 tablespoons cocoa. Add the milk and vanilla, whisking until smooth. Pour over the melted butter in the baking dish. In a separate medium bowl, combine the remaining 1 cup sugar, remaining 4 tablespoons of cocoa, the pecans, and toffee bits; sprinkle evenly over the batter mixture. Slowly pour the 1 1/2 cups boiling water over the top of the cobbler. Bake until top of cobbler looks set, about 45 to 50 minutes.

Serve warm with caramel whipped cream, ice cream and pecans, if desired.

note: Paula's recipe calls for 1/2 cup of whole milk, but I needed about a cup to make a smooth batter. The batter should be thick like a brownie batter, but smooth enough to whisk, so add in as much as necessary.

To make the caramel whipped cream:
Combine the 2 cups heavy cream and powdered sugar in an electric mixer fitted with the whisk attachment and beat on medium-high until soft peaks form. Add 2-4 tablespoons of the caramel syrup, and beat together. Taste and add more syrup or sugar if necessary.

My caramel syrup: use if you prefer homemade:
adapted from The Joy Of Cooking

Place in a small, heavy saucepan:
1 cup sugar

Pour evenly over top:
1/4 cup water

Set over medium-high heat and swirl the saucepan gently by the handle until the sugar is dissolved and the syrup is clear. Avoid letting the syrup boil until the sugar is completely dissolved. Increase the heat to high, cover the saucepan tightly, and boil the syrup for 2 minutes. Uncover the saucepan and continue to boil the syrup until it begins to darken around the edges. Gently swirl the pan by the handle until the syrup turns a deep amber and begins to smoke. Remove from the heat and add:
1/3 cup water
Stand back! It will spit and hiss and sputter. Stir until smooth. If the caramel remains lumpy, stir briefly over low heat. Serve at once or let cool, then cover and refrigerate for up to 6 months. Re-heat over low heat, stirring in a little water if needed.

A lot of writing, but an easy dessert, especially if you buy the store bought syrup and the right ice cream!

Monday, January 17, 2011

Swedish Pancakes

IMG_2117

My friend came over the other morning to help me transition my blog from blogspot to this dot com. I am thrilled with the results so far! Before I bombarded her with all my questions, wants and needs, I fed her these Swedish pancakes. A good rule of thumb to follow when you need someones help is to first bribe them with food. It sets the pace for a good day.

I am in love with Swedish pancakes. They are heavier and more eggy than a crepe, yet still thin. They are really easy to prepare too, so that's a plus. I made these last Summer for about 10 people and it was great because you can whip up your batter in the blender, pour it into the hot, buttered skillet, cook, flip and keep warm in the oven until you are ready for them. They won't dry out, I promise.

We topped ours with maple and boysenberry syrup and my favorite was the latter. Berry flavors go really well with these. In fact, If you were to order the Swedish pancakes at IHOP they would come served with a sauce made from lignonberries. At least, that's what they used to come with. No need for butter. really, trust me on this one. There is enough butter in the batter and on the skillet you make these in to ever need more.

Swedish Pancakes
adapted from Food Network Magazine
makes 12 pancakes

8 tablespoons unsalted butter
1 cup all-purpose flour
1 3/4 cups whole milk
3 large eggs
1/2 teaspoon vanilla extract
1/4 teaspoon salt
Confectioners sugar, maple syrup and fresh fruit, for garnish

Melt 4 tablespoons butter. Combine the flour, milk, eggs, melted butter, vanilla, and salt in a blender; process until smooth.

Preheat the oven to 200 degrees. Warm the same skillet over medium heat until a drop of water bounces and sizzles. Add 1 teaspoon butter; turn to coat the pan with the melted butter. Pour in about 1/3 cup batter and quickly swirl the pan to evenly coat the bottom. Cook until the pancake sets, 1- 1 1/2 minutes. Using a rubber spatula, carefully lift the pancake by the edges and flip; cook until lightly golden on the other side, 15 to 30 seconds. transfer to a plate; keep warm in the oven while making the others. repeat with the remaining butter and batter to make about 12 pancakes. if the pancakes seem too thick, thin the batter slightly with warm water. Fold or roll and serve with confectioners sugar, syrup and fresh fruit.

My friend made a version of these the other day and had trouble with the flipping. The easiest way I have found is when it's ready, tip your skillet so the pancake slides out half way holding a rubber spatula under it for support, then fold it over. It should happen easily. I'm loving my new website, but still tweaking things, so be patient with me! And uh, hopefully my photography will keep improving ;)

Tuesday, January 11, 2011

Smokey Red Peppers and Beans Gumbo (vegan)


I was a tad skeptical about making this. Gumbo normally gets it's trademark smokey flavor from sausages. This is vegan so It didn't call for sausages or shrimp or chicken. However, I decided to give this a shot because it came from a vegan cookbook that I have come to love and trust to deliver on taste. In the end , this was fab. The smokiness was totally there thanks to a little liquid smoke, roasted red peppers and fire roasted tomatoes. The backbone of the gumbo was held up by yeasty beer and thick tomato paste. The usual suspects were there; okra, onions, celery and bell pepper and also the addition of kidney beans, a not so usual suspect, and when it all came together wonderful things happened. It thickened up beautifully and tasted divine. I sound surprised, and I was. I was surprised because it was so good that I probably would have chosen to eat this gumbo over any other meat filled one even before the word vegan became so loosely used in our household.

I hate when food pretends to be something ( like gumbo) and falls terribly short because you cut out the main ingredients to accommodate a certain diet. Vegan in this case. However, if that said food turns out to be surprisingly wonderful AND can accommodate a certain diet, well then, I'm all for it. My kids downed this in a flash by the way. Probably because the vegetables don't taste like vegetables. They taste smokey and mild due to the cooking process. Oh, about the cooking process. You'll notice the recipe says to sometimes let certain vegetables or flour cook together for a longer period of time than normal before adding the next ingredients. Just do what it says. You can't argue the results. That being said, I did have to adjust the heat to low once because my peppers started to burn a bit before it was cooked through like the recipe asked.

And lastly, a disclosure. I used butter instead of earth balance or another vegan margarine. I know, I know, that defeats the purpose, but I can't stand vegan margarine. It was my only tweek.

Smokey Red Peppers And Beans Gumbo
adapted from "Veganomicon"

serves 6-8

1/3 cup vegan margarine, (or butter for non vegans)
1/4 cup all-purpose flour
2 medium sized onion, cut into small dice
2 green bell pepper, cut into small dice
1 stalk celery, sliced thinly
4 fat garlic cloves, minced
1 (12-ounce) package frozen, sliced okra
1 (28-ounce) can fire roasted tomatoes with their juice
3 roasted red peppers, jarred or homemade chopped into fine dice
1 (16-ounce) can kidney beans, drained and rinsed
3 cups vegetable broth (more if needed)
1 cup ale-style beer
3 tablespoons tomato paste
1/8 teaspoon allspice
1/2 teaspoon liquid smoke flavoring
pinch of freshly grated nutmeg
2 bay leaves
pinch of cayenne (optional)
1 teaspoon salt or to taste

5 cups cooked brown rice, for serving

First were going to make a roux: Preheat a large heavy bottomed stockpot over medium-low heat. Place the margarine in the pot and stir until melted. Sprinkle in the flour and stir to dissolve it. Cook the flour mixture, stirring frequently, until it is a rich caramel color and smells toasty, anywhere from 10-14 minutes.

Add the chopped onions and bell peppers to the roux mixture, stirring to coat completely. Raise the heat to medium-high and cook until the vegetables are very soft, at least 10 minutes.

Add the celery, garlic, and okra, and cook for another 6 minutes. Add the tomatoes, roasted red peppers, kidney beans, and vegetable broth. Whisk together the beer and tomato paste and add that to the mixture, stirring to incorporate completely. Stir in the allspice, liquid smoke, and grated nutmeg, and lastly tuck in the bay leaves.

Raise the heat and bring the mixture to a gentle boil, then lower the heat back to medium and partially cover. Allow the mixture to simmer 30-45 minutes, stirring occasionally, until okra is very tender. Allow to cool at least 10 minutes before serving, then season with salt, pepper and cayenne. Serve by itself or with a scoop of brown rice in the center of the bowl with the gumbo around.

This is a long list of ingredients. I know. But I wouldn't blog about it unless it were worth it. Also, a long ingredient list doesn't always mean a lot of work. You only need to chop the onions, garlic, and red peppers. The rest is a breeze.

Friday, January 7, 2011

Breakfast Pizza


I have two words for you. Breakfast pizza.

There are two things you should know about it.
1) It will change your world and
2) You will not only make it once.

I have tried to make this for two days in a row only to finally make it this morning. The two main ingredients? Bacon and eggs. OK, I'll stop with the "two" stuff now since I'm even annoying myself.

Jeremy's cousins Brett, Derek and his wife Nancy, plus two friends, Jeff and Kathy came to visit us yesterday. They were only here a mere 22 hours and we ate out last night so I really had to make a proper breakfast for them this morning. It was only polite. I will now forever associate them with breakfast pizza. I think I might love that.

It sounds weird, I know. But the combination of the fresh baked dough coupled with bacon, eggs, cheese (both mozzarella and Parmesan) and a pop of scallion and a hint of garlic just hits the spot. It's everything you wish you had for breakfast this morning and should probably have tomorrow if you are as smart as I think you are.

Breakfast Pizza
adapted from "The Big Sur Bakery Cookbook" via smittenkitchen.com
makes 1 large pizza, serves 6-8

1 large pizza dough (make your own or pick up from a local pizzeria)
6 strips bacon
1/2 cup grated Parmesan
2 cups grated mozzarella
6 large eggs
freshly ground pepper
Kosher salt
5 scallions, thinly sliced
1 garlic clove, minced

Preheat the oven to 500 degrees.

Fry the bacon in a large saute pan over medium-high heat until crisp. Cool on a paper-towel lined plate; roughly chop.

Stretch the pizza dough out onto a large baking tray or pizza stone that has been sprinkled with a bit of flour so it won't stick, and shape into a rectangle about 16x12 inches...or as big as you'd like. Sprinkle minced garlic over dough and sprinkle with half of the Parmesan, the mozzarella and bacon. Crack the 6 eggs over the top and season with salt and pepper. Top with the rest of the Parmesan.

Bake for 10 minutes, rotating after 5 minutes if necessary. When crust is golden, the cheese is melted and the egg yolks are cooked to medium, it is done. Sprinkle chives over the top, cut into sections and serve immediately

As many of you know, I am currently working on a new page for my blog. It's slow going since I don't know much about computers or how they function. Yes, I just said that. I am hoping to remedy this as soon as possible but I have a pretty strong feeling that technology won't ever be my gift. I need to stay in the kitchen, apparently. Anyway, look out for the change. It could happen as soon as next post but more likely next week.

PS. Kel, I'm sorry you missed this but having your kids, who have croup, over for breakfast with my kids, who are healthy would probably be frowned upon in the parenting world. This pizza though? It might have been worth it. For you anyway.

Thursday, January 6, 2011

Trendy Blog Award

TrendyBlogAward

Jhen Stark from From Here To Eternity extended her grace and awarded me my very first blog award! I'm thrilled!

So in honor of this award, I'm passing it to 5 others...

Debi- The Truth About Motherhood (becuase she is funny and trendy as I'll get out! :)
Laura- The Cooking Photographer (because cooking is trendy and her pizza is fabulous!)
Chris- Epic Parent (because trying to be an upright, Godly parent is always cool in my book)
Aubrey- We Eat, What Else Is There? (because she cooks, and eats, which are my fav things)
Kel- Then There Were Five (She already got one of these but she deserves another for helping me figure this linking stuff out!)

Now all you have to do to pass receive this award is pass it to 5-10 other bloggers who are trendy and leave a link to the Trendy Blog button so they can grab it. Here is the link

I'm in the middle of trying to re-vamp my site so I have not posted in the last couple days. I'll be back in business soon. Thanks for being patient with me!

Sunday, January 2, 2011

White Chickenless Chili (with or without chicken)


December 30th is my little Olivia's birthday. This year she turned two. I decided not to make a huge deal out of the day, with Christmas and New Years and all that jazz, so instead I made a big pot of this chili and invited people over to celebrate, last minute. It wasn't necessarily a party, but there were pink heart balloons and carrot cake with rainbow sprinkles and this chili with all the fixings, so I think we did a job well done, considering. Next year we will do it up right for my girl, but this year was so busy and so cold and so snowy that a low key stick-to-your-ribs chili dinner seemed appropriate.

I originally got the base for this recipe from my Aunt Jenny. It's good and calls for all the right stuff like cumin and onions, beans and lime, which I think of as truly Southwest. I tweaked a few things, added garlic and thickened it up a bit. My Aunt's was always really good and flavorful, but it was also really thin. Think beans in broth that sunk to the bottom. It needed to be thicker and it needed a little more salt. In the end, I added to the recipe rather than change it and it's better than ever. Honestly, this chili could proudly be served in any restaurant due to it's rich depth of flavor and I mean that.

Over here at the MacGray house we don't really eat meat, so I make this vegetarian. If you like it that way too, just tweak the recipe by adding 2 more cans of beans and no chicken. Also you can substitute vegetable broth for the chicken. It's delicious and honestly, we don't miss a thing. The vast array of toppings make it hearty and satisfying. We top ours with chunks of avocado, jack cheese, cilantro, sour cream, corn chips and fresh lime juice.

White Chicken Chili
serves 4

4 cups chicken stock
2 fat garlic coves, minced
4 tablespoons flour
1 small chopped onion
1 small can diced green chilies
1 teaspoon ground cumin
1 pinch fresh nutmeg
1 teaspoon kosher salt
juice from 1/2 a medium lime, or to taste
2-15 oz. cans great northern beans and/or navy beans, drained
1 15-oz. can white kidney beans, drained
3 cups cooked shredded chicken (When I use it, I buy a rotisserie chicken. Grilled works too)
olive oil

Toppings: Chopped cilantro, grated jack cheese, sour cream, avocado chunks, corn chips and lime wedges

Heat a soup pot over medium heat and add 2 tablespoons olive oil. Add onion and garlic and saute until onion is translucent and soft, about 5 minutes. Add the cumin, salt, nutmeg and flour and cook, stirring, for another minute (this is to cook the floury taste away). Add the can of green chilies, the beans, and chicken stock and bring to a boil, stirring occasionally. Turn the heat down to a simmer and add the chicken and lime juice, stir and check for seasonings. Serve hot with all the toppings. Squeeze additional lime juice on your bowl of soup, if desired.

Notes: to make your soup thinner, add more chicken stock. If after adding the flour and adding your stock you want it thicker, still, make a roux. In a small saucepan melt 2 tablespoons of butter over medium heat. Add 2 tablespoons of flour and stir together for 2 minutes, then add it to your chili pot while simmering, one tablespoon at a time until thickened to your desired consistency.

This chili thickens up more if refrigerated, so if you have leftovers you may need to add a bit more chicken stock to thin it out.

We are headed to an annual sledding party out at my friends parents ranch. They have it every New Years Day. Everyone is supposed to bring a dish and I lucked out this year because I have lots of leftover chili to take. Perfect really, since it's currently -14 out and we will all be wanting something hot!